As a content creator who loves sharing videos online, it can be time-consuming to create videos for different social media platforms. Fortunately, Adobe Premiere Pro has a feature called Auto Reframe that simplifies this task. In this blog post, I’ll walk you through how to easily resize your videos for any social network.
Introducing Auto Reframe
Adobe Premiere Pro’s Auto Reframe feature is a powerful tool that allows you to automatically adjust your video to suit different aspect ratios. You can use it to reframe clips or sequences for square, vertical, and cinematic 16:9. It can also be used when cropping high-resolution content like 4K and beyond. This is very helpful for creating videos that are optimized for different social media channels such as Instagram, YouTube, or Facebook.
Auto Reframe uses AI that intelligently identifies the actions in your video. It follows the part of the screen that needs to be in view. I tried it on both a talking-head and screen recording video and I was impressed by the results. It cropped the part of the video where my face is and also it follows where my mouse cursor is.
How To Use Auto Reframe
Auto Reframe is recommended to use after you fully edited your video. This means that the content is ready to be published online.
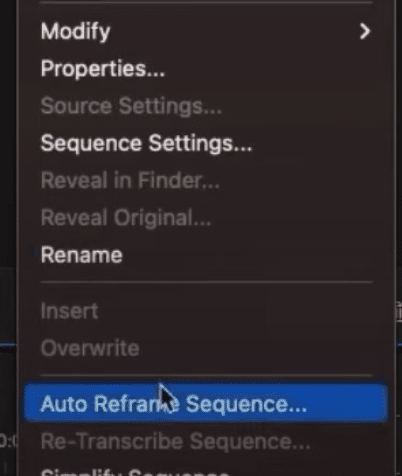
So the first thing you need to do is right-click on the sequence that you are currently working on. And then click on Auto Reframe Sequence.
On the Auto Reframe Sequence window, you’ll be able to manipulate some settings such as the Target Aspect Ratio and Motion Tracking.
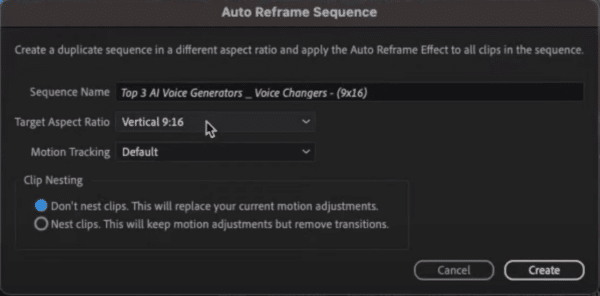
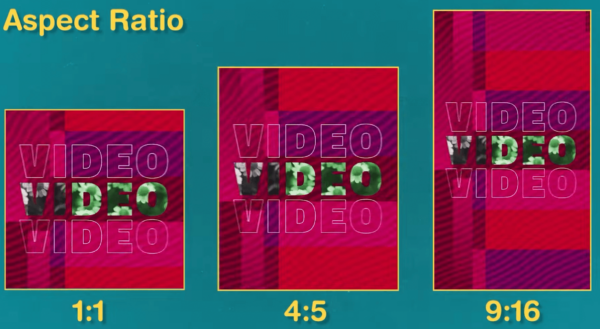
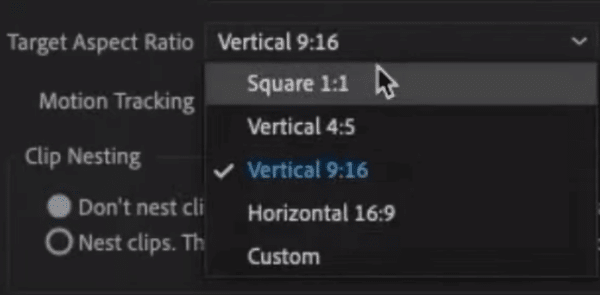
Under Target Aspect Ratio, you can choose from Square1:1, Vertical 4:5, Vertical 9:16, Horizontal 16:9, and Custom. Choose one that suits your project. For example, if you are creating Instagram and Facebook reels, Vertical 9:16 is recommended.
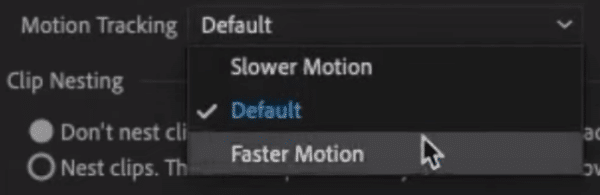
After selecting the right Aspect Ratio, proceed to choosing the suitable Motion Tracking. Choose Slower Motion when there is very little or no camera motion. However, if there is a lot of motion in the footage such as in action sports, Faster Motion is the best choice. The Default option is appropriate for most content, so if you are not sure what to choose, just go default.
Finally, click the Create button. Adobe will then reframe your video with your chosen aspect ratio. You may need to fine-tune the keyframes in the sequence after reframing so make sure you watch the video output.
Final Thoughts
Adobe Premiere Pro’s Auto Reframe tool is definitely a game-changing solution for content creators and editors. It allows you to resize a video from one aspect ratio to another. Moreover, it is designed in a way that it intelligently tracks actions in your videos ensuring that the important parts are in frame.
Premiere Pro Presets For Audio
Ever thought of giving your project that Hollywood sound without the fuss? Try out our Premiere Pro audio presets. Crafted by sound gurus, they’re like magic wands for your project’s audio, spicing it up without any of the hard work. New to the sound editing game or don’t have all those fancy tools? No worries. With these presets, you’re set to impress. And guess what? I’ve whipped up some of these for you. Take a peek here!