Whether you are creating a podcast, video, or music track, the quality of the audio has a great impact on the overall project. In this blog post, I’ll share 3 easy audio effects that you can use to enhance your audio quickly and easily inside Adobe Premiere Pro. These can be applied to narration, dialogue, or interview, and obviously should be applied with less or more intensity depending on the desired outcome.
Set Up the Workspace in Premiere Pro
Before anything else, we should first set up our workspace and make sure that we are working on the audio workspace. To do this, hover over the workspace icon on the upper right-hand side and choose Audio.

Next, is to add the 3 effects that we are going to use inside the Audio Mixer Tab. The first effect to add is the Parametric Equalizer. To do this, click the dropdown arrow on the first slot and then go to Filter and EQ > Parametric Equalizer.

Now, on the second slot, add DeEsser. To do this, click the dropdown arrow and go to Amplitude and Compression > DeEsser.

Finally, on the third slot, add Dynamics. To do this, click the dropdown arrow and go to Amplitude and Compression > Dynamics.

Now that the workspace is set up, we can then proceed to enhance our audio by tweaking the 3 effects we just added to our Audio Track Mixer.
Effect 1: Parametric Equalizer
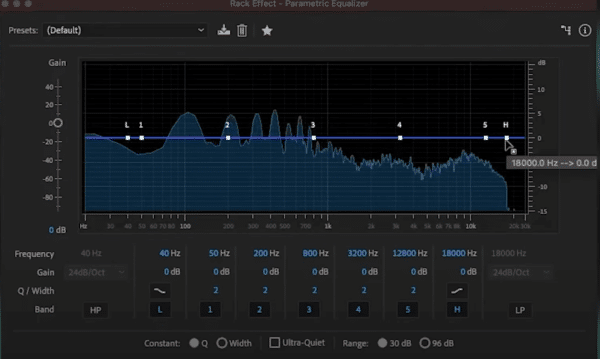
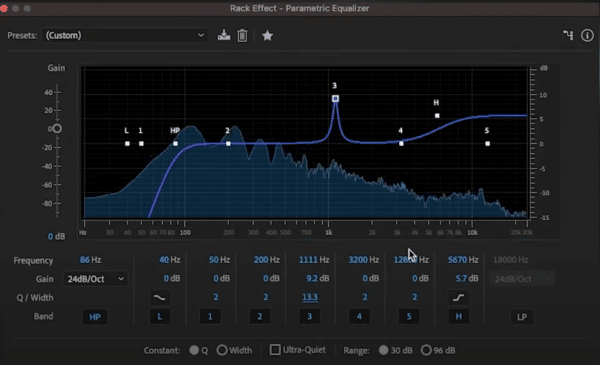
The Parametric Equalizer is an audio effect that adjusts the balance between different frequencies in your audio recording. With parametric EQ, you can enhance certain frequencies or reduce others, depending on the desired effect. It is an easy-to-use audio effect that can help you fix issues like low-end rumble and harsh high-end frequencies.
You can adjust the frequency bands to your liking on the Parametric EQ window. For example, you should increase the high-end frequencies and change their shape, which can help make your voice sound clearer and crispier. Also, you can eliminate low-end rumbles by reducing the low-end frequencies. Below are screenshots of the before and after of an audio that I enhanced using Parametric EQ.
Before:

After:

Effect 2: DeEsser
The DeEsser audio effect is very helpful in getting rid of sibilance on your recording. With a little DeEssing, you can smooth out your voice and make it not sound so harsh, especially for those who are listening using headphones.
On the DeEsser tab, you can see a red light on the Gain Reduction if it detects sibilant consonants (such as s and z) that are distorted and harsh to the ears.

What you can do here is increase the Center Frequency (around 4900-5000 Hz) to check if it can detect more sibilance. And then increase the Threshold to make sure that the Gain Reduction will only light up on the sibilant consonants.

Effect 3: Dynamics
The Dynamics audio effect helps to even out the levels of your recording. It is perfect to use when you are working with two interviews at different levels and they sound all over the place or the clip just doesn’t sound good.
There are a few effects we can tweak on the Dynamics window but for now, we will focus on Compression. Compression is an audio effect that reduces the dynamic range of your audio recording. Compression can help you create a more consistent sound and prevent distortion or clipping by reducing the difference between the loudest and softest parts of your audio.
To do this, switch on Compressor in the Dynamics tab and then adjust the threshold, ratio, and gain settings to your desired level.

The Threshold determines the point at which compression starts to take effect, the Ratio determines how much compression is applied, and the Gain adjusts the overall volume of the audio after compression has been applied.
And there we go, we just created a basic vocal improvement chain inside Adobe Premiere Pro with three easy effects. You can watch this YouTube video to see how I tweaked these three effects to enhance a podcast intro.
Final Thoughts
Enhancing your audio doesn’t have to be complicated and overwhelming. With the three audio effects outlined above, you can quickly improve the quality of your recordings in Adobe Premiere Pro.
Parametric Equalizer can help you balance different frequencies, DeEsser can get rid of sibilance, and Compression can make your audio more consistent. By experimenting with these and other audio effects, you can take your recordings to the next level and create engaging digital content that your audience will love.
Bonus Tip For Premiere Pro Users
Using professionally made Premiere Pro presets for audio can be a quick and easy way to achieve high-quality sound for your project. These presets are designed by audio experts and can save time in post-production by allowing you to easily adjust settings such as EQ, compression, and noise reduction with just a few clicks. They can also provide consistency in sound quality throughout your project, making it more professional and polished. With a wide range of presets available, you can easily find the right one to suit your project’s needs, whether it’s for voiceover, music, or sound effects. By using professionally made presets, you can enhance the overall audio quality of your project without the need for extensive manual editing, allowing you to focus on other aspects of post-production. And the good news? I have created presets like this for you! Check them out here.


