What is Audio Amplification?
Amplifying audio refers to the process of increasing the volume or loudness of a sound or audio recording. This can be done in a variety of ways, depending on the software or hardware being used, but the basic concept is to increase the amplitude, or the strength, of the audio signal. Amplifying audio is typically done to make the sound louder, more prominent, or to balance out different audio levels in a recording.
There are different ways to amplify audio. Some methods include:
- Software-based audio editing: Most audio editing software, such as Adobe Premiere Pro, Audacity, or Logic Pro, have built-in tools for amplifying audio. These tools allow you to increase or decrease the volume of a specific section of an audio file or track.
- Hardware-based audio amplification: There are also hardware-based audio amplification devices that can be used to boost the volume of a recording. Some examples of these devices include audio interfaces, preamps, and mixing consoles.
- Using the audio settings in the operating system or device: Many operating systems and devices, such as computers and smartphones, have built-in audio settings that allow you to adjust the volume of audio output.
It’s worth mentioning that amplifying audio too much can cause distortion and noise, it’s important to use it moderately and to always keep an eye on the level of audio, to avoid clipping and overloading the audio. It’s also important to use a good quality microphone, in order to capture the best sound quality to work with.
Premiere Pro is a powerful video editing software that allows you to create professional-looking videos. One of the features that can help you improve the audio quality of your videos is the ability to amplify audio. In this blog post, I’ll show you the 3 easy ways on how to amplify audio in Premiere Pro.
Method 1: Tweak the Audio Track Mixer
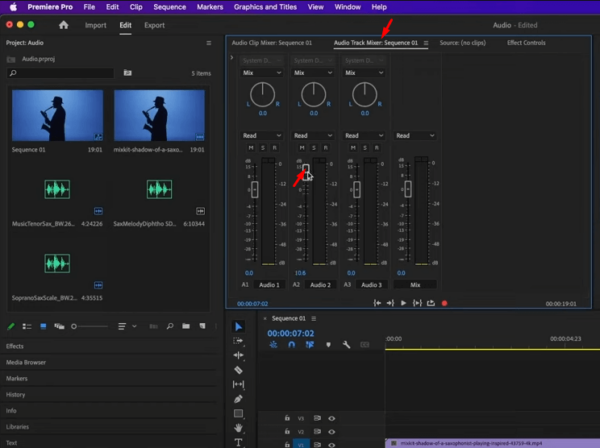
The first way to amplify audio in Premiere Pro is by using the Audio Track Mixer.
The Track Mixer is located in the Audio Mixer panel, which can be found in the Window menu. It displays the audio tracks in your project in the form of faders, with each track represented by a separate fader.
To tweak the audio of a specific track in the Track Mixer, you can use the following steps:
- Select the track that you want to adjust in the Timeline.
- Go to the Audio Mixer panel and find the corresponding fader for that track.
- Use the fader to adjust the volume of the track. You can drag the fader up to increase the volume or down to decrease it.
- To adjust the panning of a track, you can use the Pan control, which is located next to the fader. Drag the control left or right to adjust the panning.
- To solo or mute a track, you can use the Solo and Mute buttons, which are located next to the Pan control.
The Track Mixer in Premiere Pro also allows you to apply effects to specific tracks. Such as equalization, compression, and reverb. To apply effects, you can use the Effects control, which is located next to the Solo and Mute buttons. You can also use the Track Output menu to route a track to a specific output channel.

Method 2: Adjust the Volume Handle
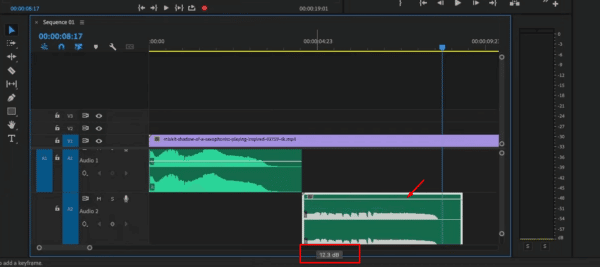
In Adobe Premiere Pro, the Volume Handle is a visual representation of the audio level of a clip on the Timeline. It allows you to adjust the volume of a clip by dragging the handle up or down.
To adjust the volume of a clip using the Volume Handle, you can use the following steps:
- Select the clip that you want to adjust in the Timeline.
- Locate the Volume Handle on the clip in the Timeline. It’s a small triangle that appears on the audio portion of the clip.
- Click and drag the Volume Handle up or down to adjust the volume of the clip. Dragging the handle up will increase the volume, while dragging it down will decrease the volume.
- You can also adjust the volume of multiple clips at once by selecting them in the Timeline and dragging the Volume Handle of one of the selected clips.

Adjusting the volume handle is a simple and effective way to control the audio levels of your clips. It gives you a precise control over the audio mix in your project.
Method 3: Add the “Gain” Effect
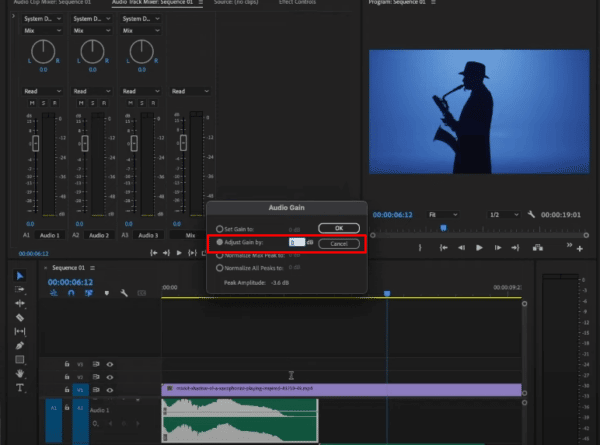
The Gain effect in Adobe Premiere Pro is a way to increase or decrease the volume of a clip by a specific amount in decibels (dB). It allows you to adjust the audio levels of a clip in a more precise and controlled way than using the Volume Handle.
To apply the Gain effect to a clip in Premiere Pro, you can use the following steps:
- Select the clip that you want to adjust in the Timeline.
- Go to the Effects panel and type “Gain” in the search bar.
- Drag the Gain effect onto the clip in the Timeline.
- Go to the Effect Controls panel and locate the Gain effect.
- Adjust the Gain value in decibels to increase or decrease the volume of the clip. A positive value will increase the volume, while a negative value will decrease the volume.
- You can also apply the gain effect to multiple clips at once by selecting them in the Timeline and applying the effect to one of the selected clips.
It’s worth mentioning that the Gain effect can be used in conjunction with the Volume Handle. And help you achieve the desired audio level. You can use the Volume handle to make a rough adjustment and then use the Gain effect to fine-tune the audio level.
The Gain effect can be also used as a way to normalize audio. Which is a process of adjusting the audio levels so that all clips have the same volume.

Amplifying Audio in Premiere Pro – Summary
The audio is an essential component of video production. It plays a critical role in creating an immersive and engaging experience for the viewer. Audio is responsible for setting the tone and mood of a video. It can help to convey emotions and create a sense of atmosphere. It can also be used to guide the viewer’s attention and to enhance the overall viewing experience. Without good audio, a video can feel flat and uninteresting, making it less likely to hold the viewer’s attention.
When it comes to amplifying the audio of a video project, there are several ways to do this in Adobe Premiere Pro – all explained above. Let us know in the comments below how you go about creating that perfect, level sound inside your Premiere Pro projects!


