Mastering audio is the final step in any audio production – podcast, music, voiceover. This is the process of putting the final touches to the clips to ensure that your final mix sounds professional and polished. With Adobe Audition’s wide range of tools and features, mastering audio can be a breeze. In this podcast editing blog post, learn how to master audio in Adobe Audition and take your podcast to the next level.
Step 1: Prepare Your Mix
Before you start mastering your audio, make sure that your mix is balanced and free of any major issues, such as clipping or distortion. In addition, you should already have added a few effects to make the recordings sound better. These effects include Parametric Equalizer, compressor, and dynamics.
This blog post can guide you on how to make your recording sound better with a few of the tools inside Adobe Audition.
Step 2: Apply Subtle Clarity Mastering
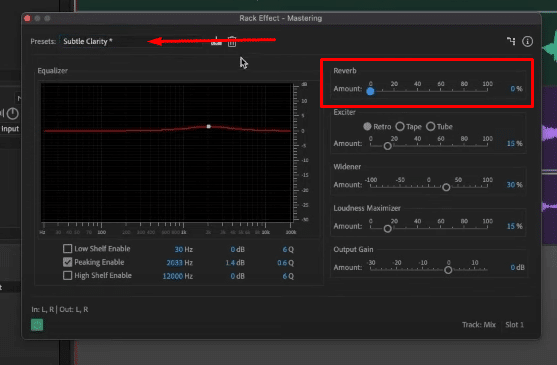
Applying Subtle Clarity Mastering to your mix compresses and boosts the clarity of the overall mix of your podcast. It won’t fix any problems on your recording so it is a must that you first prepare your mix.
To add this mastering effect, go to Effects > Special > Mastering.
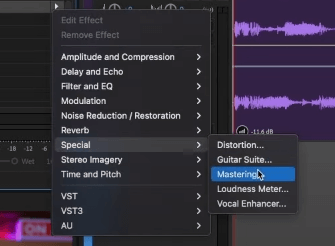
And then on the mastering tab, select the Subtle Clarity preset. Make some adjustments to the controls available on the mastering window. I highly recommend you switch off the Reverb.
Step 3: Optimize Loudness Meter
The Loudness Meter effect is relatively new in Adobe Audition and it is very useful to make sure that your podcast is in the correct loudness.
Why are we interested in loudness?
Well, loudness is simply the perceived overall volume of your podcast to the human ear. And platforms such as YouTube, Spotify, and Apple Music use this preset to determine that your podcast will sound the same in volume as the previous and next podcast. This is important so that the listener won’t have to keep turning up or down the volume.
To optimize the Loudness meter of your podcast, go to Effects > Special > Loudness Meter.
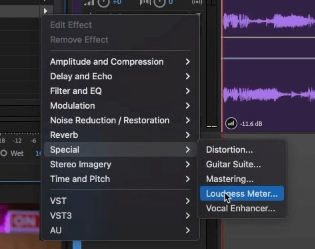
On the Loudness Meter window, choose the Preset for your podcast. For example, if you are planning to publish your episode to Apply Music, then choose Apple Podcast. Again this is to ensure your content is optimized for your podcast streaming platform.
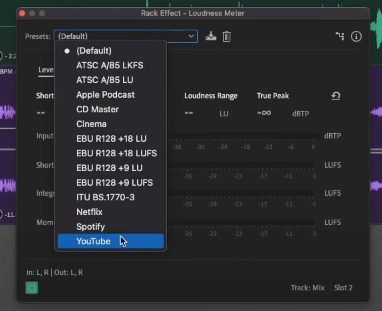
You can watch how to use the Loudness Meter tool in this video clip. Or if you prefer using the automated way of matching loudness, follow this video tutorial.
Step 4: Export Your Audio
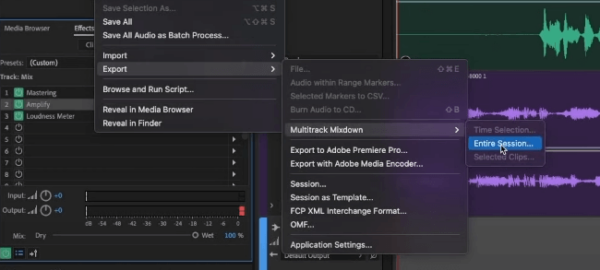
After applying mastering and optimizing the loudness meter, it is the perfect time to export your podcast. To do this, go to File > Export > Multitrack Mixdown > Entire Session.
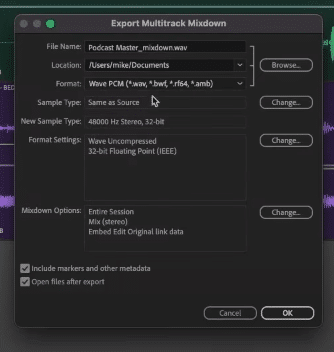
On the Mixdown window, make sure to set everything up like the File Name, Format, Location of the download, and Sample Type. Once everything is good to go, click OK.
And that’s it! You can now upload your podcast to your streaming platform.
Final Thoughts
Mastering audio is an important step in the podcast editing process. You can achieve a professional-sounding podcast by preparing your mix, applying subtle clarity mastering, and optimizing the loudness meter.
Custom Podcast Editing For You
Need help editing your podcasts?
The Music Radio Creative team of audio engineers can provide high-quality audio production and podcast editing for busy podcasters. Save your valuable time and leave your podcasts to the experts.
Let us help you take your podcasts to the next level with our high-quality editing services!


