The nightmare of every content creator is publishing a project that has boring and dull audio. Fortunately, there are a few effects in Adobe Audition that creators can manipulate to produce a crisp audio recording. In this blog post, learn how to make your boring audio sound crispy using Adobe Audition.
Method 1: Apply Vocal Enhancer
Most of the time, just adding the vocal enhancer preset can make an audio sound crispy. To do this, go to Effects > Filter and EQ > Parametric Equalizer.
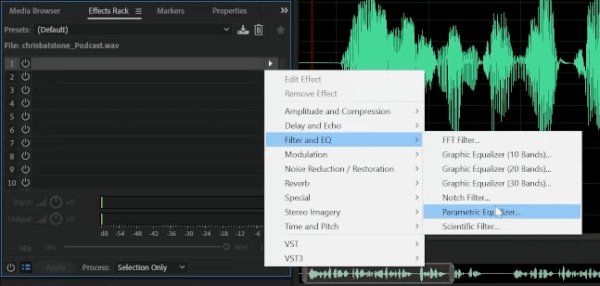
And then on the “Parametric Equalizer” window, choose “Vocal Enhancer”.
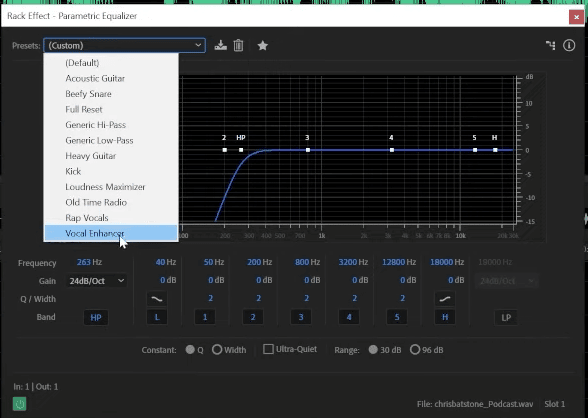
By adding this preset to your clip, there are a few things that it does to your recording.
First, it adds a High-pass (HP) filter, which rolls off the frequencies that are inaudible to humans. It can also boost the base as needed by increasing the low-end frequencies. In addition to that, this preset can also move out some of those boxy bases. Finally, this effect can increase the high-end frequencies. All of these help make your recording crispy and can be automatically added to the audio just by applying the vocal enhancer preset.
90% of the time, applying the vocal enhancer preset is good enough but in some cases, you need to still manipulate it. Make sure that you listen to your enhanced audio before you save your work.
Sound Better Presets
At this stage let me tell you – if you are finding this process too much – I have got a simple solution! Check out my Adobe Audition Presets for many use cases here. I have developed specific presets for podcasters, voice overs, jingle making and more. If in doubt – message my team – we can help you find the best presets for you!
Method 2: Use Compression
Compression helps to even out the levels of an audio, making it sound more balanced and professional. To do this, go to Effects > Amplitude and Compression > Dynamics.
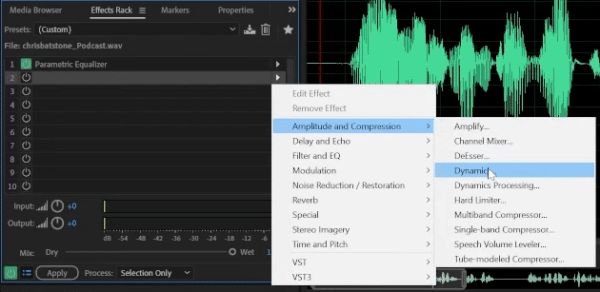
On the “Dynamics” window, you can manipulate the compression tool, which is on the second row.
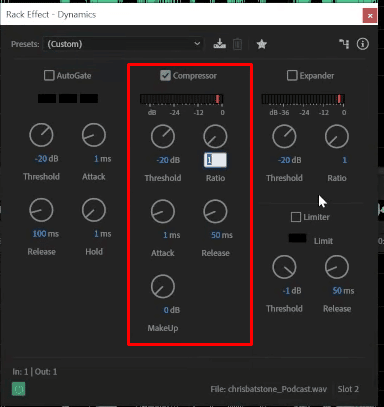
Here are the controls under compression that you can adjust. (source: Adobe)
- Threshold – the level at which compression begins. Once a threshold level is set, any audio below the threshold will be unaffected, but any audio above the threshold will be compressed by the ratio set.
- Ratio – the amount of attenuation or downward compression that will be applied once a signal reaches the threshold.
- Attack – how long it takes the audio signal to be fully compressed to the ratio set after it has crossed the threshold.
- Release – how long it takes the audio signal to revert from being affected to uncompressed.
- MakeUp Gain – used to turn the overall level of the signal back up.
Method 3: Apply Expander
One of the things applying expander to your clip is that it fades down when there is no speech, which results in getting crispy audio. To do this, go to Effects > Amplitude and Compression > Dynamics. On the “Dynamics” window, you can find the expander controls in the 3rd column.
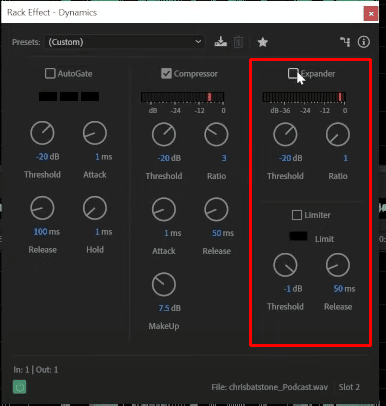
Here are the controls under compression that you can adjust. (source: Adobe)
- Threshold – the level at which expansion begins.
- Ratio – used to control the change in dynamic range.
Method 4: Use Exciter
Another effect you can find in Adobe Audition is “Exciter”. This effect can distort the high-end frequencies, which can help in making your recordings sound crispy. To do this, go to Effects > Special > Mastering.
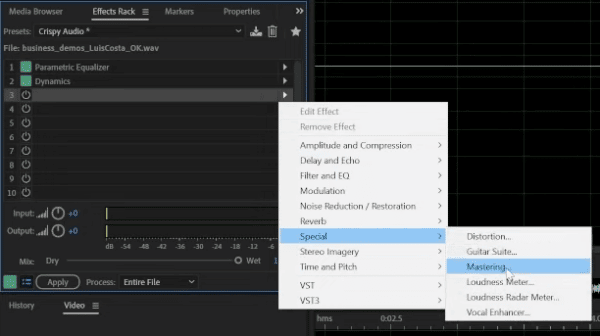
On the “Mastering” window, you’ll find the “Exciter” control just after the “Reverb” control. Play with this effect until you achieve that crispy audio you are looking for.
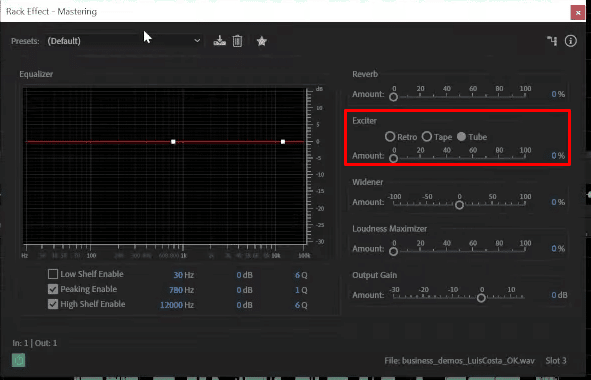
These four effects that you can apply to your audio can help you achieve a crispier and cleaner recording. Make sure you learn how these effects work and what they can do for your clips to make the most of them.
You can watch this video to see how I manipulate these four effects to make three different recordings become clean and crispy.
Final Thoughts
Making your audio sound crisp and professional using Adobe Audition is relatively straightforward. With the right effects and techniques such as using vocal enhancer preset, compression and expansion, and exciter effect, you can quickly transform your boring audio into a polished and crisp recording that will engage and captivate your listeners.


