Equalization (EQ) is a powerful tool that allows you to shape and enhance the sound of your audio recordings. When used effectively, EQ can bring clarity, balance, and depth to your tracks. In this blog post, we will explore how to use EQ in PreSonus Studio One, a popular digital audio workstation (DAW) application.
Step 1: Drag and Drop Pro EQ
Studio One has a brilliant interface. But if you are new to this application, it can be hard to find the effects you want to add to your audio.
On the left side of your workspace, go to Effects and then click PreSonus.
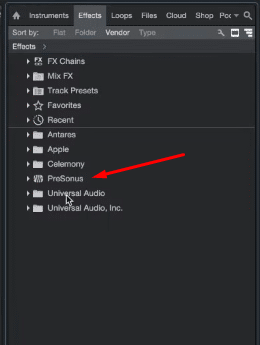
And then scroll down further until you find the Pro EQ effect.
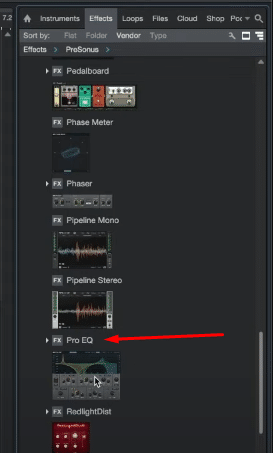
Simply drag and drop the effect into your voice track.
Step 2: Listen and Identify Frequency Areas
The Pro EQ window in Studio One allows you to playback the audio and see all the different frequencies in your recording. This is helpful in identifying the areas that require modification.
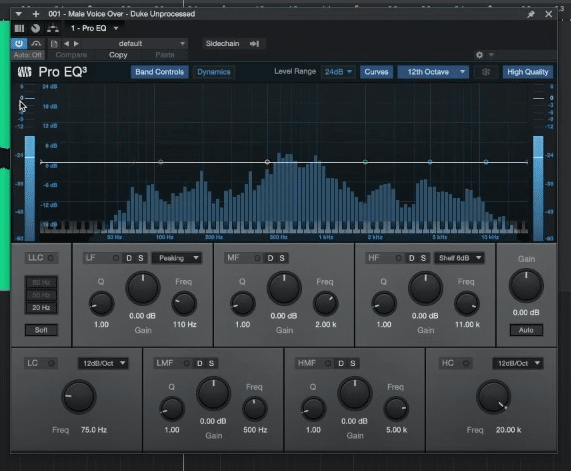
Listen to your recording and identify any problem areas that might need adjustments. These include muddiness, harshness, or imbalances in the sound.
Step 3: Tweak the EQ Effects
Before you adjust any controls on the Pro EQ tab, it’s important to understand the basics of equalization. EQ allows you to adjust the volume level of different frequency ranges within an audio signal. The most common types of EQ controls are:
- Low-frequency (LF) controls: These affect the bass and sub-bass frequencies.
- Mid-frequency (MF) controls: These impact the midrange frequencies, which include vocals and instruments like guitars and pianos.
- High-frequency (HF) controls: These shape the treble and high-frequency content in your audio.
Now, let’s start tweaking the EQ controls.
Basically, the idea is to use the EQ controls to cut or boost specific frequency ranges. If a particular frequency range sounds muddy or overpowering, reduce its level by cutting it. Otherwise, if you want to emphasize a certain frequency range, boost it.
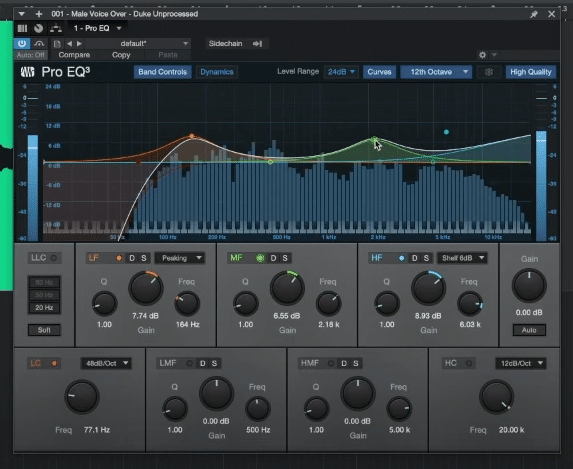
Explaining this in writing might not be enough so here is a video on how I tweaked the EQ controls to make my recording sound better in Studio One.
In a nutshell, what I did with the different EQ controls is that I rolled off some bass, added some high-end, and played with the mid-frequencies.
Final Thoughts
Equalization is an important tool in enhancing audio tracks. By familiarising yourself with the Studio One interface, understanding the basics of EQ, and properly tweaking the EQ controls, you can effectively use EQ in PreSonus Studio One to bring out the best in your recordings.
Learn To Produce Audio Like a Pro
Are you producing audio for a living?
If audio production already is your job or you aim for it to be your full-time job – then this is for you!
Learn how to become a master audio producer with Mike Russell, the Adobe certified expert. This Audio Production Course is designed for audio enthusiasts looking to produce audio on a professional level.

