Podcasting is a popular and powerful medium to share ideas, knowledge, and stories. If you want to start podcasting, this article is perfect for you. In this blog post, we’ll discuss how to start podcasting. This is a step-by-step tutorial that will teach you the process from setting up your equipment to publishing your content online.
Pick an Audio Editing Software
The very first step to start podcasting is to pick the right audio editing software. Several applications out there can do the job. These include Riverside.fm, which is a great tool for recording remote guests from anywhere in the world. Another option is Adobe Podcast, an AI-powered cloud-based audio production tool specifically designed for podcast creation.
However, in this article, we will be focusing on Audacity. This is a perfect audio editing software, especially for beginners. It is a free and open-source Digital Audio Workstation (DAW) that provides many features and functionality for creating podcasts.
Plugin in a Microphone
To record your podcast, you’ll need a good-quality microphone. There are several options in the market but when you are starting, make use of what you have at the moment. So long as it is working and does the job well.
Plug in your microphone to your computer and ensure it’s recognized as the input device.
Set Up a Recording Device in Audacity
Once you have your microphone plugged in, open the Audacity application. When you first open Audacity, there are a few things you need to set up. These include making sure your audio devices work. To do this, click on the Audio Setup option on the top menu bar. You’ll be provided with a drop-down menu where you can check if the right devices are selected.
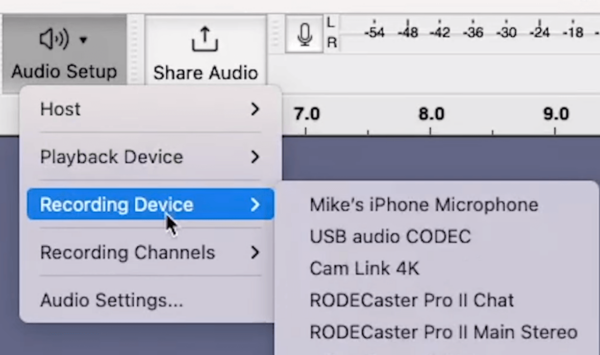
Select the right Playback and Recording device from the available options. If you don’t see your device on the list, you may need to reconnect your microphone to your computer.
Record your Content
After plugging in your microphone and ensuring it works, start recording your podcast content. To do this, click on the red circle on the left-most menu bar.

Once this is enabled, everything you say will be recorded. If you want to stop, play, or pause the recording, you can do so by clicking their respective icons on the left side of the Record button.
Import Audio Files into Audacity
If you have an audio file that you already recorded using another software and you want to edit it on Audacity; or let’s say you have music you want to add as the background, you can import these to your timeline.
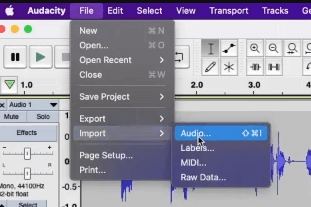
To do this, just drag and drop the files from your computer into the timeline. Another way to import files is by going to File > Import > Audio > Choose the file from your computer.
Audacity will then automatically add the files to other audio tracks. If you want to change the order of audio tracks, just select a track and then drag it up or below.
Make Content Edits
After you record or import your podcast episode, you can edit it by cutting out mistakes, pauses, or any unwanted sections. Audacity’s editing tools make it easy to refine your audio.
A. Split Audio to Keep the Timing Intact
One of the things you can do in editing your podcast in Audacity is split audio. Splitting a section of the audio before deleting it is helpful not to budge the timeline of the audio.
To do this, select a portion of the audio you want to remove and then Double-click > select Split Clip (Ctrl/Cmd + I).
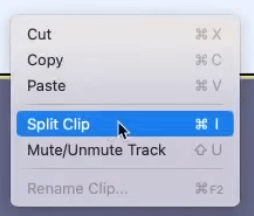
You’ll see that the section you selected is now separated from the rest of the clip. Finally, click Delete on your keyboard to remove that unwanted section.
B. Adjust the Volume of the Music
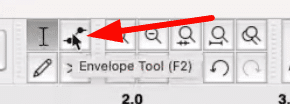
If the imported music track is too loud and overpowers your recorded voice, you’ll need to reduce its loudness. You can manually do this by using the Envelope tool found at the top tool dock.
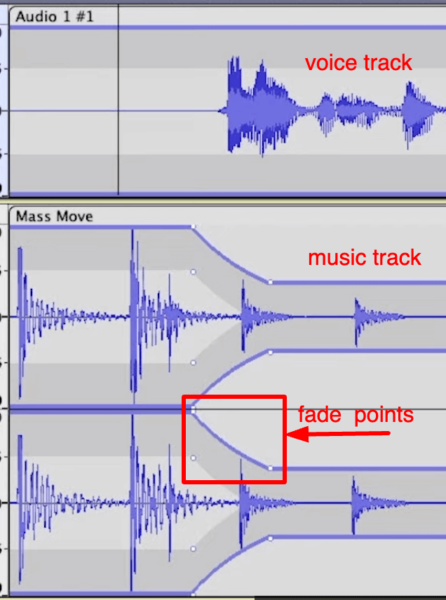
Once you enable the Envelope tool, head over to your music track and then create fade points. The image below shows how it should look like once you add fade to your music.
Improve your Voice Easily in Audacity
Audacity has several features that you can use to improve your podcast content. You can experiment with these different tools and see what works best for your podcast episode.
A. Add Compression for Levelling Volume
The first audio effect we can use is Compression. This is a helpful tool to even out the volume of your audio tracks. By applying compression, you’ll reduce those troughs and peaks. Moreover, it can help you create a more consistent sound and prevent distortion or clipping.
To add compression, go to Effect > Volume and Compression > Compressor.
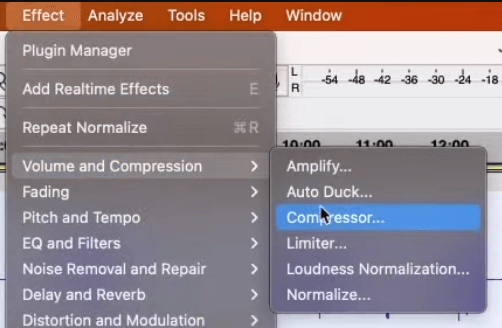
On the compressor window, adjust the threshold, ratio, and gain settings to your desired level. The Threshold determines the point at which compression starts to take effect, the Ratio determines how much compression is applied, and the Gain adjusts the overall volume of the audio after compression has been applied.
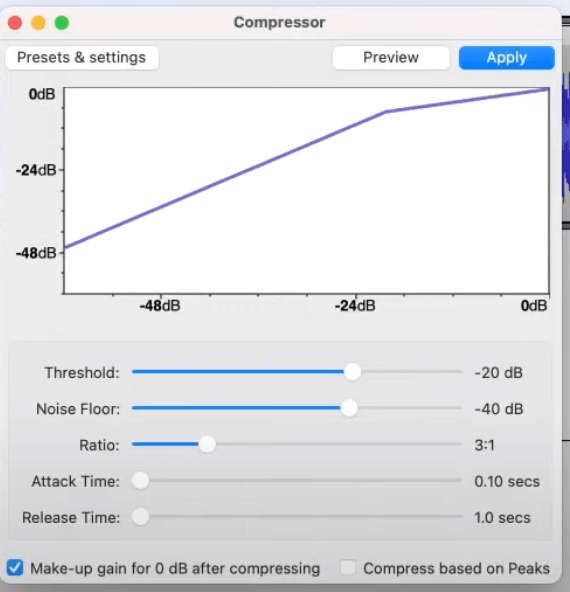
You can experiment with the different settings. Don’t forget to hit the Apply button to save the effect.
B. Normalize Tracks for Better Sound
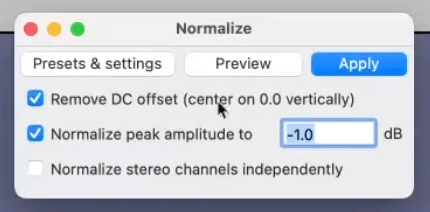
Another audio effect you can add to your tracks is Normalize. This feature can make your recording a bit louder. To do this, go to Effect > Volume and Compression > Normalize.

On the Normalize window, you can leave the settings as default or make the settings as the below picture. And then hit Apply.
Export your Podcast Episode
After recording your podcast content, removing unwanted sections, adding audio effects to improve the recording, and adding background music, it is time to export the file. That is of course if you are happy with the overall content.
A. Save the Audacity File
If you plan to make some changes later on the podcast, it is recommended that you save it as an Audacity file. Doing this will enable you to come back and make tweaks later on.
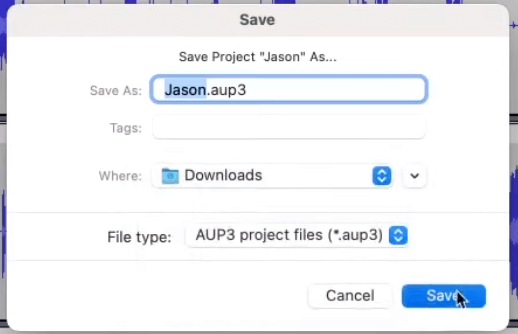
To save a project, go to File > Save Project > Save Project.
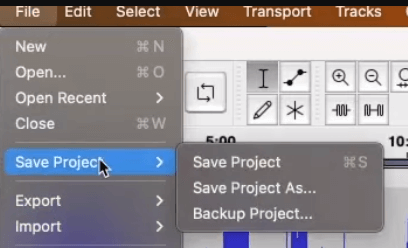
Make sure to rename the file and select the right folder where it will saved so that you can find it easily when you need to make edits. After that, click Save.
B. Export the Audio File
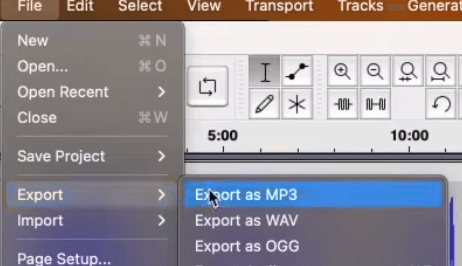
If you want to export the project as an audio file, just go to File > Export > Export as MP3.
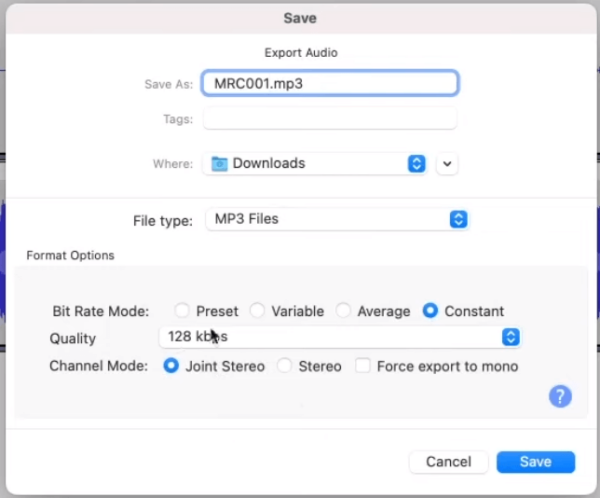
Now, rename the file, select the right folder where it will be saved, and then choose the right format for the audio file. As a recommendation, I would go with Constant Bit Rate Mode, 320 kbps or 128 kbps Quality, and Joint Stereo Channel Mode. These format options ensure that your podcast episode is of high quality. After that, click the Save button.
Finally, Audacity will prompt you to edit the Metadata of your audio file. You can just ignore this but filling in the information needed will preserve useful data about your Podcast episode such as the title, date, artist name, and genre.
After you click the OK button, Audacity will then process and export your audio file.
Finalize your Podcast Episode
Now that we have the audio for our podcast, we can then share it on any podcasting site. However, if you want to go the extra mile, you can do the following.
A. Get your Audio up on YouTube with inVideo
If you want to reach a wider audience, you can create a video version of your podcast. Invideo.io is a tool we use to quickly turn podcast audio into video by adding stock images and videos to the recording. You can then upload the generated video to your YouTube channel or any other video-streaming platform.
B. Generate Podcast artwork with Midjourney
When it comes to creating artwork for your Podcast, there is an AI tool called Midjourney. It generates images from the prompts you add. We are also using this tool in our business.
C. Use ChatGPT to Generate Episode Titles
Finally, there is a popular AI tool called ChatGPT that can help you generate episode titles. Just like Midjourney, you can give it prompts and it will provide a detailed response to that prompt.
Final Thoughts
Starting a podcast in 2023 can be overwhelming, especially for beginners. But with the help of Audacity and by following the steps outlined in this blog post — from setting up your recording device to finalizing your podcast content, you’ll be well on your way to creating and publishing your first podcast episode. Don’t forget to experiment and be creative when you start podcasting.
Podcast Editing Help
Bring your podcast to life with Music Radio Creative’s audio and video editing services. Our team specializes in creating engaging, high-quality podcasts that captivate both listeners and viewers. Visit us now to see how we can enhance every aspect of your podcast!