Audacity is a free and open-source Digital Audio Workstation (DAW) that has become very popular among content creators, podcasters, audio editors, and musicians. It provides a lot of features and functionality, which makes it an excellent option for anyone who needs to edit audio files. In this blog post, I’ll show you the ultimate step-by-step Audacity guide for beginners.
How to Download Audacity
The very first thing you need is to download the Audacity software. To do that, go to their official website, scroll down, and then click on the Download Audacity button. It is available for most operating systems like Windows, macOS, and Linux. Finally, follow the installation instructions and you’ll have Audacity up and running in no time.

Select your Audio Interface
When you first launch the Audacity app, it is recommended to set up your audio interface. To do this, click the Audio Setup button (with a speaker icon) at the top tool dock. You’ll be presented with a few menus.
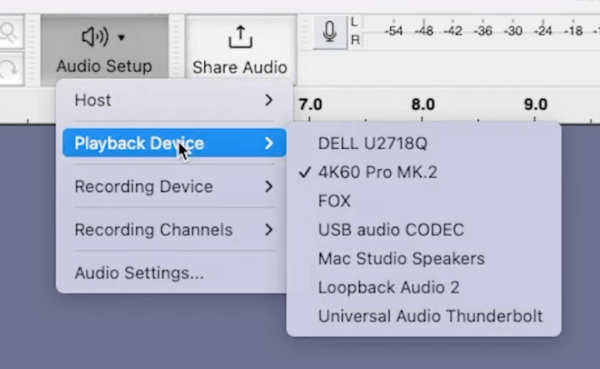
The first thing you need to set up is the Playback Device. Choose your audio interface from the available options.
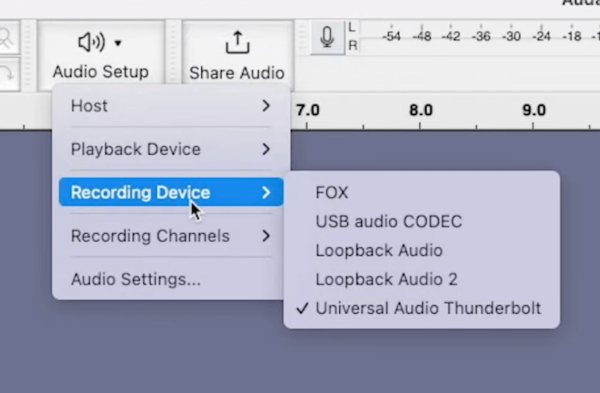
And then found below is the Recording Device. Again, click on it and then choose your microphone from the list.
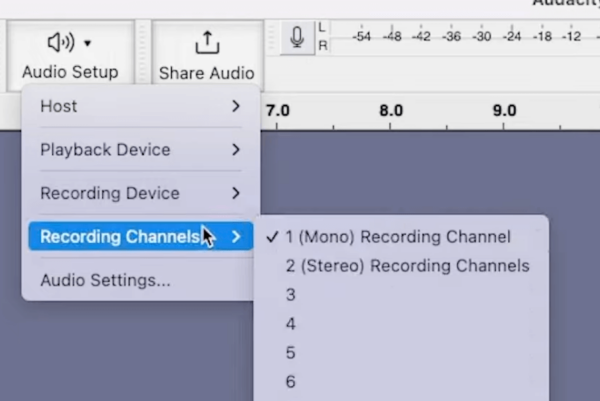
Finally, the last thing you need to set up under the Audio Setup menu is the Recording Channels. Here, choose either mono or stereo. If you are only using a microphone, then Mono would be a great choice. But if you are working with instruments, choosing Stereo is recommended.
Hit the Record Button and Test
Now that you set up your audio interface and recording device, we can start recording. To record, just press the Record button (red circle icon) on the upper left side of your workspace.
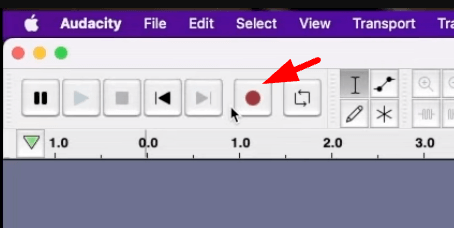
A few things to observe while you are recording is the audio level on the top right side of Audacity. This indicator is helpful to manipulate the volume of your recording. You can drag its controller to the left to make your microphone quieter.
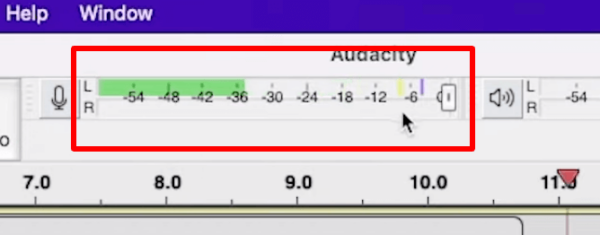
Another thing to check while you are recording is to ensure the waveform doesn’t peak (clipping) or remain too low (not audible). If you experience either, you’ll need to adjust your recording device.
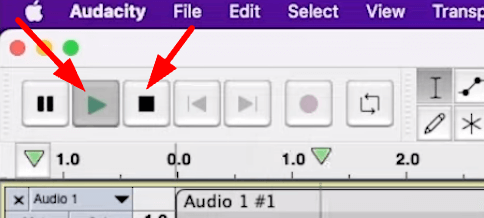
Finally, make sure to listen to your recorded audio. To do this, you can click on the Play button and then stop it with the Stop button. These two buttons are found just beside the Record option.
Choose the Project Sample Rate
Before you proceed, another thing to set is the Project Sample Rate. This determines the maximum audio frequency that can be reproduced. To set this up, just choose the sample rate of your choice from the list. You’ll find the sample rate menu at the lower left side of your workspace.
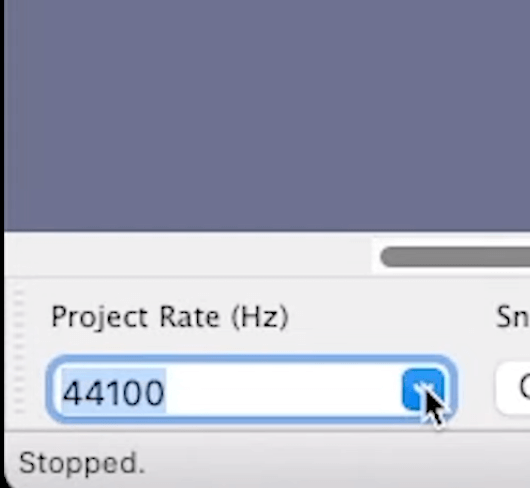
It is advisable to use a sample rate of 44100 Hz for most standard audio projects, as it provides a good balance between audio quality and file size. Anything lower than this is just poor quality and any higher requires Pro Audio Setup.
How to Zoom In and Zoom Out
Audacity allows you to zoom in and out to view and edit your audio more accurately. Use the zoom tools on the toolbar or use keyboard shortcuts like “Ctrl/Cmd+1” (Zoom In) and “Ctrl/Cmd+3” (Zoom Out).
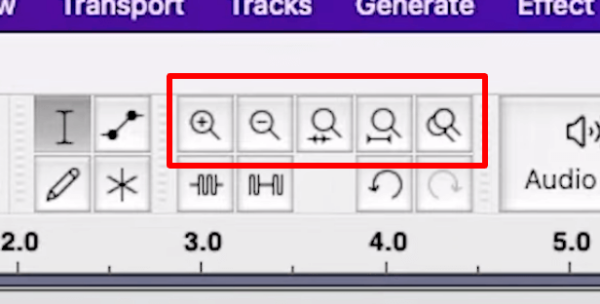
You can zoom in and out any portion of your audio. Just make sure that you either highlighted that section or put the cursor on that area.
How to Import Music Track
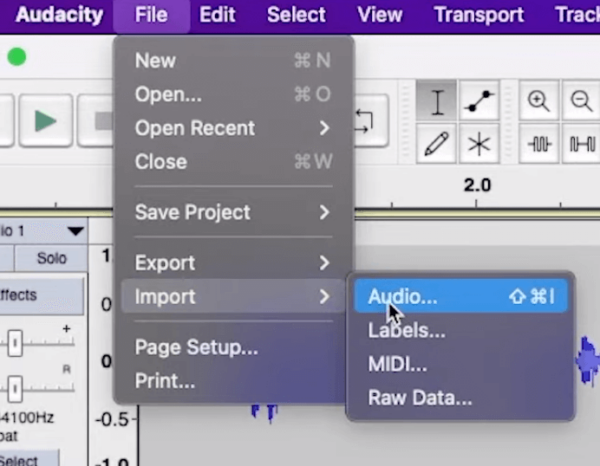
If you are working with music or pre-recorded audio, you might need to import these files into Audacity. To do this, just go to File > Import > Audio. And then select the files from your computer. You can then drag the imported audio files to the desired position in your audio timeline.
How to Reduce Music Loudness
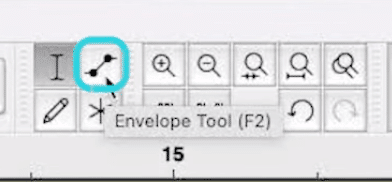
If the imported music track is too loud and overpowers your recorded voice, you’ll need to reduce its loudness. You can manually do this by using the Envelope tool found at the top tool dock.
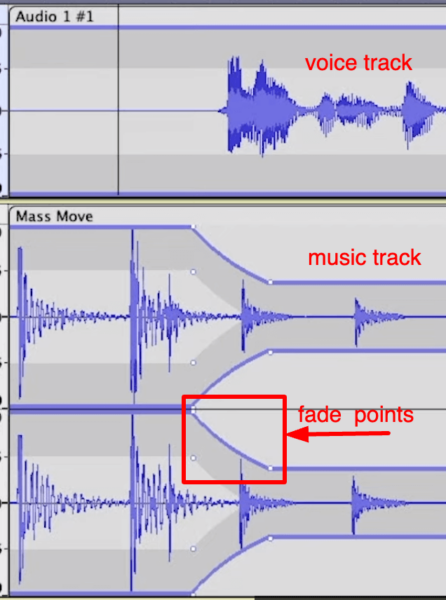
Once you enable the Envelope tool, head over to your music track and then create fade points. The image below shows how it should look like once you add fade to your music.
How to Make Voice Louder
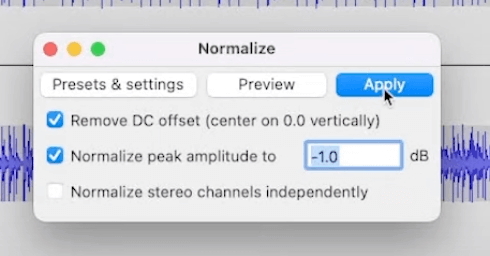
In most projects, the voice should be louder than the background music. To make your voice louder, go to Effect > Volume and Compression > Normalize.
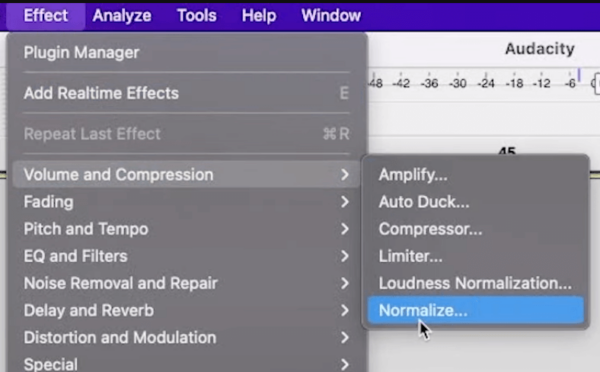
And then on the Normalize window, make the settings as the below picture. And then hit Apply.
How To Listen To Your Voice ONLY
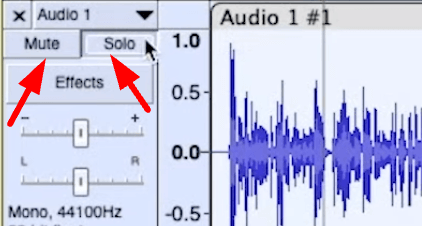
When you want to listen to a single track (either your voice or music only), there are two options you can go about it. First is by enabling the Solo option on the left side of your audio timeline. When this is enabled on your voice track, it will mute the other tracks when you play it.
The second way to do this is to manually mute the other tracks. To do this, click on the Mute button just beside the Solo option. When you enable this, it will mute that certain track.
How Split or Delete Audio Track
Splitting and deleting audio tracks are two helpful processes in editing audio. Both can be done seamlessly in Audacity. To split a clip, put your cursor on the area you want to cut out and then Right Click and select Split Clip.
You can also cut out a large portion of your clip. To do this, highlight a section of your audio and then Right Click and select Split Clip. The keyboard shortcut of Split is Ctrl/Cmd+I.
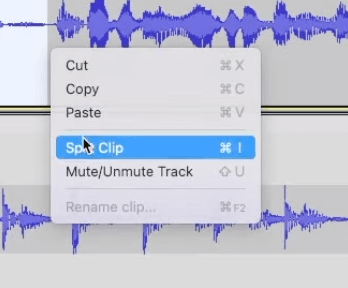
Now, to delete the split clip, just Double Click and click the Delete key on your keyboard.
How to Undo Your Changes
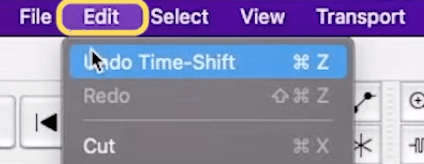
There are instances when we make mistakes while editing audio files. Fortunately, audacity has a very simple way to undo things. To do this, just go to Edit > Undo Time-Shift or just press Ctrl/Cmd+Z on your keyboard. This will revert your last action.
How to Make Voice Sound BETTER
One task you can do while editing your audio files is to make your voice sound better. There are a few effects inside Audacity that you can apply to your recording. The first one is adding Normalization, which we did a while ago. The other effects are as follows.
Add Equalization
Adding equalization to your voice enhances the quality of an audio by manipulating the sound Frequency. It allows you to increase the volume of some frequencies and reduce others. To apply this effect, go to Effect > EQ and FIlters > Filter Curve EQ.
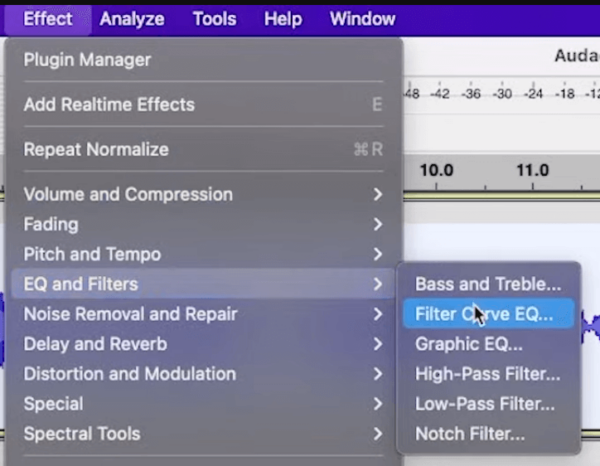
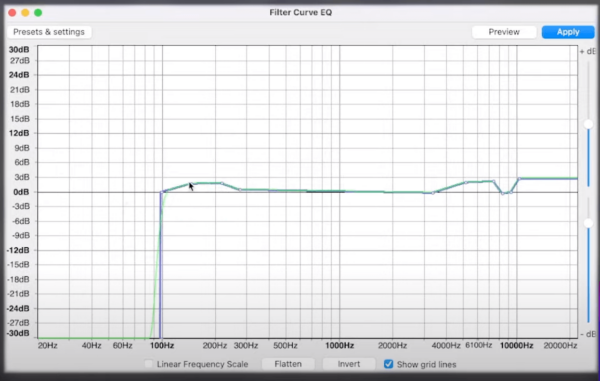
Now, on the Filter Curve EQ window, manipulate the frequencies. You can roll off the low-end frequencies to eliminate those rumbles and inaudible sounds to the human ear. Moreover, you can boost the high-end frequencies to help make your voice sound clearer and crispier.
Add Compression for Consistent Volume
The next effect I want to introduce is Compression. This is helpful if you want to even out the voice. By applying compression, you’ll reduce those too many troughs and peaks. Furthermore, it can help you create a more consistent sound and prevent distortion or clipping.
To add compression, go to Effect > Volume and Compression > Compressor.
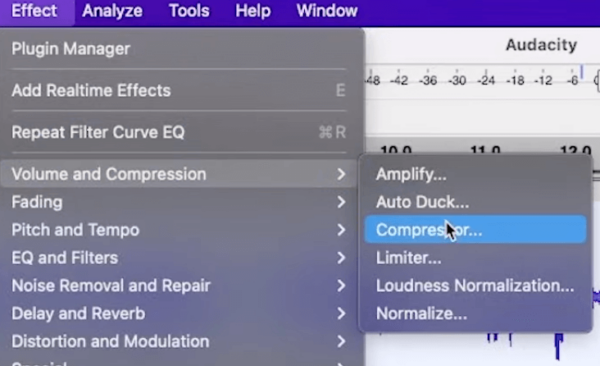
On the compressor window, adjust the threshold, ratio, and gain settings to your desired level. The Threshold determines the point at which compression starts to take effect, the Ratio determines how much compression is applied, and the Gain adjusts the overall volume of the audio after compression has been applied.
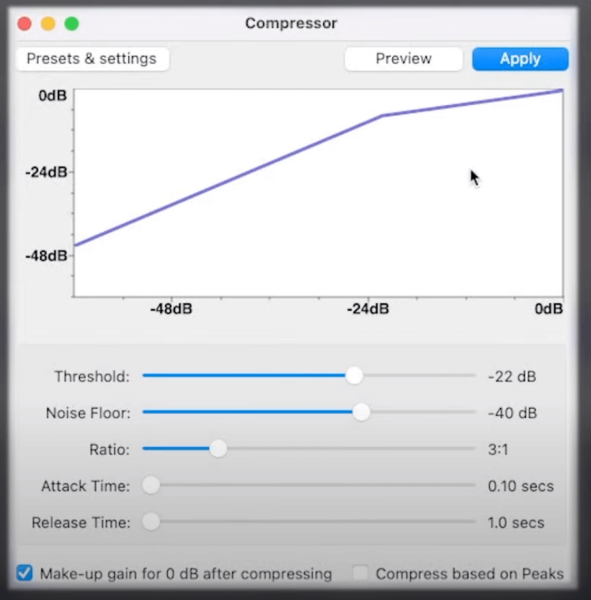
Don’t forget to hit the Apply button to save the effect.
How to Save and Export Audio Files
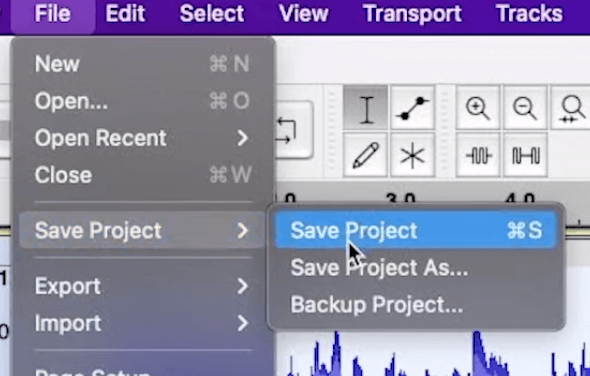
After you edit your recording and you are happy with the result, it’s time to save and export your file. To save your project, go to File > Save Project > Save Project. Make sure to name the file and select the location you want it saved.
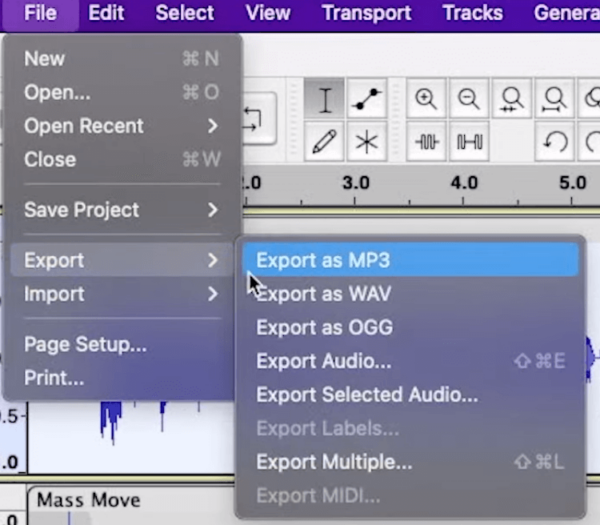
On the other hand, to export, go to File > Export. You’ll be presented with a few options to export the audio file. You can save it as a WAV file, mp3 file, or OGG file.
Final Thoughts
Audacity is a great choice for beginners who need a free and flexible Digital Audio Workstation. Although it can be overwhelming as a first-time user, with this step-by-step guide, you can edit your audio projects seamlessly with Audacity.




great series of tips for getting much better audio sound bites
Hey I really appreciate this. It is great advice and although I’ve recorded very minimally and semi-professionally, this seems to be a great in home studio for the simple musician.