Audio editing in DaVinci Resolve can be overwhelming, especially for beginners. This editing tool offers a comprehensive suite of audio editing features that can sometimes be confusing to use. In this blog post, learn how to edit audio using DaVinci Resolve. This is a step-by-step introductory guide that can help beginners make the most out of this editing software.
Step 1: Import Audio Files
When you first open DaVinci Resolve, you’ll be automatically presented with the Media tab. This tab allows you to import files from your computer to the system.

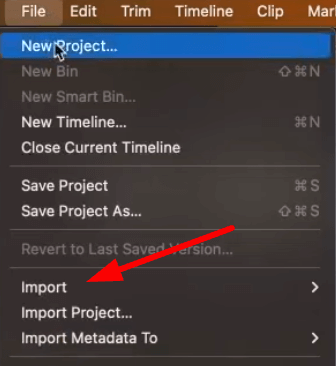
To import, simply drag and drop the files. Another way is to go to File > Import > select files > Open. Make sure to add all of the audio files – voiceovers, music, and sound effects, that you will use in creating the project.
Step 2: Create a Timeline
The next step is to create the timeline where we will do most of the audio editing. There are a few tabs in DaVinci Resolve but most of them are not useful when editing audio. The Cut, Edit, Fusion, and Color tabs can only be used when you are editing video. With that, let’s skip them and proceed directly to the Fairlight tab.

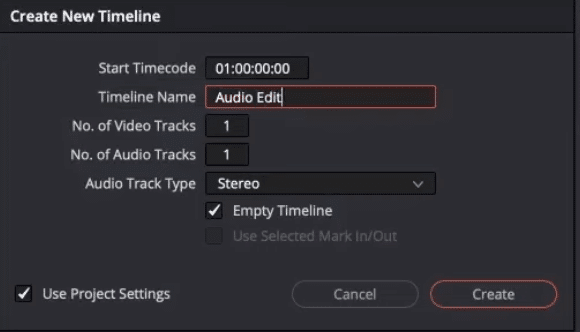
While on the Fairlight section, go to File > New Timeline. Then on the New Timeline window, you can do a few things. The first is to add a name for the timeline. This will help you recognize what you are working on. Also, you can set the number of audio tracks that will be added to the timeline. Moreover, you can set the audio track type. Don’t forget to click Create.
Step 3: Add Audio Tracks
When editing an audio project, chances are you will be working with a lot of audio files. With that, it is important to separate each file into different tracks. For example, you can add the voiceover on track 1, background music on track 2, and sound effects on track 3. This way, you’ll have an organized timeline.
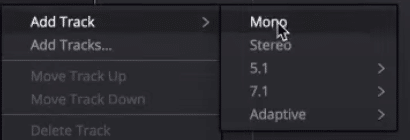
You can add tracks on the Create New Timeline window as mentioned in Step 2. If you haven’t, you can do so while you are in the timeline section. To add audio tracks, double-click on the left side of the timeline > Add Track > choose the audio track type. You can add as many tracks as you want.
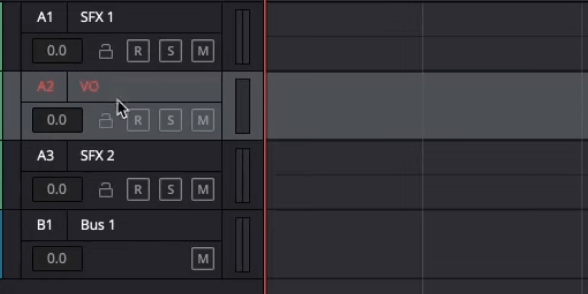
One thing that I highly recommend you do while adding audio tracks is to add a name for each. Doing this will help you organize your files, avoid confusion, and streamline your editing workflow.
Step 4: Start Editing
After preparing the timeline and audio tracks, it’s time to start editing. I want to emphasize here that there is no definite process for editing audio. The process depends on several factors such as the nature of the project. There are, however, editing techniques that are applied most of the time while editing audio. Those are the ones I am adding to this guide.
Cutting and Trimming
One of the common editing techniques is to cut and trim audio segments. The goal is to remove the sections that will not be included in the final project. It can also be used to separate and/or connect audio segments.
There are several ways how to cut and trim audio in DaVinci Resolve.
Adjusting Audio Levels
There are instances when your recording has inconsistent volume wherein some parts are too loud while other parts can’t be heard. This can result in an unpleasant listening experience.
A simple way to solve this is to adjust audio levels. In most cases, you will just need to lower/increase the volume of the whole track. To do this, just go to Inspector > Audio > manipulate volume.
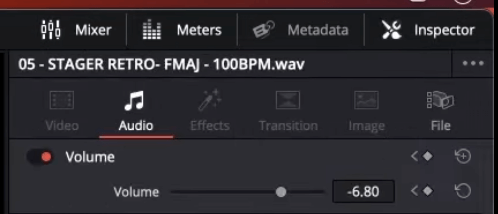
Another way to adjust audio levels is to use keyframes and manually decrease the volume. This is very useful when you want to adjust the volume of a certain section. To do this, add 2 keyframes (hold atl+click) on the audio track you want to adjust, and then drag it down (reduce) or up (increase).

Adding Audio Enhancements
Another common audio editing technique is enhancing the recording using effects. There are many audio effects inside DaVinci Resolve but you don’t need to apply everything. The following can be enough to make your audio sound great.
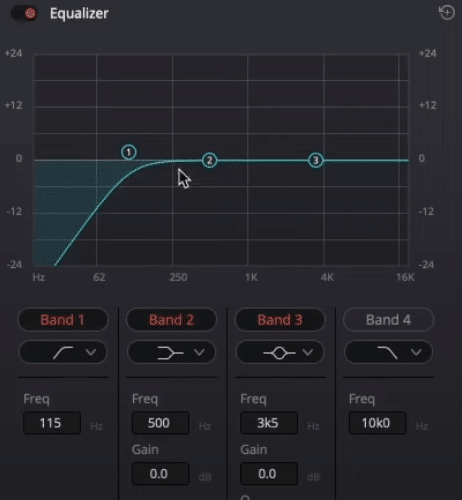
Equalizer
An Equalizer adjusts the balance between different frequencies in your audio recording. With this, you can enhance certain frequencies or reduce others. It is the audio effect that you can use to fix issues like low-end rumble and harsh high-end frequencies.
Dynamics
Dynamics is another great audio effect inside DaVinci Resolve. It can be used to fix audio issues such as clipping and distortion. On the Dynamics window, you can access other powerful features such as compression and limiter.
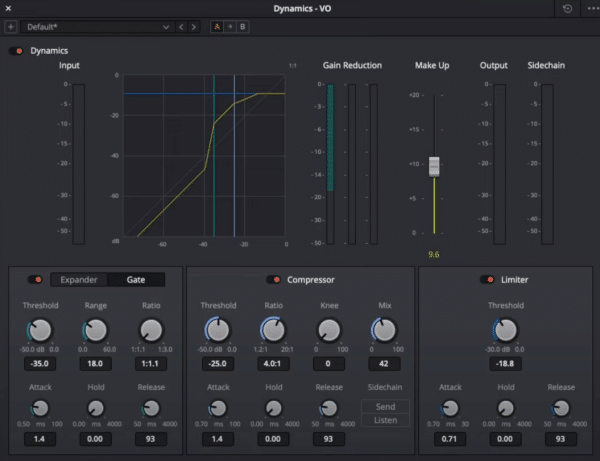
These features work differently. The compressor compresses the high bits of your voice down, making it easier to listen to. On the other hand, the limiter sets a certain limit so your audio will not be able to go any higher.
Step 5: Save and Export Project
When you are done editing your audio, don’t forget to save and export the project. Saving it allows you to come back in the future and make changes to the project. Exporting it, on the other hand, enables you to permanently add the edits you made to the audio. Also, it allows you to share and upload the final output to different platforms.
Final Thoughts
Audio editing in DaVinci Resolve shouldn’t be stressful. It can be confusing, especially for beginners, but the process – from importing raw files to exporting the final output, is actually simple. I hope that this introductory guide has helped you gain confidence in using DaVinci to edit your audio.
I have a video that shows the above process step by step:
Professional Presets For DaVinci Resolve
You can have a perfect sound on your videos in just one click. How? With our expert audio presets for DaVinci resolve!


