Background noise can seriously reduce the quality of your recordings—whether you’re a podcaster, YouTuber, voiceover artist, or content creator. From air conditioning hums and fan noise to street sounds or noisy neighbours, unwanted sounds can creep in unnoticed and ruin an otherwise perfect take. The good news? It’s easier than ever to remove background noise using free tools like Audacity.
In this step-by-step guide, I’ll show you how to remove background noise in Audacity quickly and effectively. You don’t need advanced audio editing skills, and in just a few seconds, you can dramatically enhance the clarity of your voice recordings. Whether you’re working on a podcast, voiceover, livestream, or radio show—this tip will level up your sound.
How to Remove Background Noise in Audacity
Audacity offers a built-in feature called Noise Reduction that allows you to target and eliminate unwanted noise from your audio. Follow these simple steps to clean up your recording:
Step 1: Capture a Noise Profile
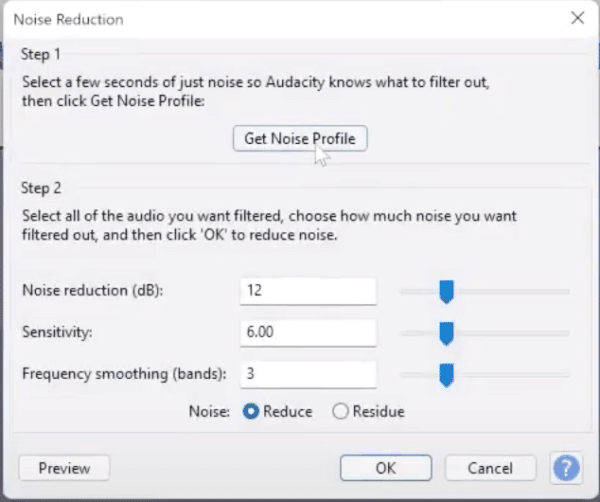
To start removing noise, you first need to tell Audacity what the noise sounds like. Select a few seconds of audio that only contains the unwanted sound (no speech or breaths). This could be a section of silence before you start speaking. Then, go to Effect > Noise Reduction and click Get Noise Profile.

Step 2: Apply the Noise Reduction Effect
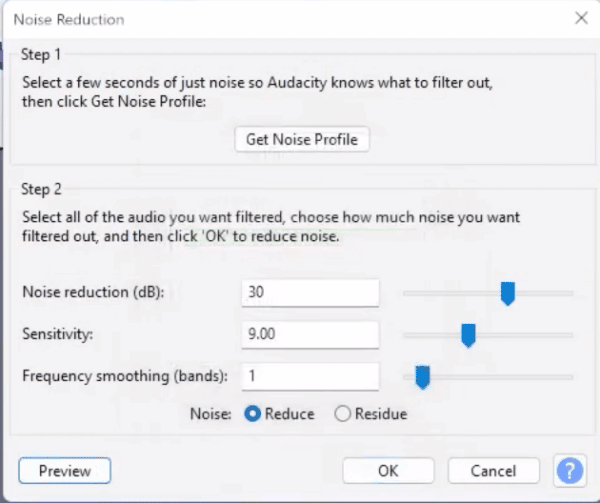
Once you’ve captured the noise profile, select your entire recording (double-click the waveform or press CTRL/CMD + A). Return to Effect > Noise Reduction and adjust the following settings:
- Noise Reduction (dB): Set to around 30
- Sensitivity: Increase to around 9.00
- Frequency Smoothing (bands): Set to 1 for more natural voice tone
Click OK and let Audacity process your audio. You should now notice a significant reduction in background noise—without affecting the quality of your voice.

Tip: If your voice sounds too thin after applying noise reduction, try slightly increasing the Frequency Smoothing or lowering the Noise Reduction dB to retain warmth. The key is finding the balance between clean audio and a natural vocal tone.
Watch: Remove Background Noise in Audacity – Quick Tutorial
If you’re a visual learner, check out our video tutorial below for a complete walkthrough on how to remove background noise in Audacity. It’s beginner-friendly and takes less than 5 minutes to follow:
Why Background Noise Matters
Removing background noise is one of the easiest ways to improve audio quality. It makes your content sound more professional, more enjoyable to listen to, and easier to edit later. Especially if you’re recording podcasts, audiobooks, YouTube videos, or any spoken-word audio, this simple fix can make a big difference.
Audiences have higher expectations now—and with tools like Audacity, there’s no reason to let background noise distract from your message. Learning how to remove background noise should be one of the first skills in your audio editing toolkit.
More Tools to Improve Audio in Audacity
Once you’ve removed background noise, consider boosting your voice further with EQ, compression, and presets tailored for voice recordings. We’ve created tools to help you do just that:
🎓 Learn more with our complete Audacity for Beginners course – perfect if you’re just getting started.
🎧 Grab our Audacity presets to instantly apply pro-quality audio settings to your recordings.
Further Audacity Reading
- Multitrack Recording in Audacity
- Best Audacity Settings for Blue Yeti Mics
- Audacity Podcast Editing Tutorial
- How to Trim Audio in Audacity


