Audacity is a popular free and open-source digital audio editor and recording software that is widely used by podcasters, musicians, and other content creators. If you’re new to Audacity and looking to get started editing your audio, this voice editing tutorial will walk you through some of the basic and advanced editing processes and techniques you can do using Audacity.
How to Set Up the Audio Interface
The very first step you should do is to make sure that the Audio interface is properly set up. To do this, go to Audio Setup > Playback Device > Choose the sound card that you are going to use. After that, make sure that the recording device you have is also correctly selected under the Recording Device setting.

How to Record Audio and Playback
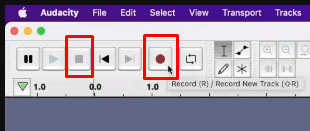
Once you set up the audio interface, it’s time to start recording. To do this, click on the Record icon on the upper menu or just press the R key on your keyboard. On the other hand, if you want to stop recording, click on the Stop button or press the Spacebar on your keyboard.

When you want to preview the audio you just recorded, you can just click the Play button or press the Spacebar on your keyboard.

How to Add Music and Sound Effects
Whatever project you are working on — podcasts, songs, or voiceovers, I know that it is essential to add music and/or sound effects. To add music to your timeline in Audacity, go to File > Import > Audio > Choose the music file from your computer.

How to Edit Your Audio
There are many processes you can do to edit your audio inside Audacity. The following are some of the most used features of the software.
How to Undo and Redo
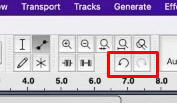
Audacity has an undo and redo function that allows you to revert changes you’ve made or redo them if necessary. You can click their icons (curved arrows) on the toolbar or use the keyboard shortcuts (Ctrl/Cmd+Z for Undo and Ctrl+Y or Cmd+Shift+Z for Redo).

How to Create Control Points
The Envelope Tool in Audacity can be used to create and manipulate “control points” at various points in the track, which determine its volume changes over time. This tool’s keyboard shortcut is F2.

How to Cut, Copy, Duplicate, and Paste
You can cut, copy, duplicate, and paste selected portions of the audio waveform by using the corresponding options in the Edit menu or using keyboard shortcuts (Ctrl+X for Cut, Ctrl+C for Copy, Ctrl+D for Duplicate, Ctrl+V for paste).
How to Trim Audio
Trimming audio means you are removing all audio from the current clip except the selected part. To do this, select the audio you want to keep and then click on the Trim icon on the toolbar or just click Ctrl/Cmd+T on your keyboard.

How to Split Audio
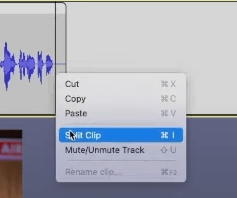
To split a clip on your timeline, just move the pointer to the desired split point on the track and press the right mouse button and choose Split or use the keyboard shortcut which is Ctrl/Cmd+I.

How to Silence Audio
To remove a portion of the audio completely, you can use the Silence option (Ctrl/Cmd+L). This will replace the selected portion of the waveform with silence.
How to Auto Duck Audio
Auto Ducking reduces the volume of one or more selected tracks whenever the volume of a single unselected “control track” placed underneath reaches a particular threshold level. This is very helpful to automatically turn the volume down of the background music to make sure that your voice recording is clearly heard.
To do this, make sure that the background music is on top while your voice track is on the bottom. Next is to select the music track and then go to Effect > Volume and Compression> Auto Duck.

How to Remove Background Noise
Removing background noise on your recording is pretty much simple and easy to do on Audacity. You’ll just have to follow two simple steps which you can read in my previous post about How to Remove Static Noise on Audacity.
How to Export Your Audio
Once you’ve finished editing your audio, you’ll need to export it in a usable format. To do this, go to File > Export and then, choose the file format you want to export it in, such as MP3 or WAV.

Final Thoughts
Editing your audio recording in Audacity can seem intimidating at first, but with practice, it can become a powerful tool for enhancing your audio content. With the tools available in Audacity, you can remove unwanted sections, enhance the audio quality, and create a polished and professional sound.
So, next time you record and edit your voice for any digital content, try using Audacity and take your project to the next level!
Presets That Save Time
Pre-made pro audio presets can save time and maintain consistency in sound levels and effects for podcasters. They are created by experienced professionals and can be customized to fit individual needs. Pre-made presets are cost-effective and accessible, making them an efficient solution for improving the overall sound quality of a podcast.
Overall, using pre-made pro audio presets can save time, ensure consistency, produce high-quality results, and be cost-effective for you. If this appeals to you – check our presets out here.


