Looking for the best robot voice generator? In this blog post, learn how to make your voice sound robotic with the different features inside Audacity. Whether you’re creating a sci-fi podcast, adding voice effects to a video, or just having fun, these methods make it easy to transform your voice into a robot voice generator for free.
Method #1: Use the Vocoder Effect
The robot voice generator tools in Audacity can help you create unique sounds.
Using a robot voice generator can enhance your audio projects significantly.
The first on our list is the Vocoder Effect. This tool combines white noise with your recording to make it sound synthesized or mechanical. This is one of the best features in Audacity that you can use to turn your voice into a robot.
Fine-tuning settings in the robot voice generator will yield better results.
To use the Vocoder effect, go to Effect > Distortion and Modulation > Vocoder.
There are several settings you can play with on the vocoder tab. These different settings will determine the quality of the voice output. For example, you can control how much of your original voice is retained after the process.
Combining features of the robot voice generator allows for more creative audio possibilities.
Brief description of how each setting works (source: Audacity Manual):
Distance: The smaller the distance, the more of the original modulator signal can be heard in the output signal.
Amplitude of original audio (percent): Defines how much of the original audio signal shall be contained in the carrier signal.
Output Choice: Determines the output (both stereo or not)
Experimenting with the robot voice generator can lead to intriguing results.
The next robot voice generator effect is the WahWah effect.
Using the robot voice generator can give your audio a unique touch.
Amplitude of white noise (percent): The amount of white noise added to the right channel before applying the vocoder.
Number of vocoder bands: Defines the frequency resolution of the Vocoder.
Amplitude of Radar Needles (percent): The amplitude of “radar needles” added to the right channel before applying the vocoder.
Frequency of Radar Needles (Hz): The number of “radar needles” per second where only one sample per period has a non-zero value.

Each setting adds a different effect on your voice recording so make sure to preview the audio before pressing the apply button. As always, have fun experimenting.
Method #2: Apply the WahWah Effect
Next on our list is the WahWah effect. This tool creates a pulsing, modulated sound that can give your voice an electronic and artificial character. This is another feature in Audacity that is great for making your voice sound robotic.
To apply the Wahwah effect to your recording, go to Effect > Distortion and Modulation > WahWah.
Similar to Vocoder, there are a few settings you can manipulate. Again, these settings determine how good your recording will sound so you need to understand how each works.
Brief description of how each setting works (source: Audacity Manual):
LFO Frequency: Sets the speed of the band-pass filter
LFO Start Phase: This determines whether the band-pass filter starts at its lowest, mid or highest frequencies.
Depth: Determines the range of frequencies that are swept through by the band-pass filter.
Resonance: Determines the degree of resonance in the band-pass filter.
Wah Frequency Offset: Determines the “base” frequency of the band-pass filter.
Output gain: Controls the amount of gain (volume) positive or negative applied by the effect.
You can achieve an impressive robotic sound with the right robot voice generator settings.

Another great method for achieving a robotic sound is through the robot voice generator.
The robot voice generator can help create a dynamic audio experience.
Panning effects can be enhanced using the robot voice generator.
As always, feel free to try different values of each setting, and don’t forget to listen before clicking apply.
Method #3: Change Pitch and Tempo
The third method is doable by manually changing the pitch and tempo of the original recording. By adjusting pitch and tempo, you can make your voice sound more robotic by removing natural human inflections and creating a more monotone delivery.
Adding reverb can complement the robot voice generator effects.
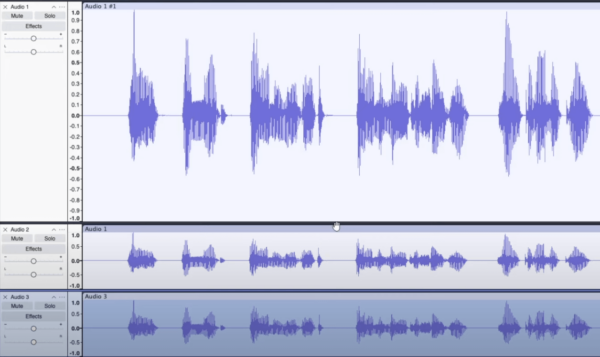
To do this, duplicate the original voice twice and add each duplicate to tracks 2 and 3. Make sure to align the tracks perfectly.

After that, change the pitch on the duplicate tracks. To do that, highlight a track and go to Effect > Pitch and Tempo > Change Pitch. On the change pitch tab, change the value under percent change. Just a subtle change will do.
Consider using a robot voice generator for more consistent audio quality.
Integrating a robot voice generator into your workflow can streamline your process.
Finally, listen to the combination of the 3 tracks. You can try different pitches on the duplicate tracks to get the desired robotic tone.
Method #4: Pan Stereo
The final method on our list is by making the recording stereo. The stereo effect can make your voice shift between speakers which mimics the synthetic movement of a robotic system. This method is done by simply panning the audio from the center to the left and right.
To do this, do the same process you did on method 3 — create duplicates of the original audio and then change the pitch. Then on the right side of your timeline, manually pan track 2 to the left while track 3 to the right.

That’s it! You just made your voice sound like a robot.
Popular TTS tools often serve as an effective robot voice generator.
Method #5: Add Reverb and Delay
Another way to make your voice sound robotic is by adding reverb and delay effects. These effects create an echoing, mechanical quality that is often associated with AI or robotic voices.
To add reverb, go to Effect > Reverb and experiment with different settings such as Room Size, Pre-delay, and Damping to create a metallic or cavernous effect.
For a more futuristic robotic sound, you can also add delay by going to Effect > Delay and Echo > Delay. Try shorter delay times and higher feedback to make your voice sound like a glitchy machine.
Method #6: Use Text-to-Speech Software
If you want an ultra-consistent robotic voice, you can also try using text-to-speech (TTS) software before importing the audio into Audacity. Many free and paid TTS tools can generate robotic voices with different accents, speeds, and inflections.
Once you have generated your robotic voice, you can further enhance it using Audacity effects like Vocoder, WahWah, and Reverb to fine-tune the artificial tone.
Popular TTS software options include:
- Google Text-to-Speech
- Amazon Polly
- Balabolka
- NaturalReader
Pro Tips for Achieving the Best Robot Voice
Combining these techniques with a robot voice generator will yield the best results.
- Experiment with Layering Effects – Combine multiple effects like vocoder, delay, and pitch shifting to get a unique robotic sound.
- Use Background Noise – Adding a subtle hum, static, or white noise layer can enhance the realism of a robotic voice.
- Play with Speed – Slowing down or speeding up your voice slightly can give different types of robotic personalities, from deep AI assistants to fast, high-pitched droids.
- Try Different EQ Settings – Boosting the mid and high frequencies while reducing the lows can make the voice sound more artificial.
Audacity Presets For Robot Voice
Transform your voice into a futuristic, robotic masterpiece with our professionally crafted Audacity presets! No complicated editing — just plug and play for instant results. Elevate your audio projects today and explore our collection of Audacity presets for the perfect robotic voice! Check them out now!
Final Thoughts
Audacity offers different features that can be used as a robot voice generator for free. By using vocoder and Wahwah effect, duplicating tracks and changing pitch, and panning stereo, you can craft a unique robotic sound for your projects. Try combining multiple techniques for even better results!
Further Reading:
- Make Your Voice Deeper in Audacity – No Plugins Needed!
- How to Remove Background Noise in Audacity | Quick Fix!
- How To Autotune In Audacity With GSnap
- How To Remove Vocals From A Song Using Audacity
- How To Isolate Vocals In Audacity


