DaVinci Resolve is indeed one of the best tools for editing audio and videos. However, one crucial step that often confuses users especially beginners is exporting their projects with the best settings for various formats. Fear not, for in this guide, I’ll explain the best settings for exporting audio and video in DaVinci Resolve.
This guide will focus mainly on the exporting stage of creating a project. So, we expect that you have already edited the project inside DaVinci Resolve and you are ready to export it.
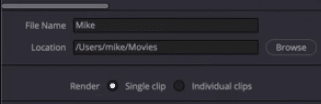
Before anything else, make sure to put a nice File Name for the project. Moreover, ensure that you have chosen the right Location where it will be exported.
Best Setting for Exporting 1080p YouTube Videos
Just like any other platform, YouTube has strict guidelines on the best properties for a video. The following are what we recommend to have the best output you can have based on YouTube’s guidelines.
Under the Video settings:
Format: MP4
Codec: H.264
Resolution: 1920×1080 HD
Frame Rate: 25
Quality: Restrict to 15000 kb/s
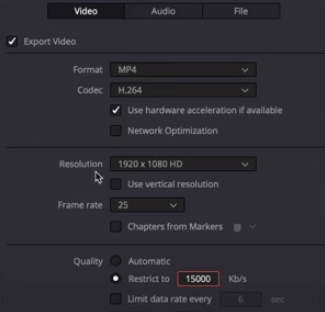
Under the Quality setting, Automatic is the default. By leaving it to default, you are letting DaVinci Resolve render your project in whatever it feels is best. Although this could be okay in some scenarios, I still would recommend you manually add a restriction based on the guidelines that the platform recommends.
Under the Audio Settings:
Codec: AAC
Bit Rate Strategy: Constant Bit Rate
Data Rate: 320 kb/s
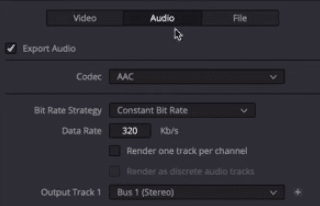
Data Rate can be anywhere you like but I recommend you choose the highest possible option. By doing this, even if YouTube will compress your audio, you’ll be at ease that it will sound as amazing as the original.
Best Setting for Exporting 4K YouTube Videos
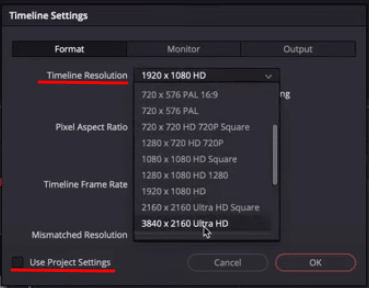
The first thing you want to do before you export a 4k video is to change the Timeline Resolution. To do this, go to the Edit view > Double-click Timeline > Timeline > Timeline Settings.

Then on the Timeline Settings tab, uncheck Use Project Settings then choose 3840 x 2160 Ultra HD under Timeline Resolution.
After that, go to the Deliver view. Most of the video and audio settings are the same when exporting 1080p videos.
Under the Video settings:
Format: MP4
Codec: H.264
Resolution: 1920×1080 HD
Frame Rate: 25
Quality: Restrict to 85000 kb/s
Under the Audio Settings:
Codec: AAC
Bit Rate Strategy: Constant Bit Rate
Data Rate: 320 kb/s
The only parameter we need to change is the Quality. YouTube recommends that for a 4K video, it should be around 66 to 85 mb/s. Again, I would choose the highest number to make sure that the project will still be high quality even if it will be compressed by the platform.
Best Setting for Exporting Short TikTok Videos
As for TikTok videos, YouTube Shorts, or even IG Reels, the dimensions will be completely different.
The initial step to make is to change the Timeline Resolution. Again, just go to the Edit view > Double-click Timeline > Timeline > Timeline Settings.
Under the Timeline Settings tab, uncheck Use Project Settings then choose 1080 x 1920 under Timeline Resolution.
If the resolution of your original video is not vertical or 1080 x 1920, you will need to adjust a lot of things. You can manually change the position and size of the video or you can also let DaVinci Resolve do it for you. To do that, go back to the Timeline Settings dialog box and choose the Scale Full Frame with Crop under Mismatched Resolution.
Final Thoughts
That’s it! Exporting videos in DaVinci Resolve doesn’t have to be overwhelming. By understanding the platform’s guidelines and choosing the appropriate settings for your intended use, you can ensure that your videos look their best on different platforms and devices.
Custom Presets For DaVinci Resolve
Are you looking to get a great sound in your DaVinci projects with just one click? Our audio experts team developed presets just for you!