Do you have quiet bits or low-level signals between parts of your audio recordings?
Although it is pretty common to have gaps of silence when recording, it will be helpful to remove those gaps and only keep the desired sections of the recorded content. In this blog post, I’ll show you how to easily remove these unwanted audio parts using Strip Silence in Studio One. In addition, I’ll discuss its various settings to help you produce a cleaner and more professional audio recording.
Audio Example
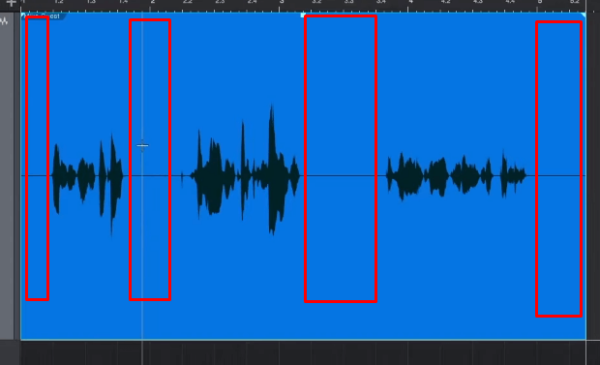
Before we explain how to use Strip Silence in Studio One, let us first learn how to identify the silent sections in an audio track without having to listen to the recording. The following image shows (in red boxes) the silent parts of your audio.

Introducing Strip Silence
Strip Silence is a feature in Studio One that allows you to automatically remove silent portions of audio files. With this tool, the editing process will be faster and more efficient.
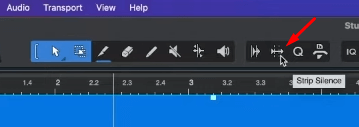
Inside Studio One, you can access the Strip Silence by clicking on its icon. You can find it at the very top of your workspace.

By enabling the Strip Silence tool, you’ll be presented with a few different parameters. Let’s discuss how to use these settings.

Strip Silence Settings
Let’s start with the first section which is the Detection settings. This determines how Studio One identifies silence in the areas you wish to process.
On the left-most side, you’ll find Material. This settings lets you choose between “Lots of Silence,” “Little Silence,” “Noise Floor,” and “Manual.”
Here’s how these options work (source: PreSonus)
- Lots of Silence: Choose this for material that contains lots of silence and single hits—for instance, a clean, typical single-drum recording (hat, kick).
- Little Silence: Choose this for material that has some action going on but still has some silence—for instance, minimal techno/single drum loops, ride, or snare tracks.
- Noise Floor: Choose this for material where there is almost no real silence—for instance, noisy drum recordings, overheads, drum mixes, and drum loops.
- Manual: Allows the Open and Close Threshold to be manually edited.
- Threshold Link: Engage to link the Close Threshold to the Open Threshold.
In the other section, you’ll find Events which determines the nature of the Events created after removing silence.
These are the different parameters and how each work (source: PreSonus)
- Minimum Length: Determines the minimum length in seconds for any resulting Event.
- Pre-Roll: Determines the amount of time in seconds that should remain at the beginning of resulting Events from the time at which the previously detected silence ends.
- Post-Roll: Determines the amount of time in seconds that should remain at the end of resulting Events from the time at which newly detected silence begins.
- Fade-In: Determines the length in seconds of the linear fade-in applied to resulting Events.
- Fade-Out: Determines the length in seconds of the linear fade-out applied to resulting Events.
- Link: Enable this option to automatically set the Fade-In parameter to match the Pre-Roll setting, and the Fade-Out parameter to match the Post-Roll setting.
Now that we have defined how these parameters work, let’s dive in on using these together to create professional-sounding audio.
How To Use Strip Silence
After enabling Strip Silence, I’d probably start by applying the Default settings. If it doesn’t work how I want it to, I suggest choosing the best Material that optimally describes the silence in your recording. And then, I would proceed to increase the Minimum Length. This is to make sure that it won’t include the gaps between my words (those natural silence). Finally, I would then tweak the rest of the parameters in the Events sections such as the Pre- and Post-Roll and Fade-in and out. It’s a fun way to experiment and try this amazing feature of Studio One.
If you prefer to watch a video, I recorded here:
Final Thoughts
Strip Silence is a powerful tool in Studio One. It simplifies the audio editing process by automatically removing silent parts from your recordings. By effectively utilizing the different settings under the Detection and Events sections, you can customize the behavior of Strip Silence to meet your specific requirements and achieve cleaner and more professional audio recordings.


