For decades, I have been an Adobe Audition user. But at this point in my career as an audio expert, it’s time to broaden my horizons and look at other digital audio workstations (DAW). Pro Tools is a powerful DAW used by professionals in the music, film, and television industries. It can be used for music creation, sound recording, editing, and audio post-production mixing.
For beginners, Pro Tools may seem intimidating, but with the right guidance and resources, anyone can learn how to use it. In this Pro Tools Beginners Guide, I’ll share with you everything to get started in under 5 minutes. From creating your own project, tweaking the interface, and recording your very first audio.
The Pro Tools Dashboard
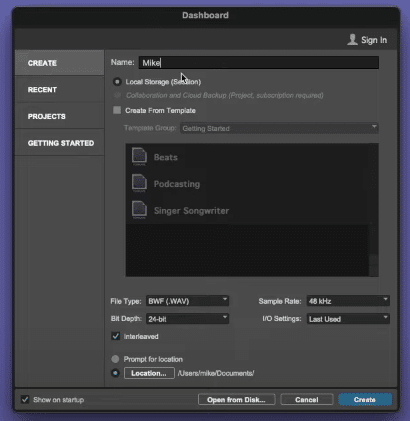
The first thing you’ll see when you open Pro Tools is the dashboard. It is where you can sign in, open the recent projects you have worked on, and create new projects. In addition, when you first install the software, it offers you a user-friendly starting guide and templates that are helpful for beginners.

Creating Your Own Template
When you create a new project, it’s recommended to create a template for all your future projects. On the Create tab of the Dashboard, you can select the File Type, Sample Rate, Bit Depth, Input and Output Settings, and the Location for your projects. These should be the first things you set when you create a new project.

The Pro Tools Workspace
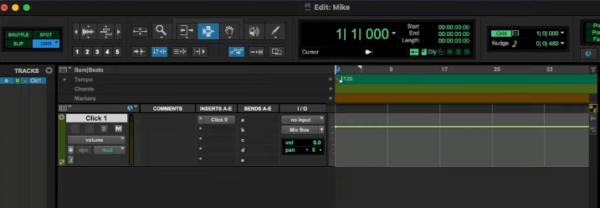
When you create a new project, you’ll be greeted with the Pro Tools Workspace. This is basically where you can find the different tools that you can use to record, edit, and mix audio.

There are a few things I recommend you manipulate on the workspace when starting out. First is to check the Playback Engine. Make sure that the device you are going to use is properly connected and is working. To do this, go to Setup > Playback Engine. And then select the right device on the Playback Engine tab.

The second is to make the transport control a bit bigger. To do this, go to Window > Transport (Cmd/Ctrl+1). This is very helpful when we start recording.

Creating a New Track
Now that we have set a few things on our Edit Workspace, let’s get ready to record. But before we can record anything, we have to first create a track. To do this, go to Track > New (Shift+Cmd/Ctrl+N). On the New Tracks window, you can set the number of tracks to create, the type of audio, and the track name. Once everything is good, click the Create button.

Tweaking the Interface
After creating a new track, it’s time to check and tweak the interface. On the right side of the track tab, you can choose the right input and output devices. Make sure they are working properly by clicking the record button and speaking through your microphone. You’ll see the green audio bar rising when you speak if it is tweaked properly.

Recording Your Audio
Now that we made sure that the input and output devices are properly connected, it’s time to start recording. To record your voice using Pro Tools, click the Record and Play buttons. It will not start recording if you don’t press the Play button. Once you are done recording, just press the Stop button.

Other Helpful Tools
There are a lot of editing tools inside Pro Tools. I’m going to share a few of the most used tools to manipulate your audio recordings.
Zoom Tool
This tool is useful for zooming in and out of your session. You can use this to have a closer look at your waveforms.

Time Selection Tool
By using this tool, you can select full or partial tracks by clicking and dragging over them. This is useful when you want to focus on a small piece of audio without selecting the entire clip.

Hand Tool
This tool can be useful in selecting entire audio clips and moving them around super easily.

Trim Tool
When the Trim Tool is selected, your cursor can be used to shorten audio by clicking and dragging over the region you want to cut.

Final Thoughts
Pro Tools is indeed one of the most powerful digital audio workstations on the market. It can be overwhelming for beginners to use this software. But with this Pro Tools’ beginners guide, you can familiarize yourself with the dashboard, workspace, and a few of the editing tools of the software. In addition, you can now create your own template, insert a new track, tweak your audio interface, and start recording.
Learn To Produce Audio Like a Pro
Are you producing audio for a living?
If audio production already is your job or you aim for it to be your full-time job – then this is for you!
Learn how to become a master audio producer with Mike Russell, the Adobe certified expert. This Audio Production Course is designed for audio enthusiasts looking to produce audio on a professional level.


