In audio production, Pro Tools is one of the leading digital audio workstations (DAWs). With its extensive range of plugins and effects, this software is perfect for editing, mixing, and mastering audio recordings. In this blog post, I’ll discuss how to make your voice sound better in Pro Tools. I will be showing you the 4 simple effects to add to your audio to create a Vocal Chain in Pro Tools.
Effects 1: Dyn3 Expander/Gate
The Dyn3 Expander/Gate is a tool for controlling the dynamics of your voice recordings. It helps eliminate unwanted background noise and ensures that your voice remains prominent and clear throughout the recording.
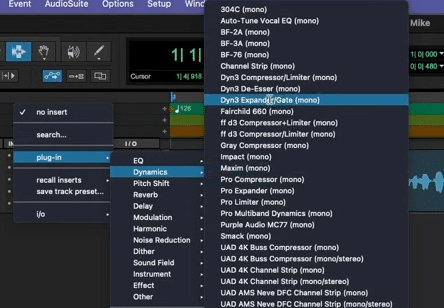
To add this effect to your recording, go to Plug-in > Dynamics > Dyn3 Expander Gate (mono).
On the Dyn3 Expander/Gate window, you’ll find several controls that you can adjust.
- Threshold: Adjust to set the level at which the plugin starts reducing the volume of the audio.
- Attack and Release: Fine-tune to achieve a smooth and natural sound.
- Ratio: Helps determine the amount of expansion or gating required for your voice.
- Sidechain: Used to focus the plugin’s effect on specific frequencies
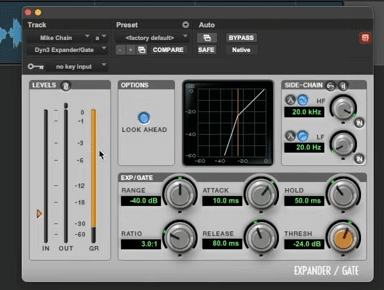
Make a few tweaks on these controls depending on your original audio and your desired outcome.
Effects 2: EQ3 7-band
The second effect to add to our vocal chain in Pro Tools is the EQ3 7-band. This is a powerful equalizer that allows you to shape the tonal characteristics of your voice. By adjusting the frequencies, you can enhance your vocals’ clarity, warmth, or presence.
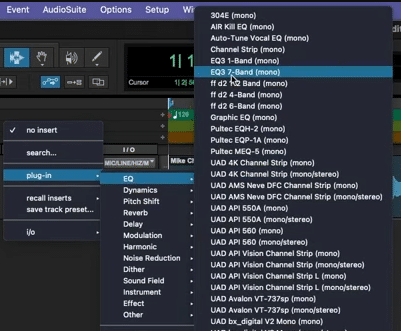
To apply EQ3 7-band to your recording, go to Plug-in > Dynamics > EQ3 7-Band (mono).
Once you are on the Equalizer tab, listen to your recording to identify frequencies that sound harsh, boomy, or thin. These are the areas you can address using EQ.
And then start manipulating the frequency bands to achieve a more balanced and pleasing tonal quality.
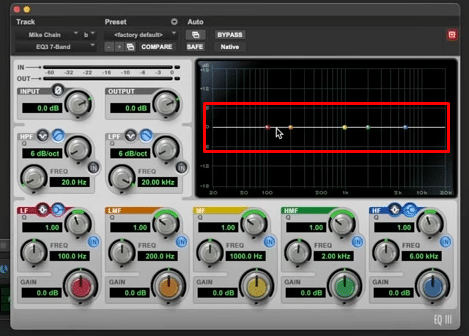
Here are a few of my suggestions:
- Adjust the red dot to add a high-pass filter that essentially roll-off low-end frequencies.
- Manipulate the orange dot to boost the bass.
- Control the blue dot to boost the high-end frequencies.
- Scan and remove frequencies we don’t need.
Basically, the idea is to use the EQ3 7-band controls to cut or boost specific frequency ranges. If a particular frequency range sounds muddy or overpowering, reduce its level by cutting it. Otherwise, if you want to emphasize a certain frequency range, boost it.
Effect #3: Dyn3 DeEsser
The third effect inside Pro Tools to make your sound better is the Dyn3 DeEsser. This is a great tool for taming harsh sibilant sounds, often found in words containing “s,” “sh,” or “ch” sounds. By reducing these harsh frequencies, your vocals will sound smoother and more controlled.
To apply Dyn3 DeEsser to your clip, go to Plug-in > Dynamics > Dyn3 De-Esser (mono).
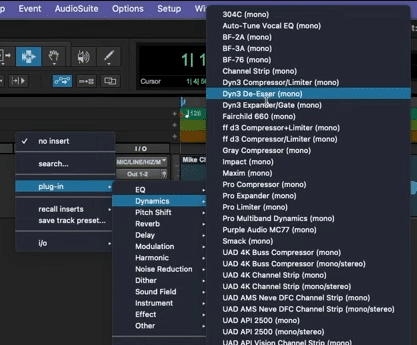
On the DeEsser panel, adjust the frequency control to target the specific range of sibilance that needs attention. And then use the range control to determine the amount of reduction applied to the sibilant sounds.
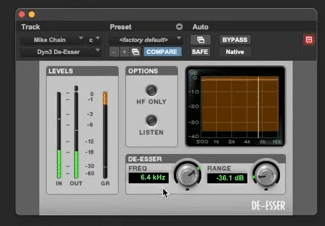
No matter how much high-end and sibilance we add with the EQ3 7-band, we can get rid of it using the DeEsser. Be cautious though not to overdo it, as it can affect the naturalness of your voice.
Effect #4: Dyn3 Compressor/Limiter
The last audio effect in this list to improve our sound in Pro Tools is the Dyn3 Compressor/Limiter. This plugin allows you to even out the dynamic range of your voice, ensuring that soft parts are audible and louder parts are controlled.
To add Dyn3 Compressor/Limiter to your recording, go to Plug-in > Dynamics > Dyn3 Compressor/Limiter (mono).
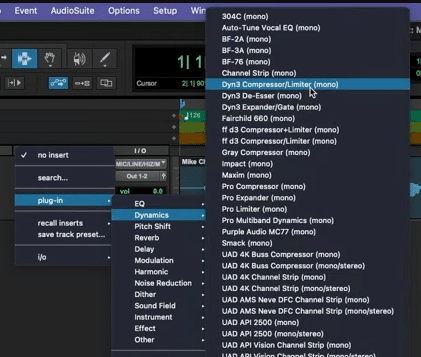
On the compressor/limiter panel, adjust the following controls.
- Threshold: to determine the level at which compression will be applied. Lower thresholds apply more compression, while higher thresholds apply less.
- Ratio: to specify the amount of gain reduction applied when the signal exceeds the threshold.
- Attack and Release: to shape the envelope of the compressed signal, ensuring it sounds natural and transparent.
- Output Gain: to compensate for any gain reduction and ensure the overall level remains consistent.

Final Thoughts:
Making your voice sound better in Pro tools is a very straightforward process. By utilizing simple effects like Dyn3 Expander/Gate, EQ3 7-band, Dyn3 DeEsser, and Dyn3 Compressor/Limiter, you can take your audio to the next level.
Watch this video to listen to the before and after of an audio recording where I applied these 4 simple effects.
Learn To Produce Audio Like a Pro
Are you producing audio for a living?
If audio production already is your job or you aim for it to be your full-time job – then this is for you!
Learn how to become a master audio producer with Mike Russell, the Adobe certified expert. This Audio Production Course is designed for audio enthusiasts looking to produce audio on a professional level.
Further Reading:
- Pro Tools Beginners Guide – Everything to Get Started in Under 5 Minutes!
- How to Make Your Voice Sound CINEMATIC – Premiere Pro Tutorial
- How To Sound Crispy in Adobe Audition – Guide On How To Sound Better
- How To Make Your Voice Sound Better in Audacity
- Adobe Audition Tutorial: How to Make Your Voice Sound Better in Multitrack


