Welcome to our beginner’s guide to Adobe Audition CC! If you’re a complete beginner and you’d like to know how to get started using Adobe Audition CC, then you’re in the right place!
The first thing to note is that there are two different work views in Adobe Audition – Waveform and Multitrack – and we’ll be going through how to get started using both of them in this guide.
Let’s get started!
Waveform Editor
First up, Waveform is the view you’ll want to use to get started recording audio.
Note that Waveform is a destructive editing area, meaning any changes you make to the audio are permanent (unless you press Control-Alt-Delete to undo any changes).
- Getting Started
To get started recording in Adobe Audition CC’s Waveform Editor, go to File > New > Audio File, give your new recording a name and click OK.
When it comes to Settings, it’s usually best to set your Sample Rate to 44,100 Hz, which is common for digital audio. For video, 48,000 Hz or higher is more appropriate – any lower and you’ll get a degradation in the quality of audio.
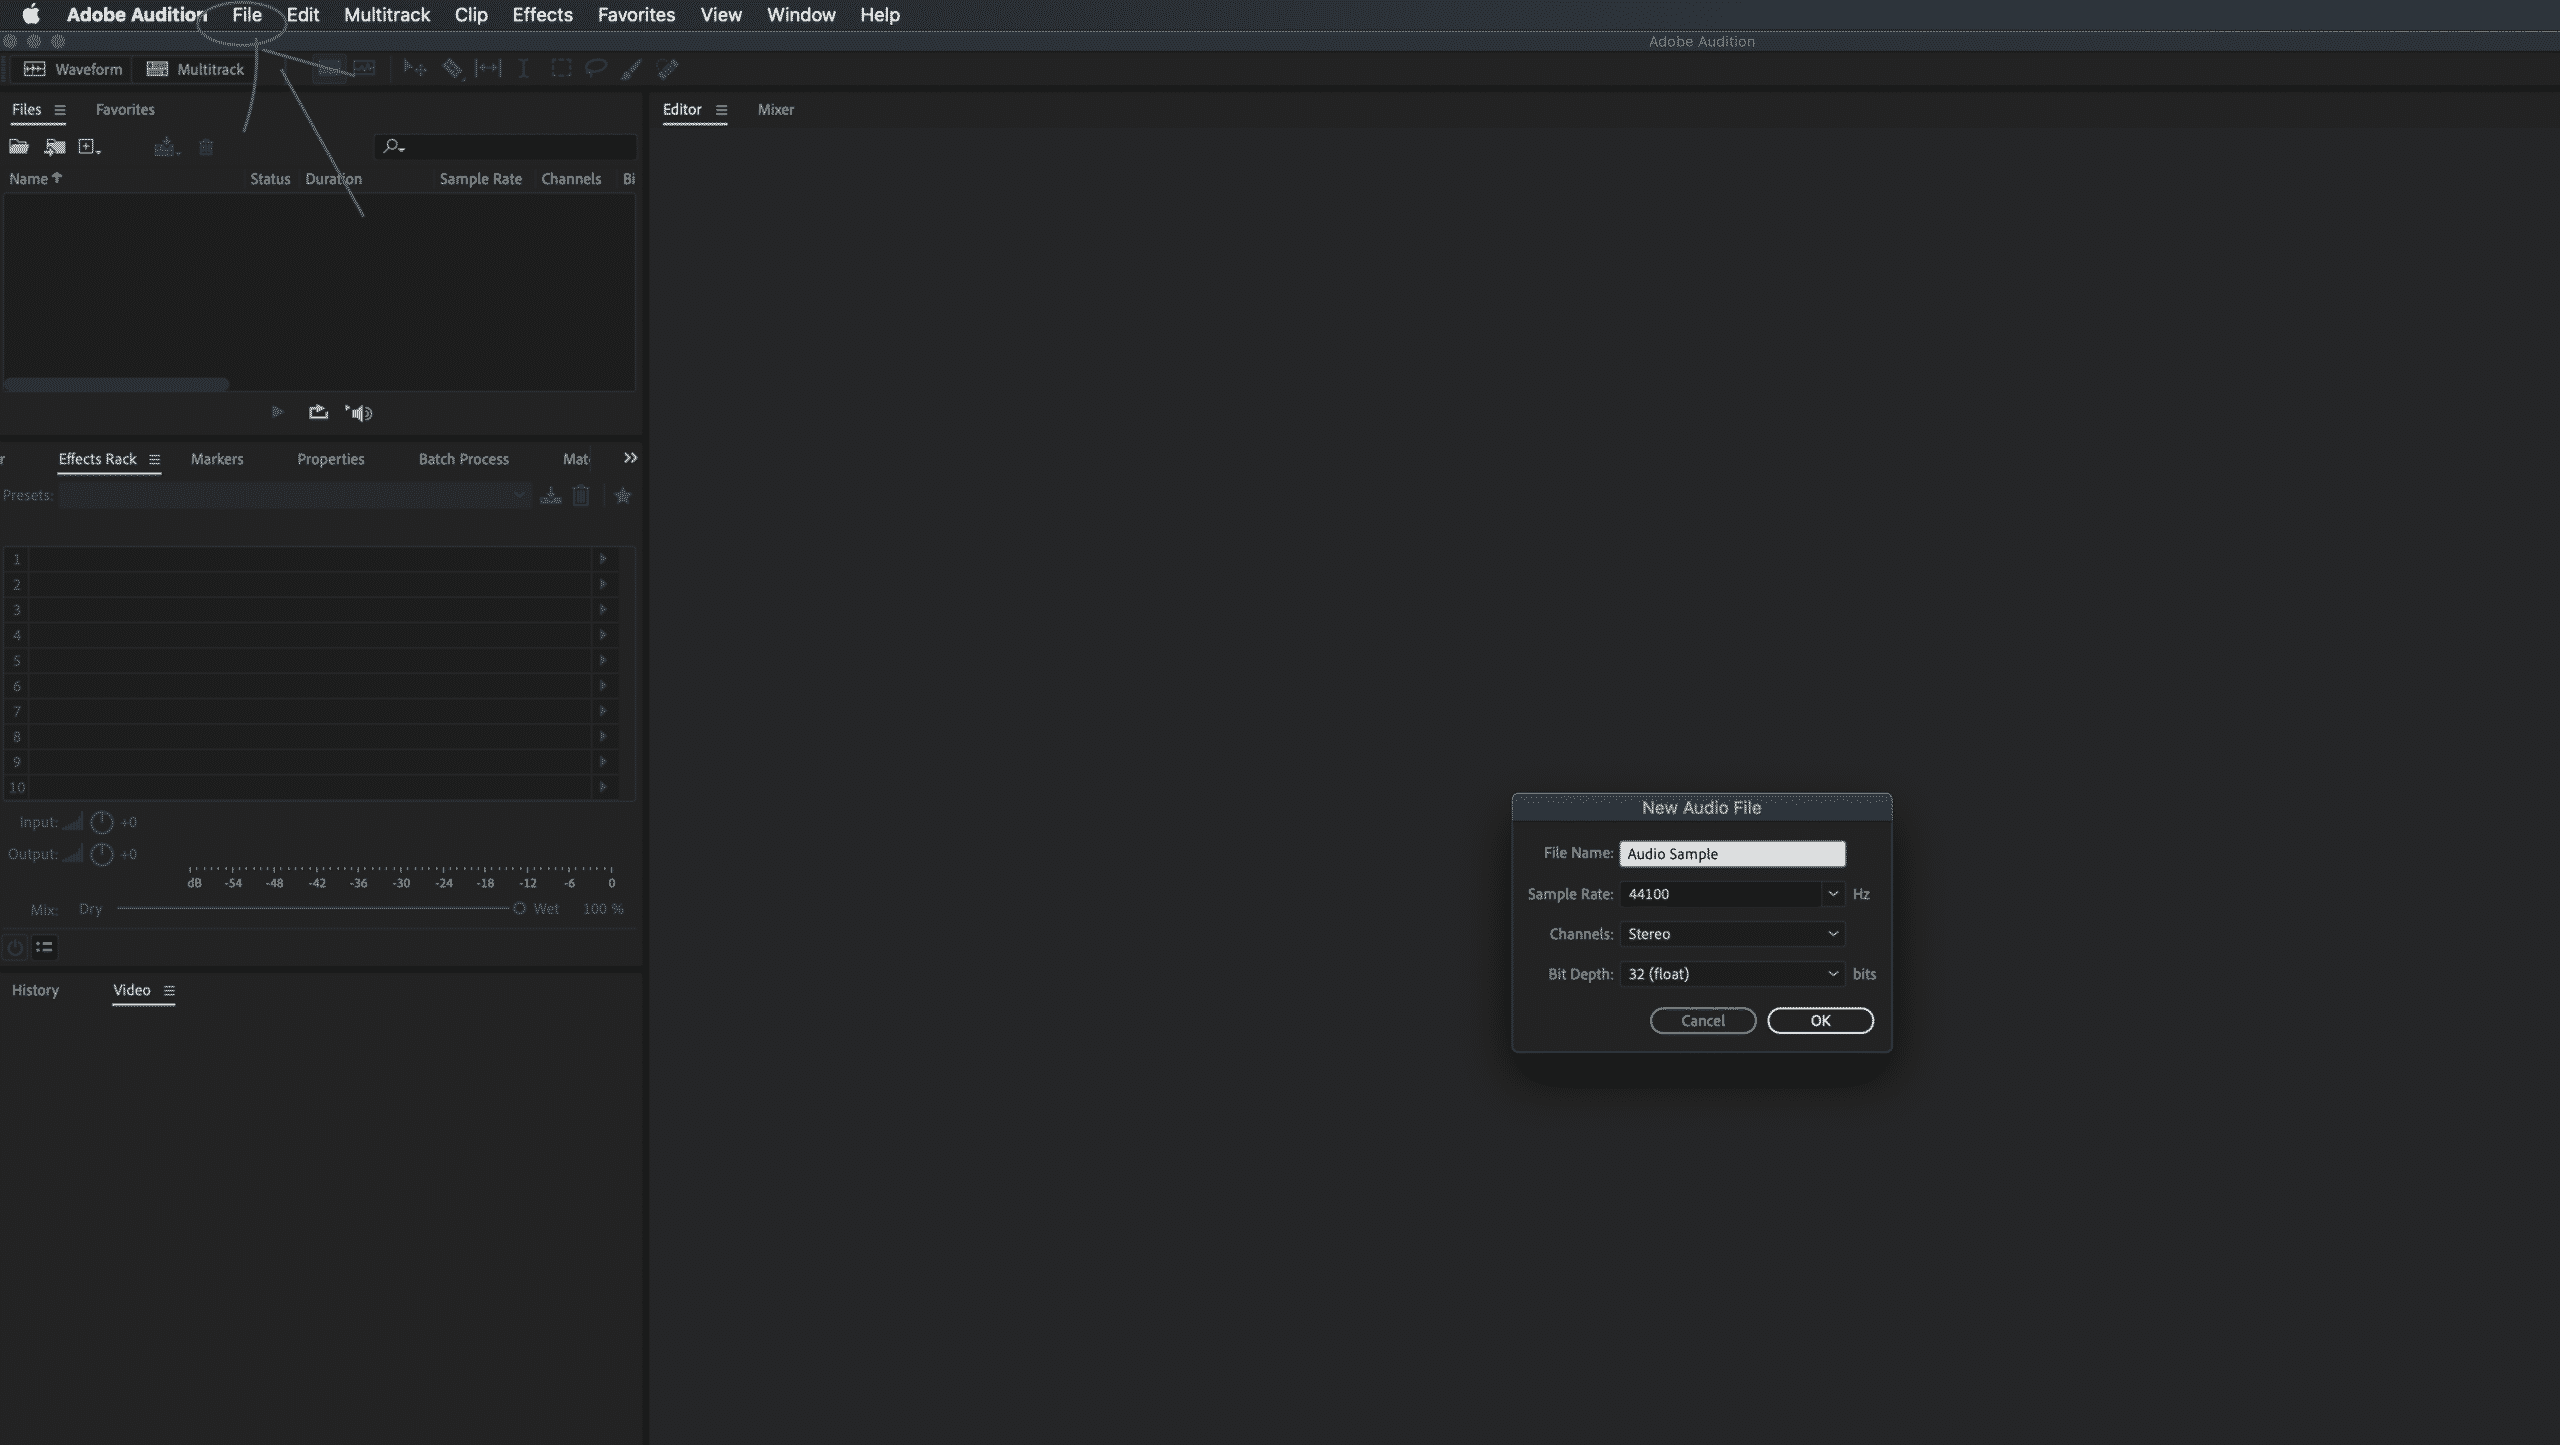
You can select either Stereo or Mono for your Channel. Stereo is best for music and jingles, while Mono works best for speech and voiceovers.
Leave the Bit Depth as the default of 32 Float – this will allow you to do lots of cool things, such as being able to distort and still not clip your audio. Click OK.
- Before Recording
In the Waveform Editor, you’ll no doubt recognise most of the controls (Play, Pause, Stop, Rewind and Fast-Forward) along the bottom from your tape recorder or Hi-Fi system!
To record, simply hit the big red Record button and it will start recording, as long as your audio interface – or whatever you’re recording with – is set up correctly.
To check this, go to Edit > Preferences, view Audio Hardware and make sure the correct Audio Input and Output are selected. This should be fairly straightforward if you’re using a built-in microphone, the microphone on your webcam or a USB mic.
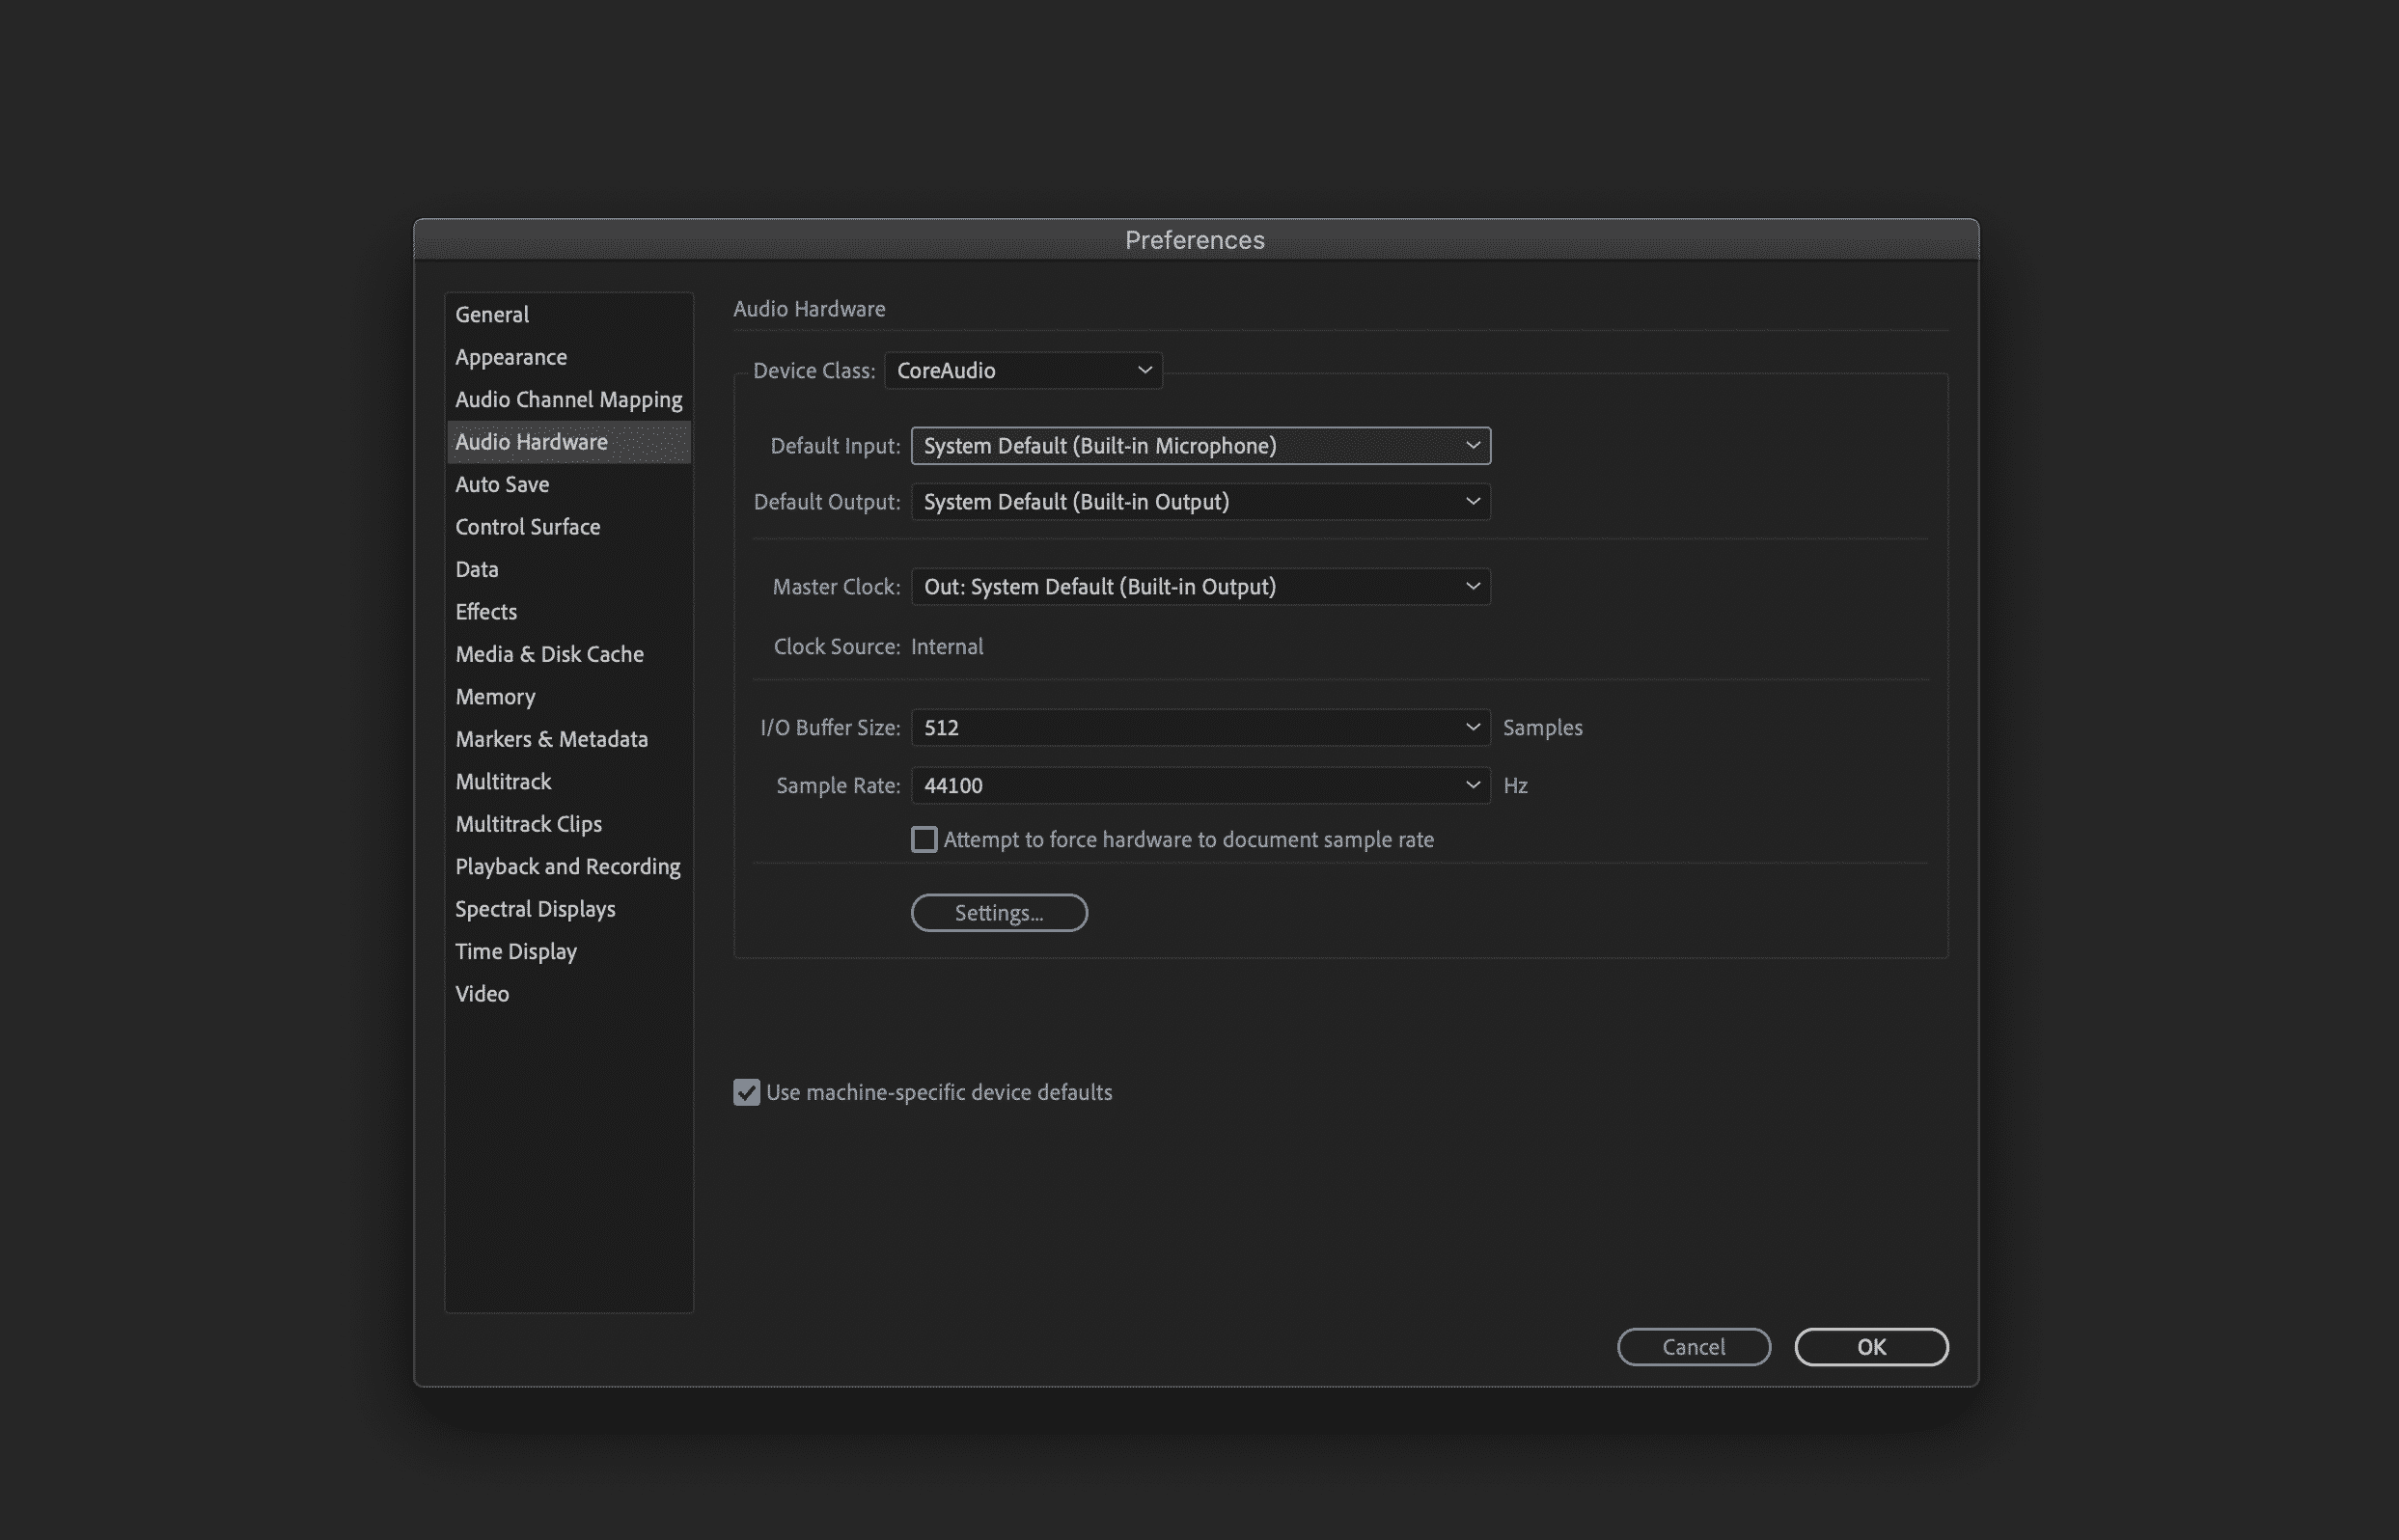
Once you’ve checked that and you’re happy it’s correct, go to Audio Channel Mapping and make sure it’s mapped to the correct channels too. Again, this should be fairly straightforward if you’re using an internal microphone or USB mic.
- Recording Audio
Now it’s time to hit record!
When you’re done, hit the Stop button or space bar to stop recording. Then, providing your outputs are set up correctly, you should be able to hit the space bar or press the Play button and hear your recording back.
- Basic Editing
In terms of volume, this should be set to between -6 and -3 dB. If it’s a bit too quiet or too loud, go to the Volume control at the top of your recording and drag the cursor to the right to turn volume up or to the left to turn it down.
Tip – by going to the Favorites menu and normalizing your recording to -0.1 dB, it will ensure your waveform is as loud as possible.
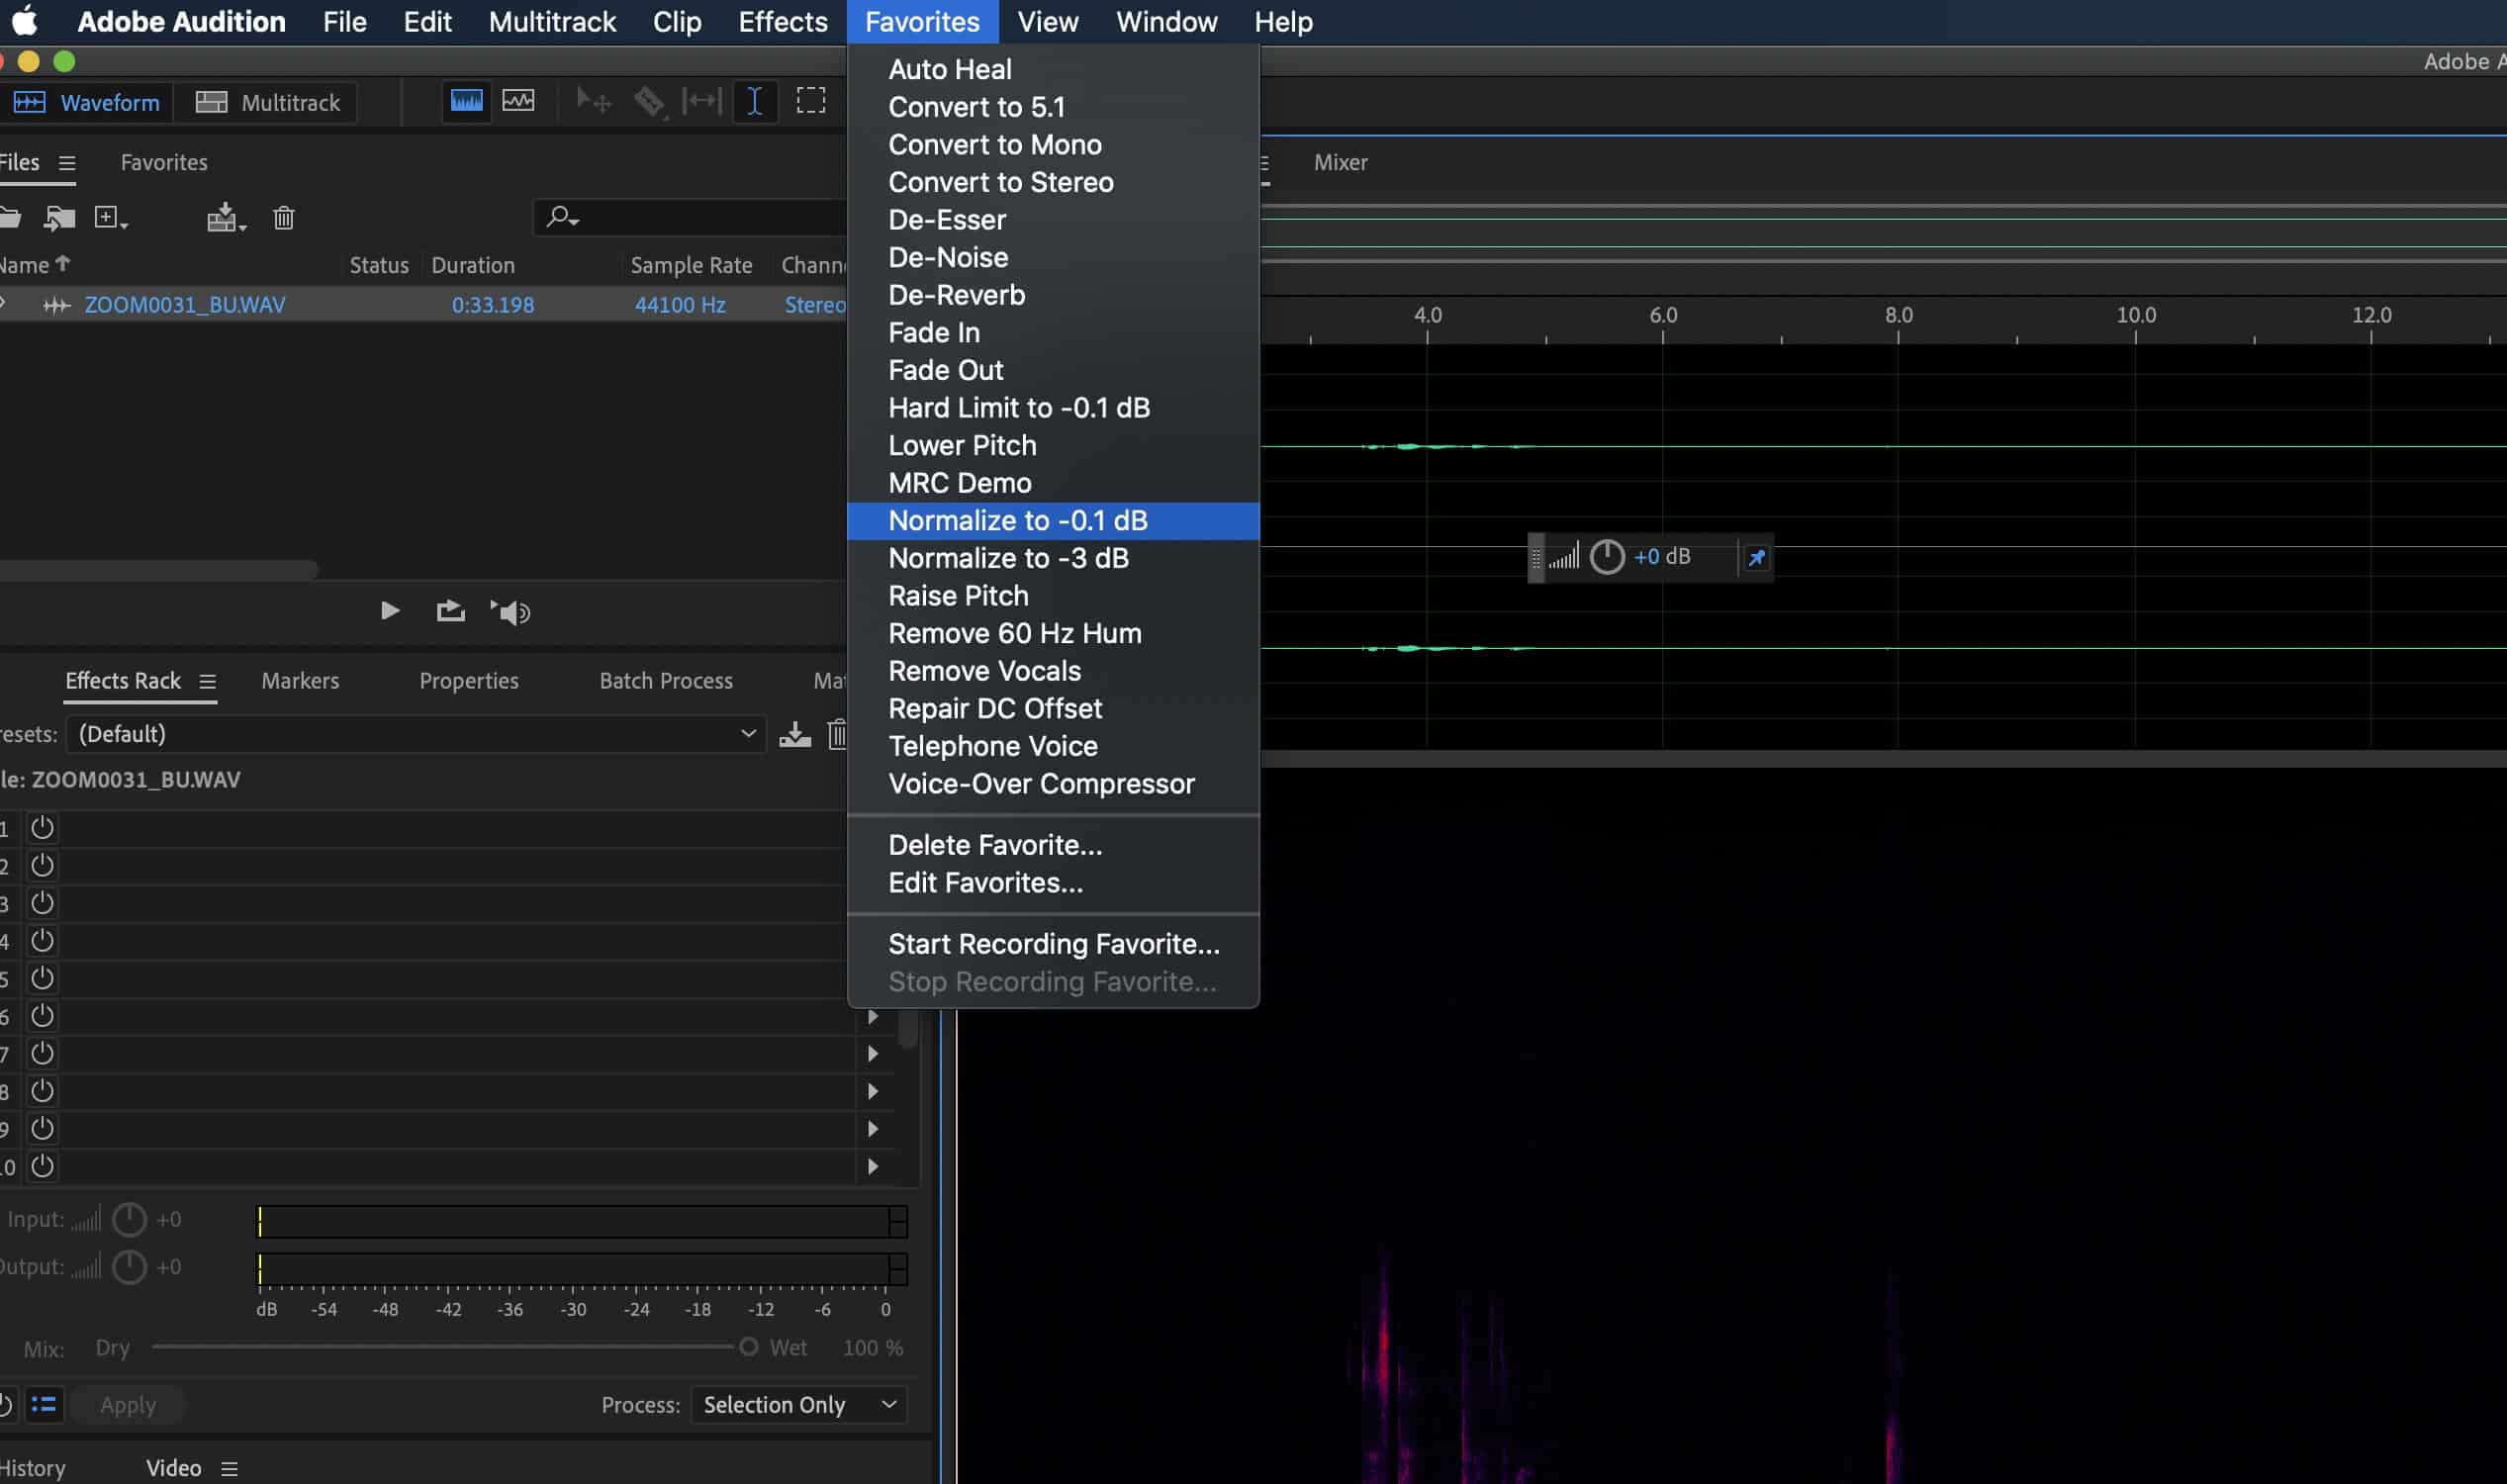
To delete any section of your recording, select and highlight the section you want to delete and simply hit the Delete key on your keyboard (and press Command-Z (if you’re using a Mac) or Control-Z (if you’re on a PC) to undo).
- Adding Effects
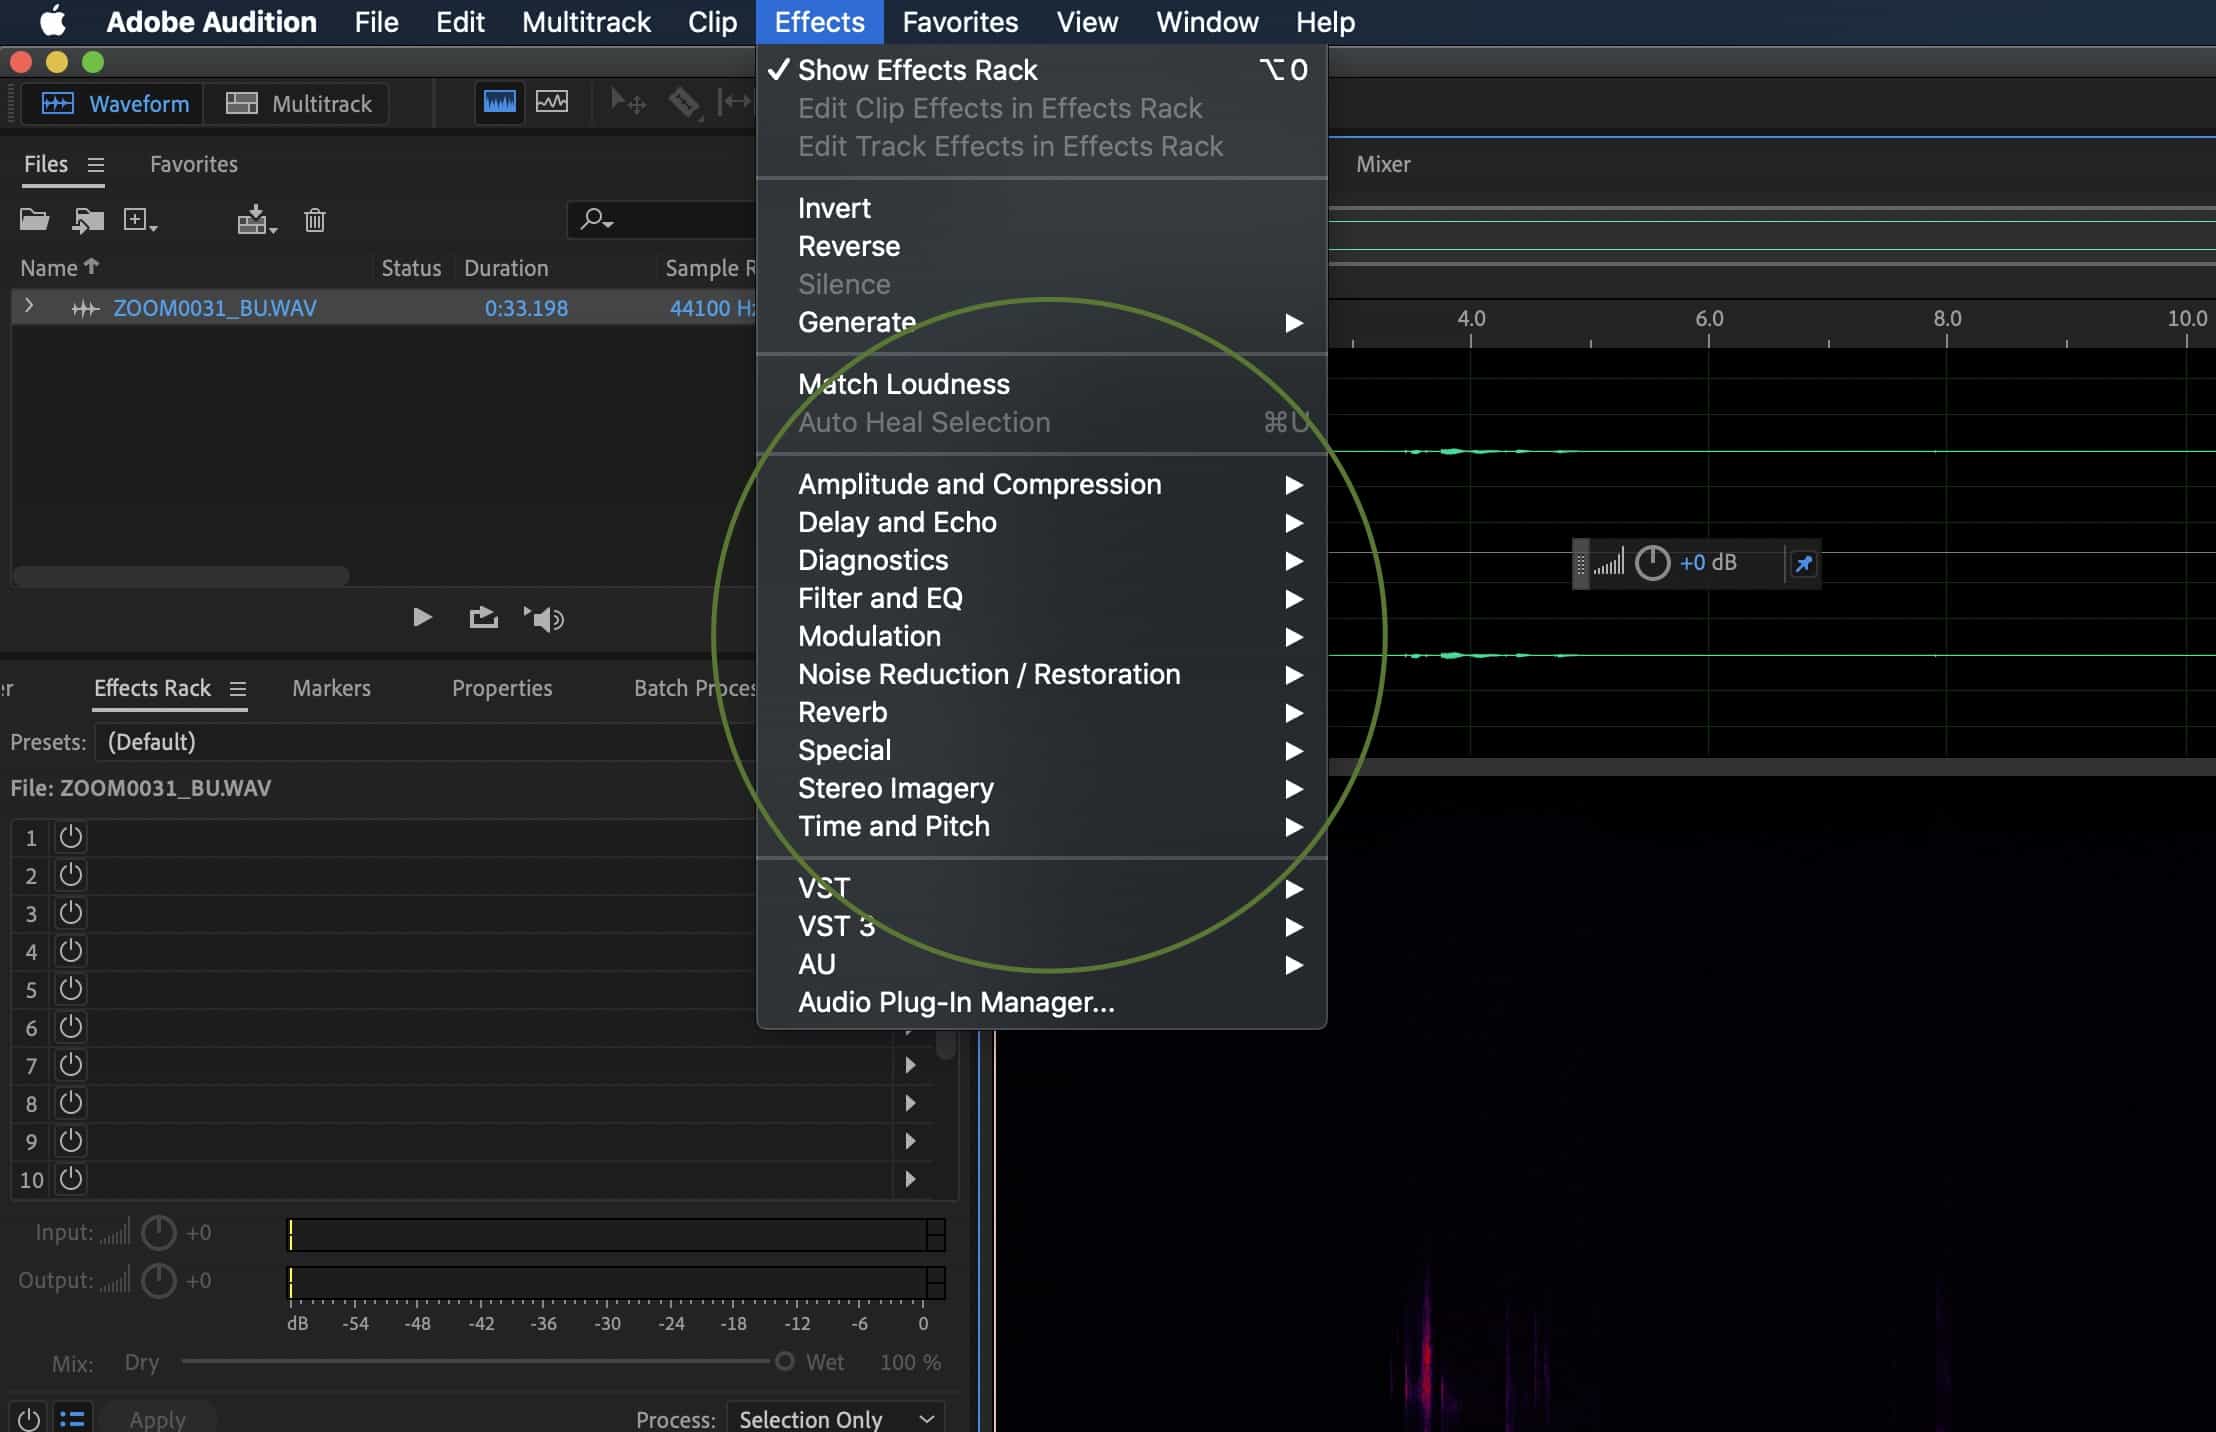
To add a basic effect to your recording, on the Effects menu you’ll find the many effects available. These range from compressors (to make your voice sound louder, smoother and nicer) to delay and echo effects, EQ (to increase the high end or low end of your voice), modulation (one of my favorites!), noise reduction, reverb, time and pitching. For beginners, use the default settings for your choice of effect and hit Apply!
Multitrack Editor
Once you’ve recorded your audio in Waveform, it’s time to try mixing different records – like voiceovers, music and sound effects – together.
Note – Multitrack is a non-destructive editing view, meaning any trims, cuts, edits or effects that you add using the Effects rack do not permanently save to the individual audio files that you’re editing together inside Multitrack.
- Getting Started
To start your first Multitrack session, go to File > Multitrack Session and give your session a name and a folder location where you want to save it.
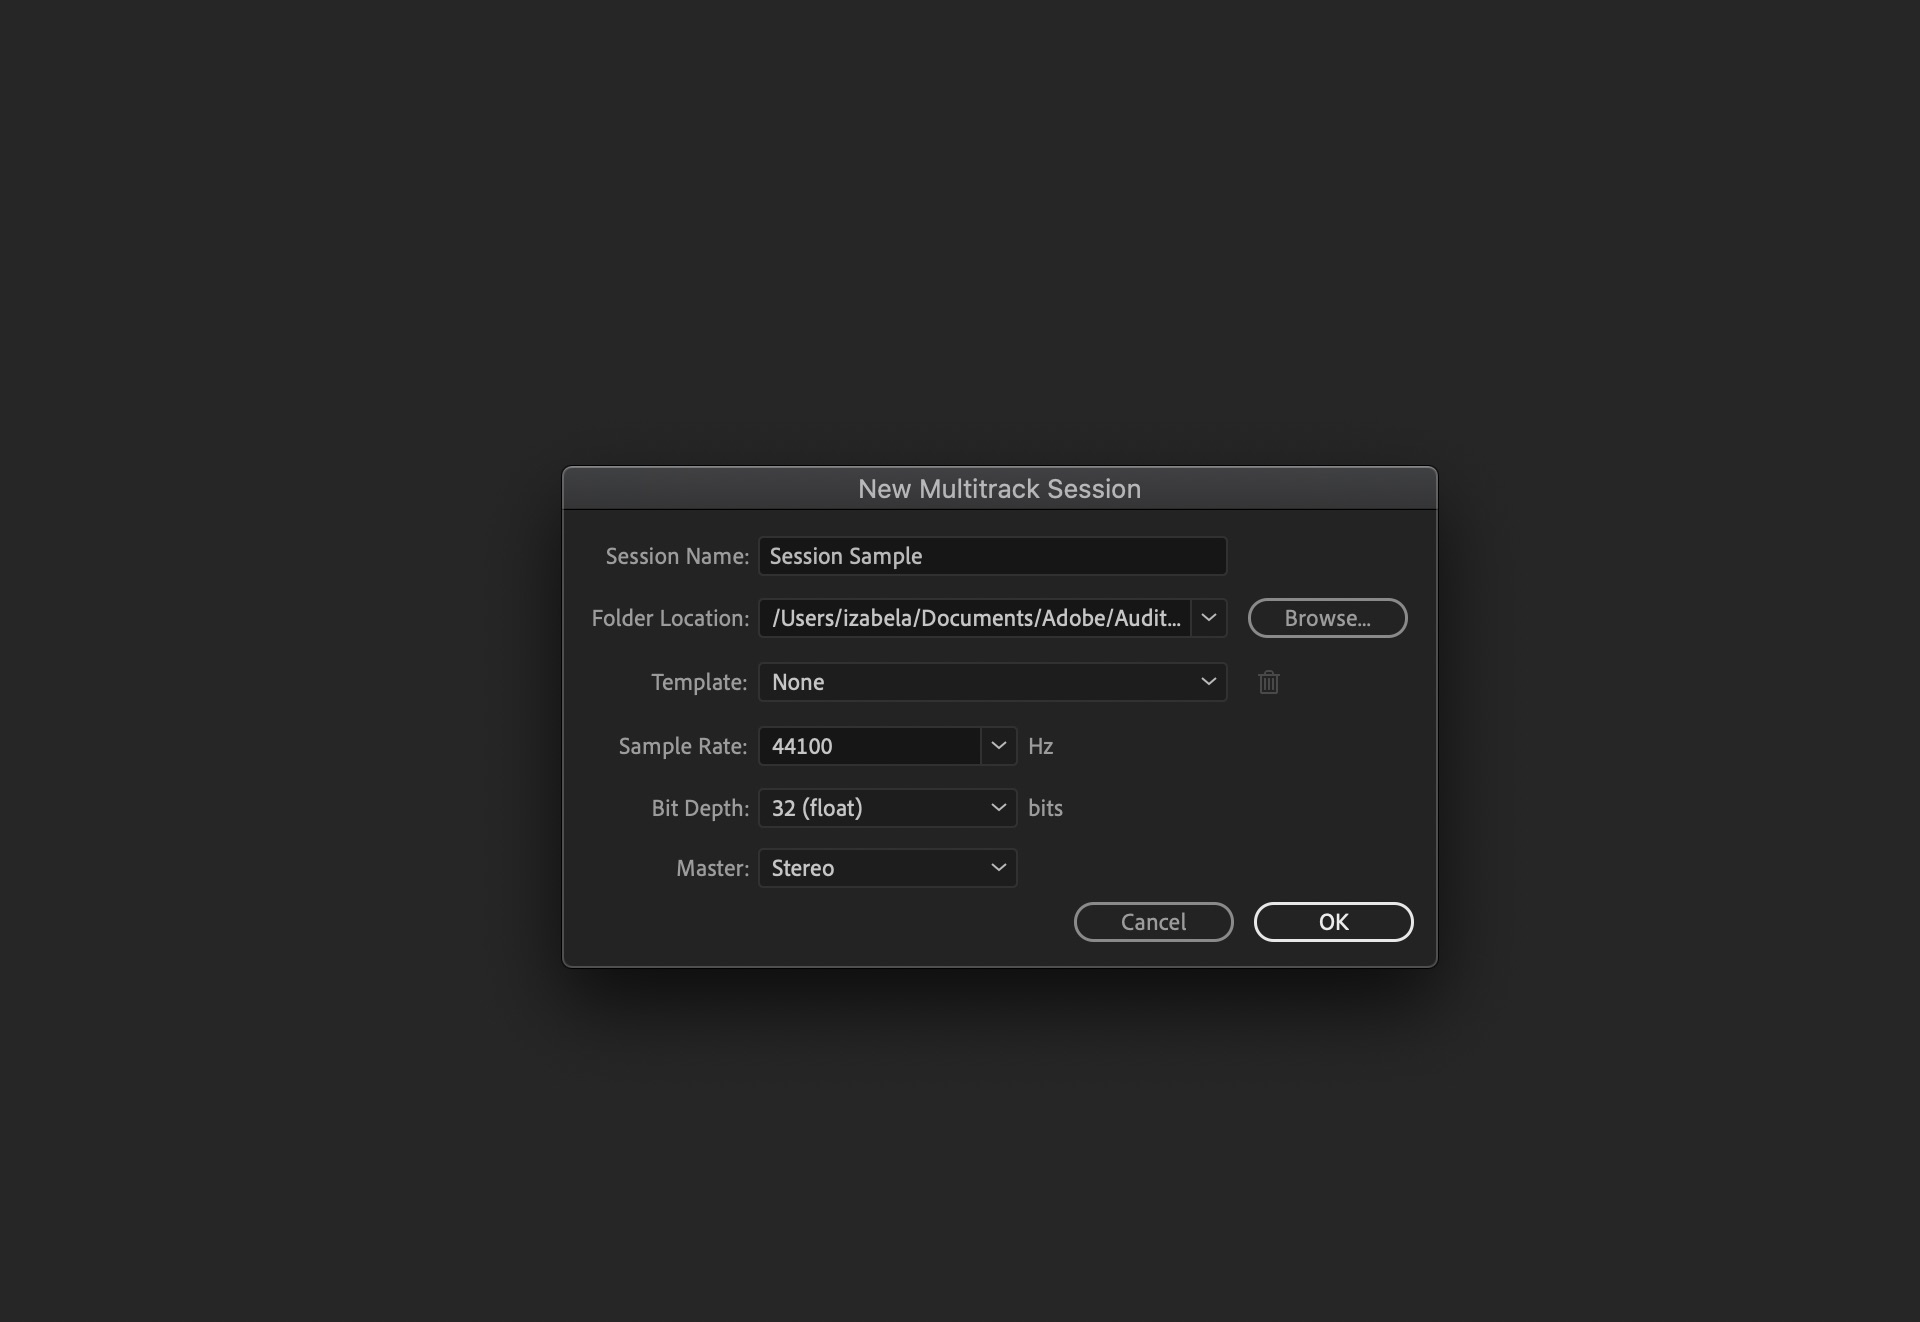
In the Settings, start with None in Template, Sample Rate at 44,100 Hz, Bit Depth again as the default of 32 Float and Stereo – unless you’re working in a Mono project (but stereo does provide more flexibility if you’re mixing in Multitrack). Click OK and you’ll be greeted with the Multitrack view…
Predictably, Multitrack allows you to mix multiple tracks (hence the name) where you can lay different audio tracks in and on top of one another and do all kinds of other clever stuff too!
- Adding Tracks
To bring the audio you’ve just recorded in Waveform over into Multitrack, you can simply click and drag it across from the left hand side of the screen to Track 1.
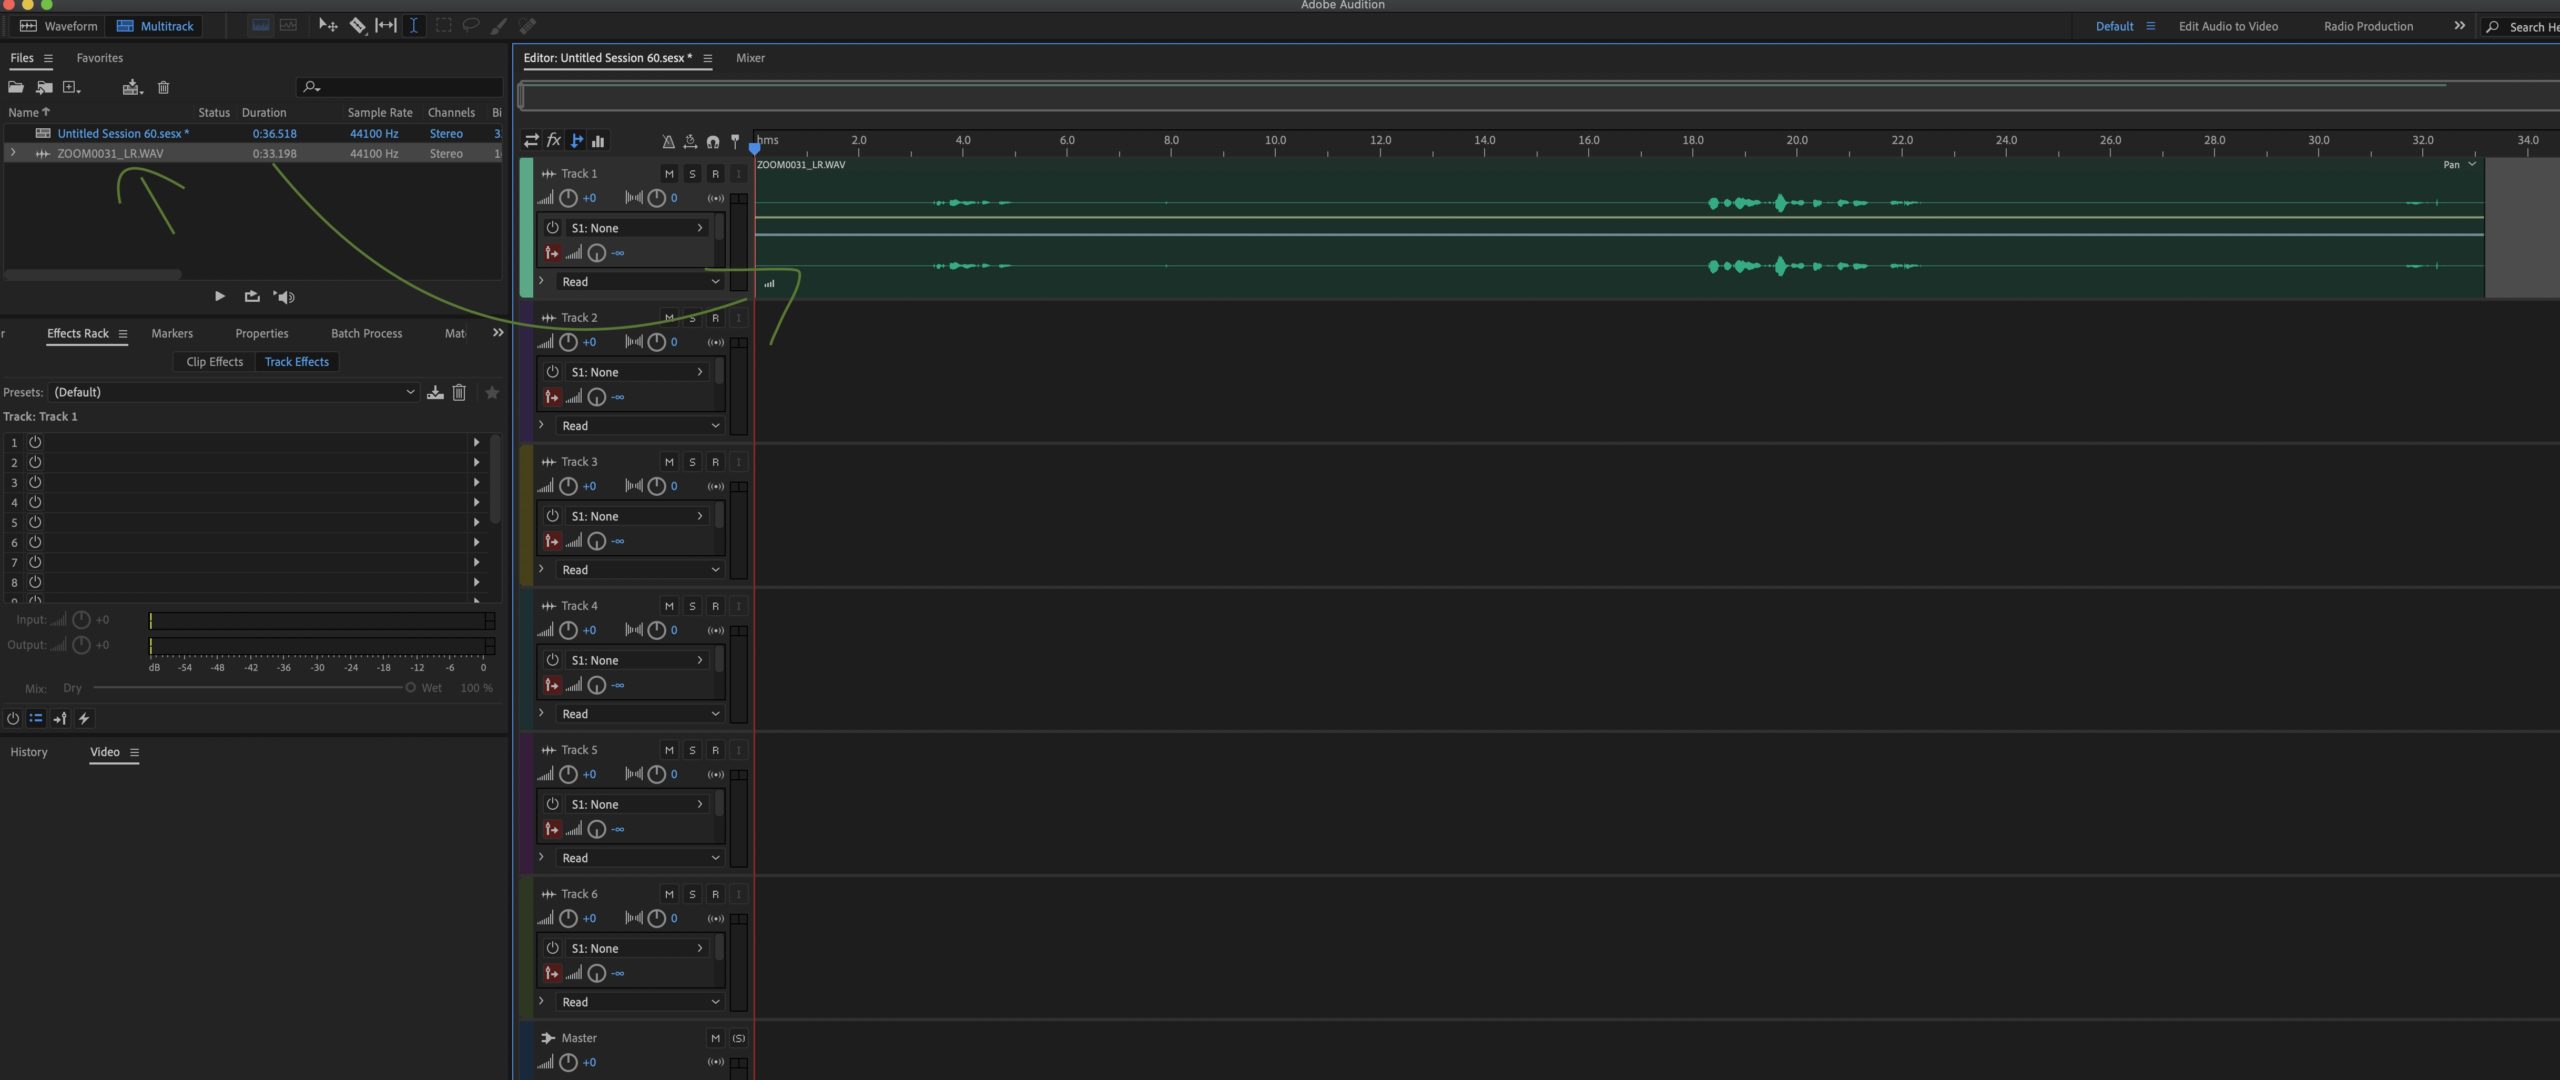
You can choose where abouts in the timeline you want it to be on the Multitrack by simply dropping it in that position. And again, you can zoom in and out by hovering over the time bar.
- Basic Editing
You can also trim your audio at the beginning and end to make it tighter by hovering over the start (or end) until the cursor icon changes and dragging across to select the section you’d like to remove.
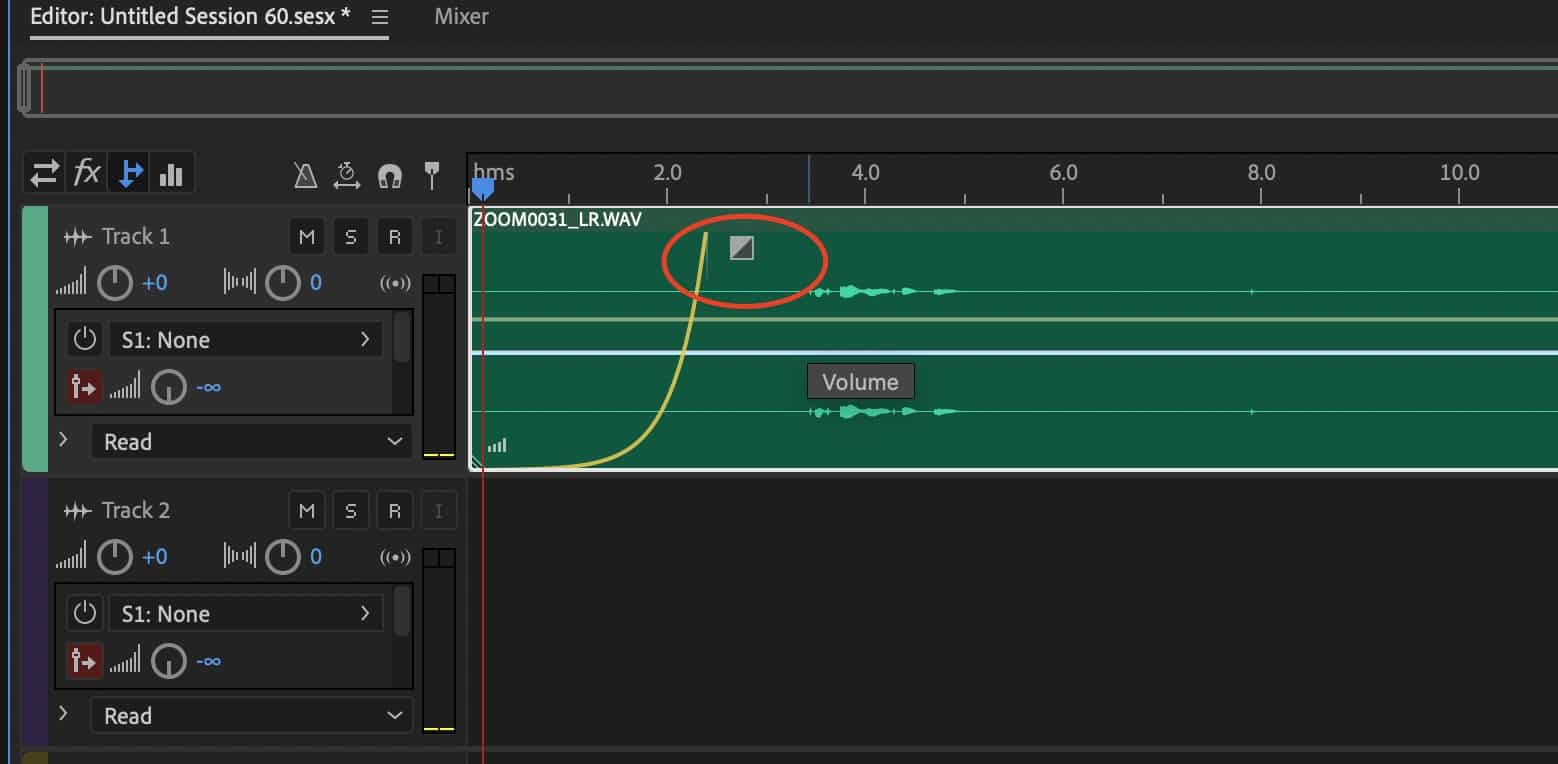
Dragging the little triangle just below the time bar at the beginning and end will allow you to fade in and out – giving you a nice smooth intro and outro. You can also adjust the volume easily too as the playback settings are the same in Multitrack as Waveform.
- Mixing Multiple Tracks
To add more tracks, going into your media browser on the left hand side of the screen allows you to browse your hard drive.
At the bottom of the media browser, you’ll find the Autoplay option. Turn this on if you’d like to allow it to play your audio selection automatically or stick with the default setting (with the Play button selected) to audition a track in your media browser.
Drag and drop your chosen audio into another Track on Multitrack and the two audios will play over each other – great for situations like playing music and speech together i.e. the whole point of the Multitrack Editor!
- Seamless Mixing
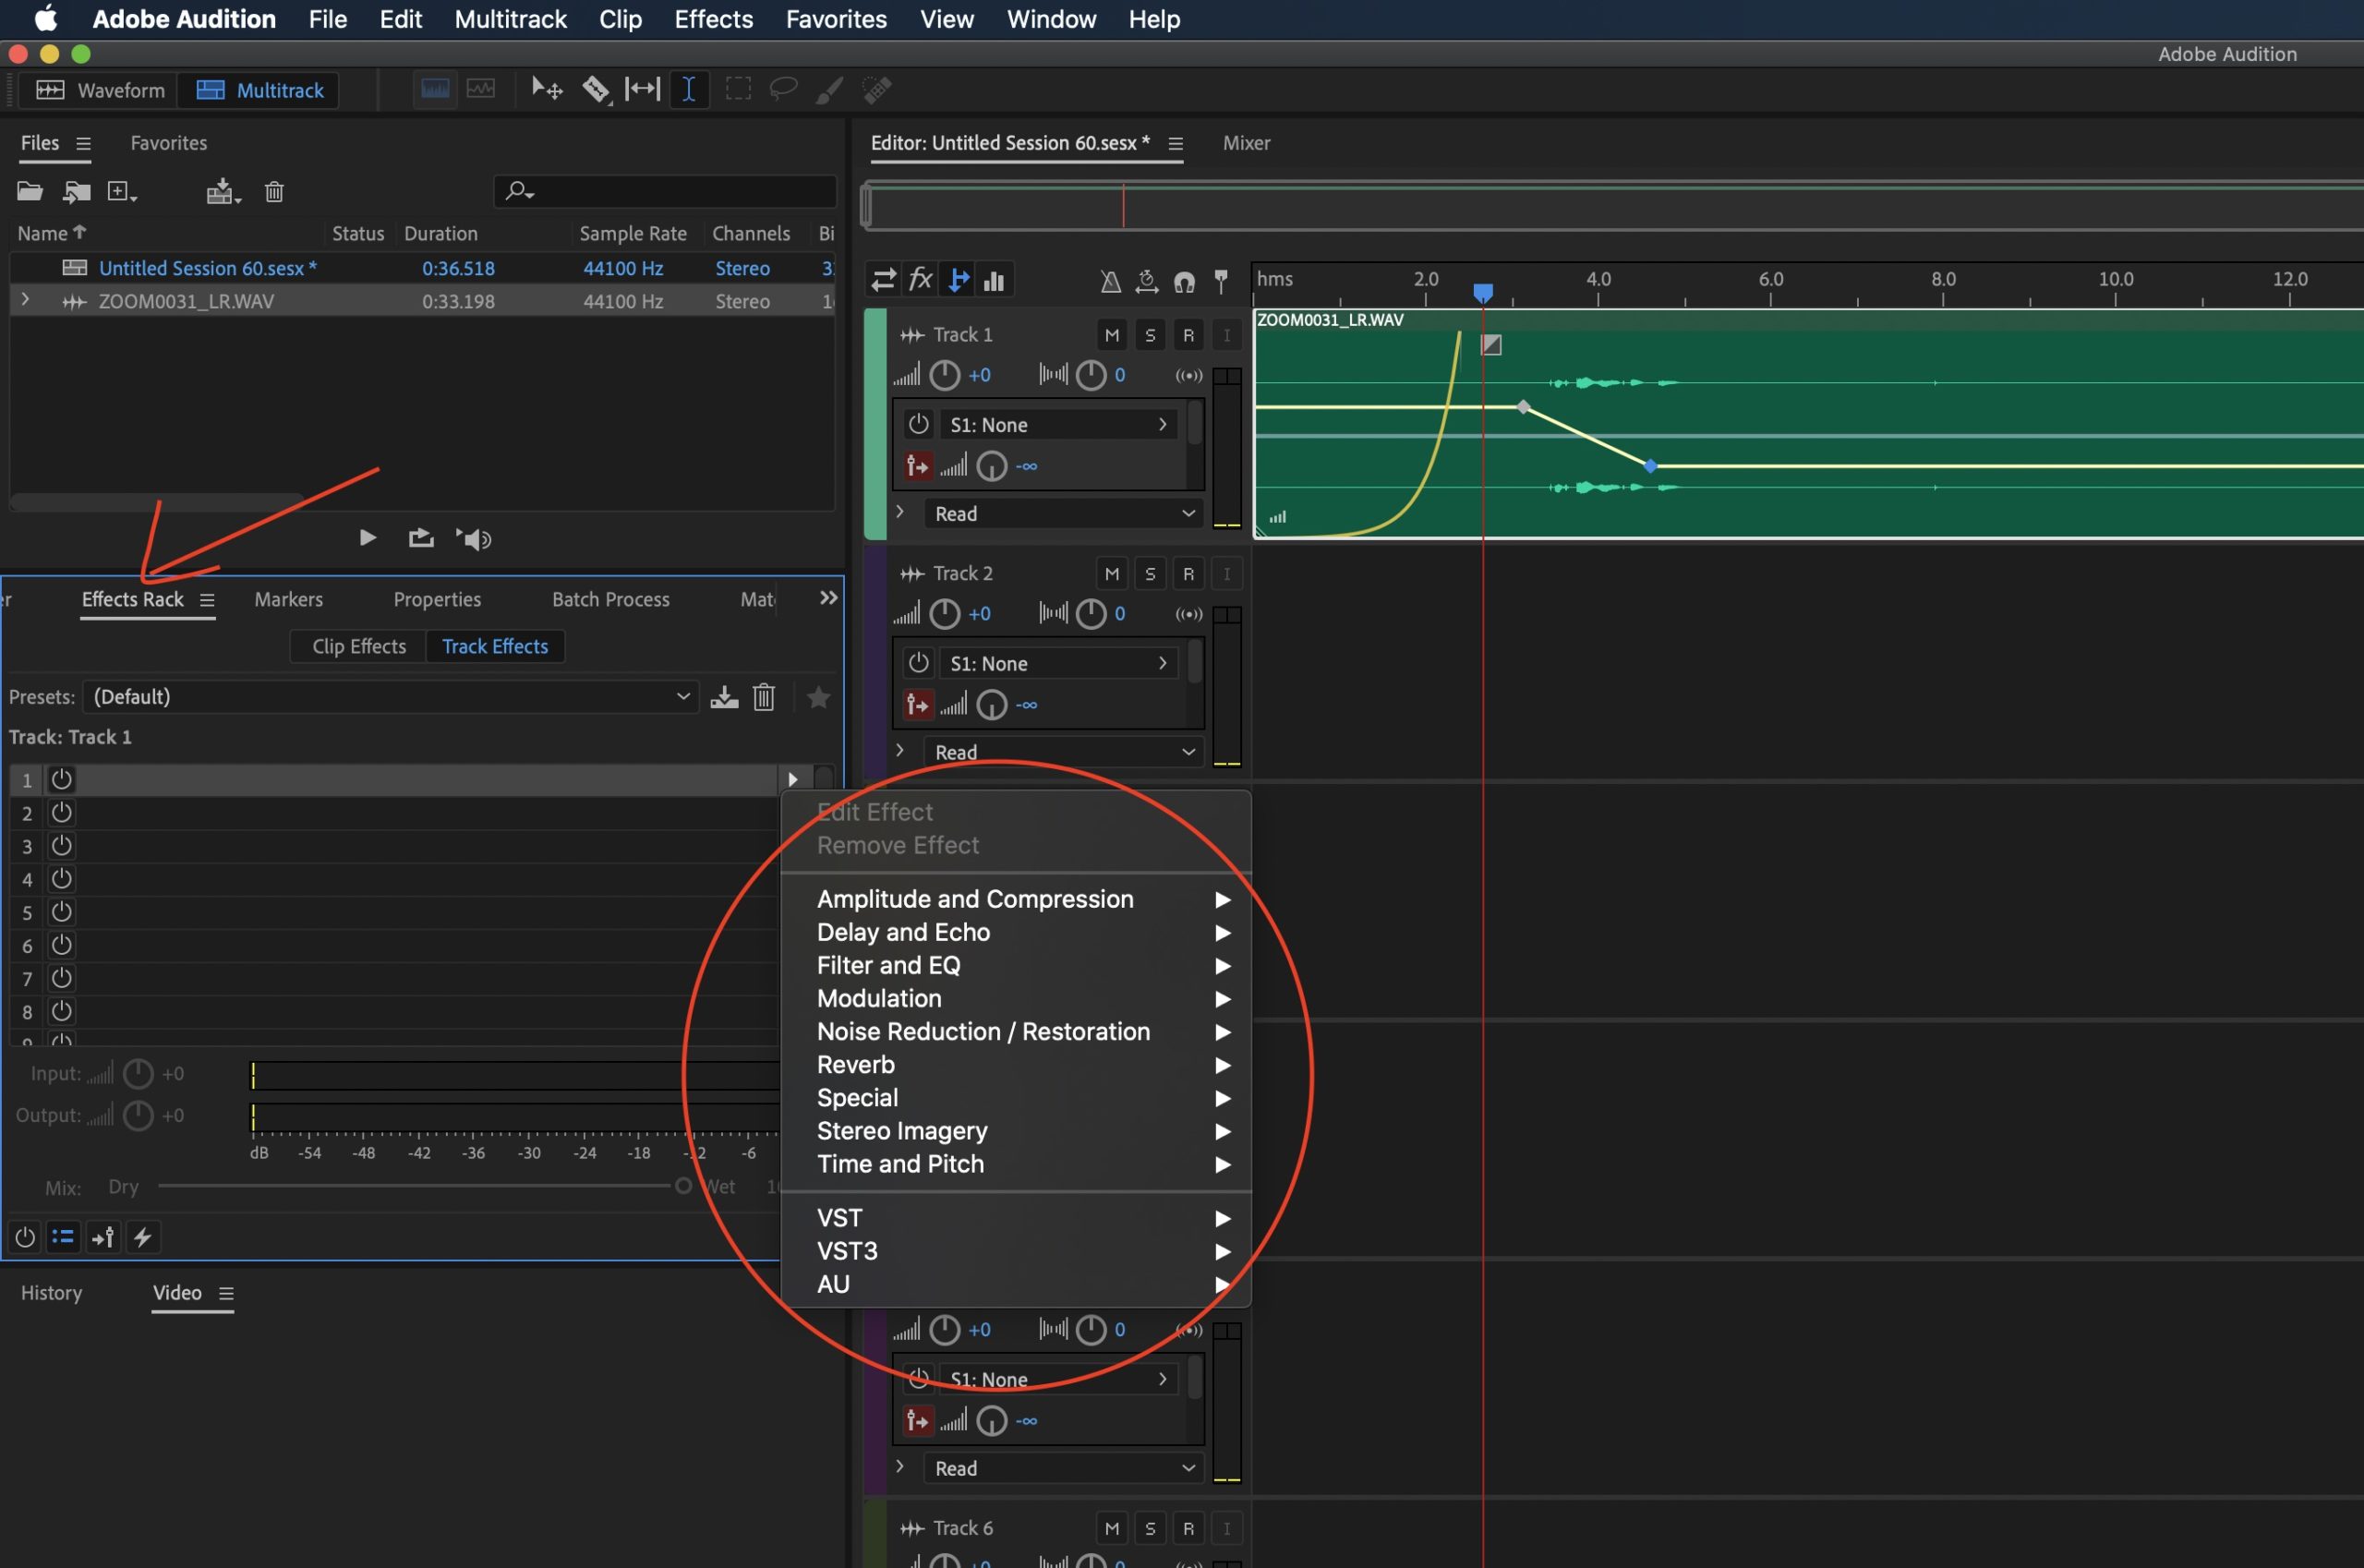
To fade the volume of one of the tracks down for a portion, click on the yellow line, add some points, and drag it down to fade the volume of one of the tracks down, for example when fading intro music as a voiceover comes in. To fade up, simply drag the line upwards.
To double-up sections of tracks, simply select the section you’d like to double-up and Copy and Paste it into another Track on your Multitrack view.

- Adding Effects
Unlike with the Waveform Editor, to add effects with Multitrack, you have a whole Effects rack on the left for every single Track you’re working with. Therefore, you need to select the Track you want to add the effect to and then go to the Effects rack on the left and select your effects from there using the drop-down menus.
Tip – one great effect is the audio compressor, which really gives spoken audio some ‘pop’ over a music bed so you can easily hear the voiceover without the distraction of the background music.
- Saving Your Mix
To save your mix into one track, go to the Multitrack menu > Mix Down Session To File > Entire Session (this means everything on your Multitrack view will get mixed into a single audio file).
Click OK and you’ll go back into the Waveform view with your new mix in one audio track with all the effects included. Then just click play to hear it!
Finally, go to File > Save As and give your file and name and a folder location where you’d like it to be saved. The format is usually WAV – or you could save it as an MP3. Keep the settings for Sample, Markers and Meta as default.
And there you have it. That’s everything you need to know to get started with Adobe Audition CC for beginners!
For more Adobe Audition CC tips, tricks and tutorials, please subscribe to our Channel!


