Audacity is a free and open-source Digital Audio Workstation (DAW) that has become very popular among content creators, podcasters, audio editors, and musicians. Despite being free, it provides powerful features and functionality that make it an excellent option for anyone who needs to edit audio. In this blog post, I’ll show you how to elevate your audio editing game using some of Audacity’s most powerful features.
Tip 1: Noise Reduction
The noise reduction tool inside Audacity is one of the best and most easy-to-use audio noise removal tools on the market. This feature can help you clean out background hums, wind noise, fan sound, and any other unwanted noise.
Follow these steps to clean audio noise using Audacity:
- Select a portion of your audio with background noise.
- Go to Effect > Noise Removal and Repair > Noise Reduction.
- On the Noise Reduction tab, click Get Noise Profile.
- Next, select the entire track, then access the Noise Reduction tab again.
- Finally, adjust settings like Noise Reduction, Sensitivity, and Frequency Smoothing, and click OK.
I wrote a blog post discussing this specific topic, you can check it here.
Tip 2: Spectral View
Did you know that Audacity has a great spectral view? This feature is almost as good now as Adobe Audition. This feature allows you to visually see the frequency range of your audio. This is useful when you need to identify and remove specific sounds or frequencies that are obvious in the waveform.
To use this tool, click the ellipsis icon on the left side of your audio track. Then select Spectogram from the menu.

Tip 3: Real-Time Compression
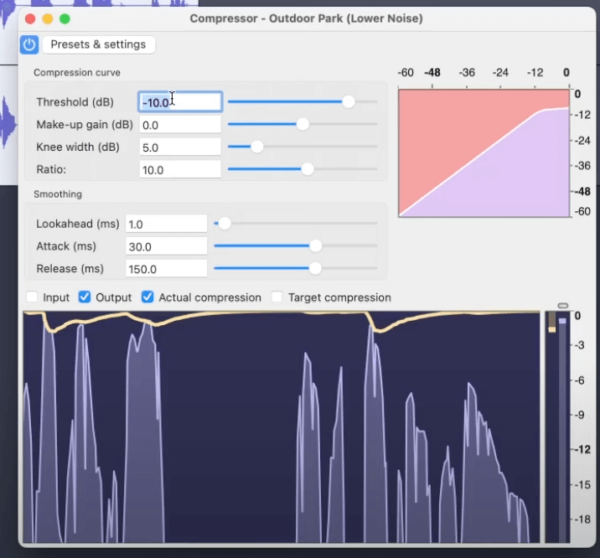
The third awesome feature Audacity has is the compression effect. This feature helps you even out the dynamic range of your audio. This means you can adjust the loudness of any part of your audio. What’s even better is that Audacity now supports real-time compression, which lets you hear changes as you adjust them.
To use this tool, click the Effects button on the left side of the track > Add Effect > Audacity > Compressor. After that, click the compressor button to open a new tab. Finally, make some adjustments to the different audio parameters to polish your recording.

Don’t forget to listen to your audio while you make adjustments to make sure that you are not overusing the effect.
Tip 4: Limiter
Limiter is another invaluable feature Audacity has. This tool can be used to prevent distortion and maintain a clean sound by ensuring that your audio doesn’t exceed a certain threshold.
To use the tool, go to Effects > Limiter. On the limiter tab, adjust the different parameters. Adjust the Threshold to -1dB and the Make-up Target to 0dB. You can leave the rest to default. By doing this, Audacity will smoothen the parts of your audio that exceed -1dB.
Tip 5: Trimming
The next tip is simple. It’s trimming audio segments. To do this, select a portion of your audio that you want to keep and then click Ctrl/Cmd + T on your keyboard. This will trim that segment, which you can then move anywhere in your track.
This can also be used to easily remove unwanted sections of your audio such as long silence and mistakes.
Tip 6: Sync Lock
Sync Lock is another useful feature in Audacity. This allows you to keep everything aligned when editing multi-track projects. With sync lock enabled, you can make sure that edits you do on one track apply to all other tracks.
To enable this feature, go to Tracks > Keep Tracks Synchronized.

Tip 7: Time Stretching
The next feature in our list is time stretching. This is a useful tool for adjusting the speed and length of your audio without losing quality or introducing unnatural sounds.
To use this feature, click the three dots on your audio track > Pitch and Speed. Then adjust the speed %. Increasing the number will make it faster while lowering it will make your audio slower. Make sure to enable the Optimize for Voice option to allow Audacity to make it sound as natural as possible.

Tip 8: Themes
Audacity allows you to customize your interface by choosing from a few themes. This can help make your editing workspace more comfortable and aesthetically pleasing.
To change themes, go to Audacity > Preferences > Interface > Choose your preferred theme. If you want to work on the old-school Audacity interface, choose Classic. On the other hand, dark mode is recommended for lessening eye strains while editing.

Tip 9: VST Effects
Did you know that Audacity supports third-party VST plugins? What makes it even better is that you can work on it in real time. This is a great feature because it allows you to expand your editing capabilities with different effects and tools. So if you have third-party VST plugins, just install them in Audacity and use them as you please.
Tip 10: Exporting
Exporting your project in Audacity is a simple process. However, it is important to set the different parameters to make your exported file as high quality as possible. With that being said, you need to choose the right format, Channels, Sample Rate, and Bit Depth. For example, if you are exporting a podcast, a Stereo channel might be better instead of Mono.

Final Thoughts
Audacity is a powerful Digital Audio Workstation that you can use for all of your audio editing needs. The 10 tips in this blog post can help you make the most out of this awesome software. Use these tips as you please to streamline your workflow and improve your audio output.
Awesome Audio In Audacity In One Click
Did you know that our Audacity presets have impacted the work of thousands of creators to date? With just one click you can improve the sound of your audio. Mike’s presets have been carefully crafted to support voice artists, radio stations, podcasters and creators who want to sound great – but don’t want degree in Audacity!


