As a content creator, the quality of your audio recordings is very important. The presence of background noise can make your content hard to understand. Fortunately, Adobe Audition offers powerful tools to remove any background noise from your audio file. In this blog post, we will explore the best ways to remove background noise from your audio file using Adobe Audition.
Method 1: Apply the Denoise Effect
The deNoise effect reduces or completely removes background noise from your audio recordings. You can control the amount of noise reduced using a slider. The values range from 0% to 100%. The higher the value, the higher the amount of processing applied to the audio signal.
To apply DeNoise on your audio, go to Effects > Noise Reduction/Restoration > DeNoise. Then on the DeNoise window, control the amount to achieve the desired result.
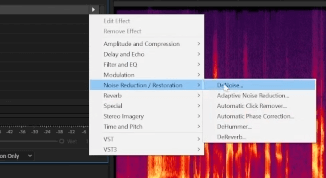
Depending on your recording, you might want to avoid applying a 100% DeNoise effect as it can make your voice sound robotic. Make sure to listen to your audio and choose the sweet spot in removing those unwanted noises.
Method 2: Use the Spot Healing Brush Tool
The next method we can do to remove unwanted noise on your audio file using Adobe Audition is by using the spot healing tool. This method only works when the spectral view is enabled.
If you are not familiar with the Spectral Frequency Display, it is a powerful tool in Adobe Audition that can help you identify specific frequencies that are causing background noise in your audio recording. To access this tool, just click on the Show Spectral Frequency Display button on the upper right corner of the window or just press Shift+D on your keyboard.
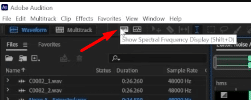
After we enabled the Spectral Frequency Display, it’s time to remove noise using the Spot Healing Brush tool. To do this, enable the tool by pressing its icon on the top menu.
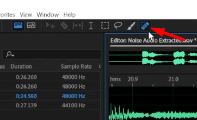
And then on your timeline, look for the noise that you want to get rid of and pain it out. This process is like photoshopping audio. You can watch this clip to see how I got rid of the birds’ tweets noise using the Spot Healing Brush tool.
Method 3: Apply Sound Remover
There are noises in our audio such as police sirens that are tougher to remove using the Denoise Effect or Spot Healing Brush tool. In this case, Adobe Audition has a better tool to use.
The Sound Remover effect analyzes a selected portion of the recording and builds a sound model. That sound model is then used to find and remove the sound. Again, this method can only work with the Spectral Frequency Display enabled.
To do this, highlight a portion of the noise in your timeline, then go to Effects > Noise Reduction/Restoration > Sound Remover (process).
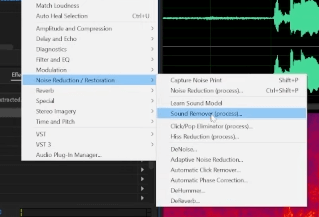
On the Sound Remover window, choose the Default preset and then click the Learn Sound Model button. Next is to highlight all of the clips in your timeline which contain the noise. There are a few controls that you can manipulate in the Sound Remover window. Make sure not to tweak them too much. You can also Preview the audio and if you are happy with the result, press the Apply button.
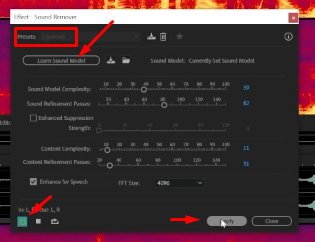
In this video, I used the Sound Remover tool to remove police sirens from my audio recording.
Method 4: Use Noise Reduction
The 4th method to remove noise from your audio recording is using Noise Reduction. This process is pretty much similar to applying Sound Remover. And again, make sure that Spectral Frequency Display is enabled.
The Noise Reduction effect dramatically reduces background and broadband noise with a minimal reduction in signal quality. This effect is perfect for removing any noise that is constant throughout a waveform.
To do this, highlight a portion of the noise in your timeline, then go to Effects > Noise Reduction/Restoration > Noise Reduction (process).
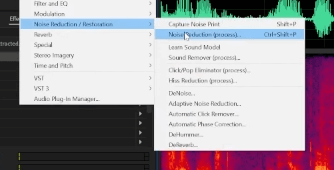
On the Noise Reduction panel, leave the preset to Default and then press the Capture Noise Print button. And then increase the Reduce Noise percentage and the Reduce by dB level. Preview the changes made to the audio and if you are satisfied with the result, click the Apply button.
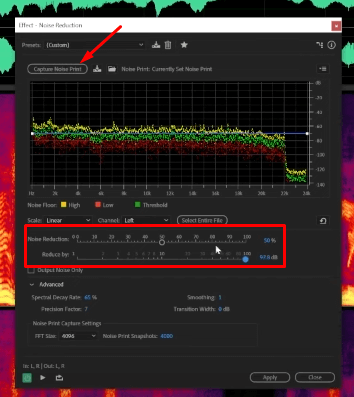
Watch this YouTube video to learn how I removed electric saw sound using the Noise Reduction tool.
Method 5: Use the Parametric Equalizer
The final tool on this list to remove noise from audio using Adobe Audition is the Parametric Equalizer. It is an effect that provides maximum control over frequency, Q, and gain settings. It is perfect for removing noise that is constant in frequency.
To do this, select a portion in your timeline where the noise is. Then go to, Effects > Filter and EQ > Parametric Equalizer.
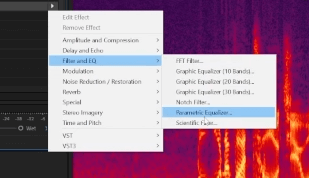
On the Parametric Equalizer window, reduce the frequency where the noise is. Watch this video to learn how I used the Parametric Equalizer to remove wind noise.
Final Thoughts
Removing background noise from your audio file is essential in producing high-quality audio recordings. Adobe Audition offers powerful tools to remove background noise, including the Noise Reduction tool, deNoise effect, Noise Reduction process, Parametric Equalizer, and Spot Healing Brush tool.
The next time you have background noise in your recordings, try out each method and see what works best for your audio file.
Presets That Save Time
Pre-made pro audio presets can save time and maintain consistency in sound levels and effects for podcasters. They are created by experienced professionals and can be customized to fit individual needs. Pre-made presets are cost-effective and accessible, making them an efficient solution for improving the overall sound quality of a podcast.
Overall, using pre-made pro audio presets can save time, ensure consistency, produce high-quality results, and be cost-effective for you. If this appeals to you – check our presets out here.


