


AI voice over has become a game-changer in the content creation space. It offers a quick and efficient way of generating narration for podcasts, videos, and other projects. However, in some cases, the generated voiceovers need enhancement. In this blog post, I’ll walk you through some quick and effective tricks to make your AI voices sound even better using Adobe Audition.
Find the Right AI Voice Sample
The first step to better AI voiceovers is choosing the right AI voice sample. Different AI tools offer different takes on your script. Moreover, these text-to-speech AI tools allow you to change parameters like the tone and accent of the speaker. So, I recommend you try to generate a few versions of your script and then choose the best among those generated samples. Or you can work with our team and our range of excellent AI voices for your next project.
Open Spectral Frequency Display
After choosing the right AI voice sample, the next step is to open the Spectral Frequency Display. If you are not familiar with the Spectral Frequency Display, it is a powerful tool in Adobe Audition that can help you identify problems with specific frequencies such as sibilance.
Use DeEsser to Reduce Sibilance
Sibilance is one of the usual problems when creating and recording content. And yes, it can also be present in AI voiceovers. Sibilance is the ‘S’ and ‘Sh’ sounds in the voice that sounds harsh on the ear.
Fortunately, Adobe Audition has a tool called DeEsser that is used to reduce these harsh sounds.
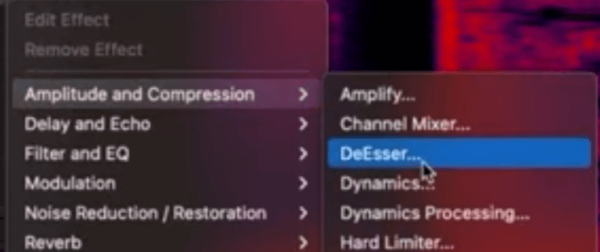
To reduce sibilance using DeEsser, you’ll need to first identify where the sibilance is on the Spectral Frequency Display. Then using the Marquee tool, highlight those parts. After that, go to Effects > Amplitude and Compression > DeEsser.

On the DeEsser window, adjust the CenterFrequency to be at the center of the problem. Also, adjust the Bandwidth so that the two lines are around the sibilance issue.

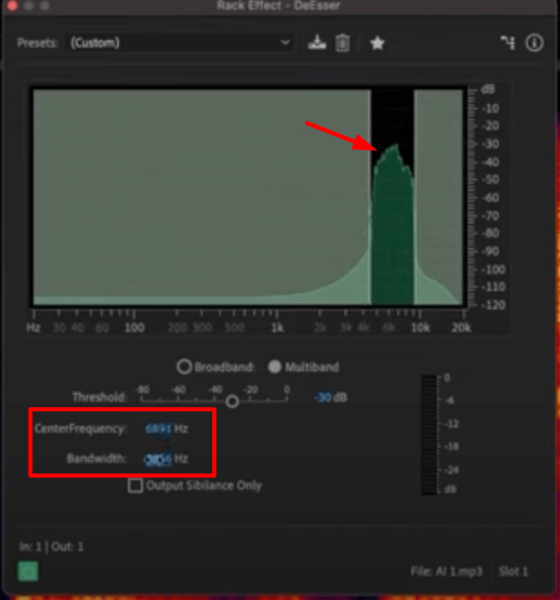
Finally, manipulate the Threshold until you find the right dB that reduces the sibilance on the voiceover.
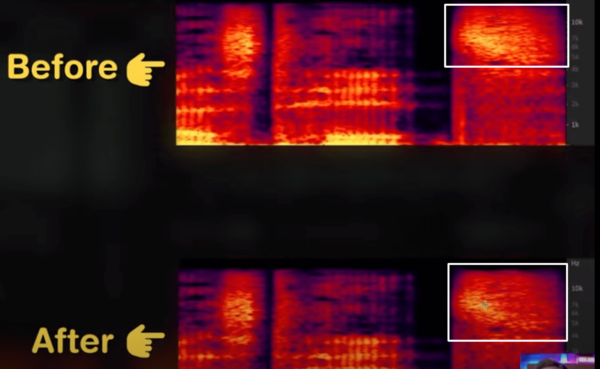
To check if the audio is enhanced, you can listen to the with and without the DeEsser effect. Or you can also look at the before and after of the spectral view and you should see something like the image below. You should see a reduction in the yellow region.

Apply EQ
Another Adobe Audition effect to enhance AI voiceovers is the Parametric Equalizer (EQ). EQ can enhance the quality of a recording by manipulating the sound Frequency. It allows you to increase the volume of some frequencies and reduce others.
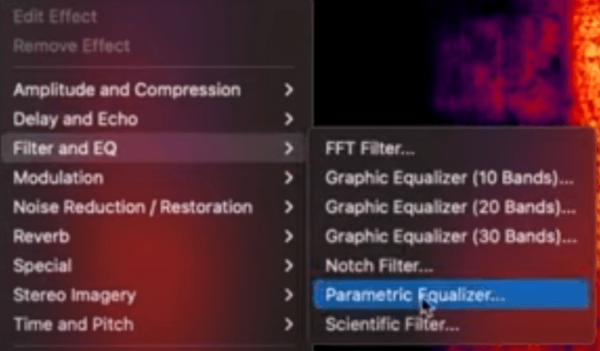
Start by adding the EQ effect to your clip. To do this, go to Effects > Filter and EQ > Parametric Equalizer.

The Parametric Equalizer window will then be opened. You can see a few parameters that you can manipulate.

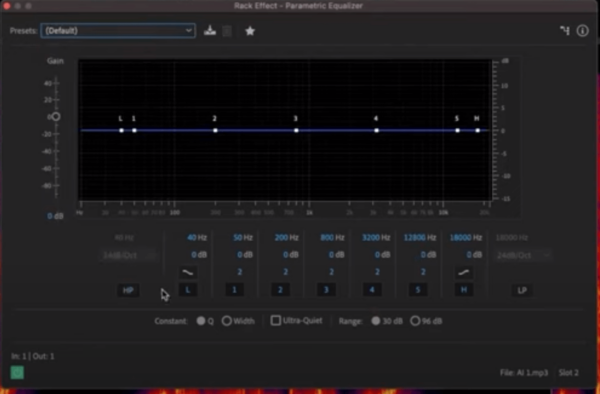
But before you adjust any controls, it’s important to understand how it works.
The most common types of EQ controls are:
- Low-frequency (LF) controls: These affect the bass and sub-bass frequencies.
- Mid-frequency (MF) controls: These impact the midrange frequencies, which include vocals and instruments like guitars and pianos.
- High-frequency (HF) controls: These shape the treble and high-frequency content in your audio.
Basically, the idea is to use the EQ controls to cut or boost specific frequency ranges. If a particular frequency range sounds muddy or overpowering, reduce its level by cutting it. Otherwise, if you want to emphasize a certain frequency range, boost it.
What you can do to enhance AI voiceovers using the EQ is to roll off some bass using the High-Pass filter; boost the high-end frequencies; cut down any frequencies we don’t need using the Low-Pass filter; and then notch in some of the weird frequencies in the voiceover.
Add Compression
Compression can make your AI voiceovers sound better by evening out the levels of the audio. This can make your narration sound more balanced and professional.
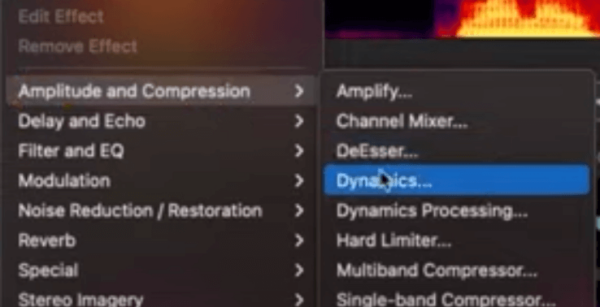
To add compression, go to Effects > Amplitude and Compression > Dynamics.

On the Dynamics window, choose the Default preset and then check Compressor.

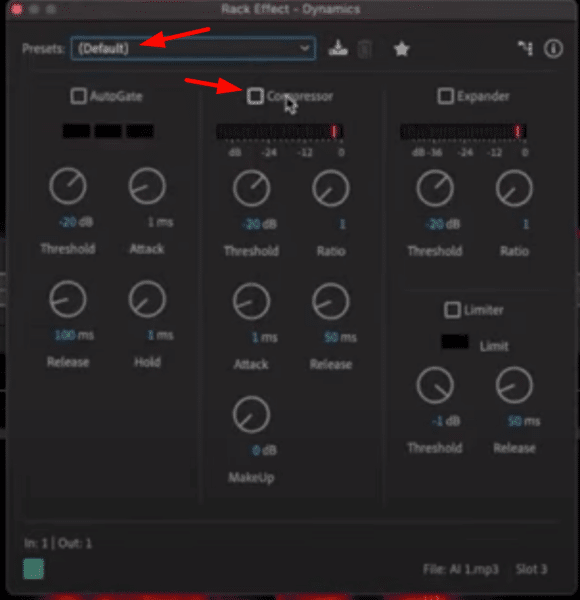
Here are the controls under compression that you can adjust. (source: Adobe)
- Threshold – the level at which compression begins. Once a threshold level is set, any audio below the threshold will be unaffected, but any audio above the threshold will be compressed by the ratio set.
- Ratio – the amount of attenuation or downward compression that will be applied once a signal reaches the threshold.
- Attack – how long it takes the audio signal to be fully compressed to the ratio set after it has crossed the threshold.
- Release – how long it takes the audio signal to revert from being affected to uncompressed.
- MakeUp Gain – used to turn the overall level of the signal back up.
Make adjustments to these settings to control peaks and make the voice sound more polished.
Mix AI Voiceovers Using Multi-track
If your project involves multiple AI generated voices or additional elements like music or sound effects, use the multi-track editor. You can create separate tracks for each element and adjust their volumes and positions. You can also apply separate effects such as Chorus that can add more character to your voiceovers.
Final Thoughts
Making your AI voiceovers sound better, more natural, and more polished is achievable with Adobe Audition. You can use Audition features like DeEsser to reduce sibilance, EQ to manipulate frequencies, and Compression to even out the levels of your voiceover. Finally, you can mix your AI voiceover with other audio elements and effects using the Multitrack Editor.
You can also watch a video version of this blog post below:
Podcast Perfection, Just a Click Away!
Ever wondered how to get that pristine sound without the heavy lifting? Say hello to our pro audio presets. They’re here to:
- Fast-track Edits: Breeze through editing with handy settings.
- Solidify Your Sound: Consistent sound = loyal listeners.
- Ace with Expertise: Crafted by audio wizards for top-tier results.
- Click and Go: No steep learning curve here.
- Think of the Savings: Ace quality without the hefty invoice.
Intrigued? Unearth our presets here!
Further Reading:
- Audio Industry News – May 2023 – Is AI Replacing Human Voice Actors?
- Get Rid of Sibilance with De-Esser in Pro Tools
- Remove ANY Background Noise from Your Audio File Using Adobe Audition
- 3 New Features For Adobe Audition in 2023
- How To Sound Crispy in Adobe Audition – Guide On How To Sound Better
