As a content creator, mastering Premiere Pro sync audio is crucial for delivering a polished and professional project. Usually, syncing audio can be time-consuming. Fortunately, Adobe Premiere Pro offers various ways to achieve seamless Premiere Pro sync audio-video synchronization. In this blog post, I’ll walk you through both auto and manual techniques for syncing audio easily in Premiere Pro.
Pro Tip: CLAP to Sync
Understanding how to use Premiere Pro sync audio effectively can elevate your editing skills and improve your workflow.
Utilizing Premiere Pro sync audio effectively will not only elevate your editing skills but also enhance your overall production quality.
The importance of Premiere Pro sync audio cannot be overstated; it ensures your projects sound as good as they look.
One of the tried-and-true methods for syncing audio and video is using a distinctive sound cue during video production. These sound cues serve as a clear audio and visual reference point that you can use to easily match the audio spike in the waveform to the visual frame where the clap occurs. This technique has been used for decades and remains effective to this day. I still use this technique during filming and works like magic.
To get the most out of Premiere Pro sync audio, you might want to experiment with various settings and features that Adobe offers.
Using Premiere Pro sync audio can streamline your workflow significantly, especially during the editing stages.
Automatic Way to Sync Audio
For those new to Premiere Pro sync audio, the interface may seem daunting, but with practice, it becomes intuitive.
The easiest and quickest method to sync audio in Premiere Pro is by using the Synchronize feature. This method will work when you are trying to sync a better audio with the original recording or the reference audio. This means that you need to have 2 audio tracks for this method to work.
Additionally, mastering Premiere Pro sync audio will allow you to tackle more complex projects with confidence.
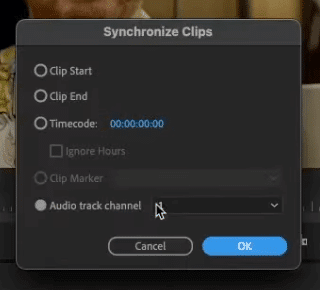
To automatically sync audio in Premiere Pro, select both tracks > right-click > click Synchronize.
When you learn how to use Premiere Pro sync audio, you’ll find that it opens up new creative possibilities for your projects.
By incorporating Premiere Pro sync audio into your toolkit, you can significantly enhance the auditory experience of your videos.
Many editors overlook the potential of Premiere Pro sync audio, but it can provide a professional finish to any project.

Then on the Synchronize Clips tab, select Audio. Make sure to choose the right reference audio track and then click OK.

After that, Adobe will automatically sync both tracks.
Manual Method to Sync Audio
In conclusion, Premiere Pro sync audio techniques are essential for anyone serious about video editing.
With the right approach, Premiere Pro sync audio can transform your editing process and improve the quality of your videos.
There are instances when you need to sync an audio without a reference audio track. This can be difficult to do but with the right knowledge and tools, it’s easy.
One of the tools we can use to manually sync a video to an audio is Audio Time Units. Compared to Time Ruler Numbers, Audio Time Units give us samples to work with instead of video frames. This enables us to be more accurate in our audio and video synchronization.
To enable this feature, right-click the time bar on your timeline and then select Show Audio Time Units.

After that, it’s time to do the synchronization process manually.
If you have a reference audio track, you can manually align both tracks based on the similarity in audio spikes. If you don’t, you can use sound cues to align the sound when the visual frame occurs.
However, if you don’t have both sound cues and reference audio track, use other visual cues such as the movement of your lips while speaking. You can gradually sync the lips of the speaker to the words spoken. This can be daunting but with Audio Time Units enabled and meticulous zooming, it will do the job.
Overall, the manual method requires more effort but gives you greater control over fine adjustments.
Final Thoughts
Syncing audio in Premiere Pro can be done automatically or manually. Either method works in different cases but if you want the best result, you can use both at the same time. Furthermore, audio synchronization can be a lot easier when you have a reference audio track and add sound cues during filming.
Premiere Pro Presets
Take your video editing to the next level with our premium Premiere Pro presets! Designed for everyone, these presets will instantly enhance your workflow. Whether you’re creating YouTube videos, commercials, or short films, our high-quality presets save you time while delivering stunning results. Browse our collection now and start editing like a pro!
Further Reading:
- Premiere Pro Plugins For Epic Audio Editing
- How To Fade Audio Inside Adobe Premiere Pro
- Audio Levels inside Premiere Pro – Beginner Tutorial
- Vintage Voice in Premiere Pro – 1930s Vocals In a Simple Steps
- How to Record and Insert a Voice Over in Premiere Pro


