Audio Mastering is a crucial process in any post-production workflow. This is the process of putting the final touches to your project. The main goal is to make your audio sound its best across various devices and streaming channels like YouTube and Spotify.
With Adobe Premiere Pro’s wide range of powerful tools and features, mastering audio can be simple and easy. In this blog post, learn how to master audio in Adobe Premiere Pro. I’ll discuss everything from basic volume matching to advanced EQ and dynamic range control. If you’re a content creator or editor, these tips will help you.
Tip #1: Match Audio Levels
Consistency is key in audio mastering. If your audio levels fluctuate between clips, it can be distracting to the listeners. Fortunately, Adobe Premiere Pro has a simple tool that can match the audio levels of your project.
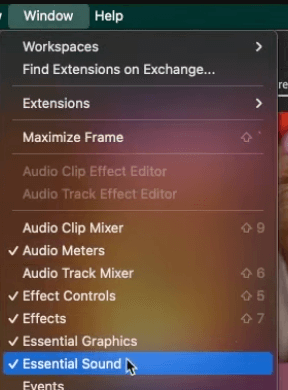
This tool is called Loudness under the Essential Sound Panel. The Essential Sound window can be found in the upper right corner of your workspace. If you can’t find it, make sure to turn on Essential Sound. You can do this by going to Window > Essential Sound.
Now, highlight all your audio tracks and then go to Essential Sound > Loudness > enable Auto-Match.
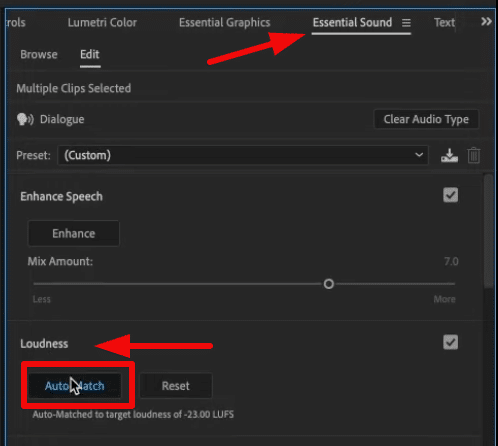
Premiere Pro will then automatically analyze your audio and ensure your entire project maintains consistent volume.
This is such an easy and important process in audio mastering that eliminates manual level adjustments.
Tip #2: Enhance Clarity
Another audio mastering tip is to enhance clarity. Clear audio helps communicate your message effectively and is important in retaining audience attention. If you sound muddy or noisy, the audience will leave even if your topic or content is great.
Adobe Premiere Pro offers another simple yet powerful tool to clean up your dialogue and reduce distractions. It’s called Clarity and can be found under the Essential Sound tab.
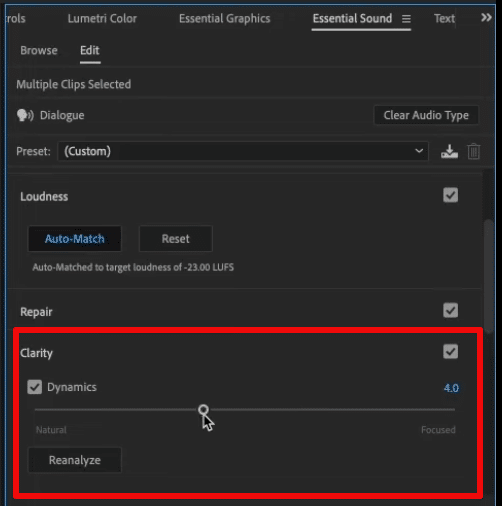
To use this feature, enable Dynamics and then slightly move the slider. You’ll notice that as you increase the number, your audio will sound clearer. With that, you can go as high as 10, but make sure to listen to your audio to avoid clipping. If you’re not familiar, clipping is an audio distortion that happens when an audio signal exceeds the maximum level.
Other Tools in the Essential Sound Panel
There are other tools in the Essential Sound tab that you can use to master audio. One is the Repair tool. You can use it to reduce noise, rumbles, and unwanted hums. It has different sliders that allow you to reduce each type of noise separately.
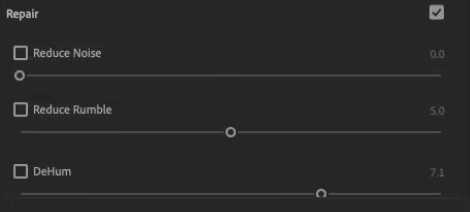
Another tool in the Essential Sound window is the Clip Volume. This can be used to quickly fix clipping on your audio.

When you use either tool, make sure to listen carefully as you adjust the parameters to avoid over-processing the audio.
Overall, the Essential Sound Panel offers a range of audio effects that can be easily applied and adjusted. These are perfect for beginners. However, Premiere Pro doesn’t stop there. The software has more features to offer, which can be used for more advanced editing.
Tip #3: Advanced EQ Techniques
Moving on, another powerful tool in Adobe Premiere Pro to master audio is EQ. EQ can be accessed under the Essential Sound Panel, but I don’t recommend using it. The reason is that the available presets are limited. Moreover, you won’t have access to the more advanced EQ features that allow fine-tune editing.
So, the best way to use EQ is to use its advanced version. To do this, change your workspace to Audio by clicking the Panel icon in the top left corner, then choose Audio.
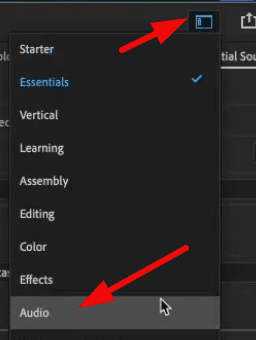
This workspace will provide you with the Mixing Desk, where you can add any audio effect.
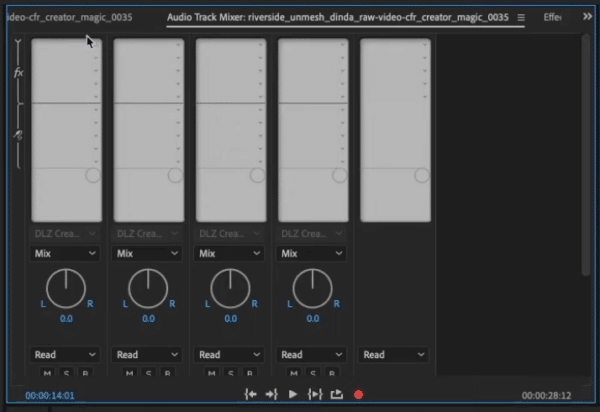
Now, to add EQ to your audio track, click the arrow-down icon > Filter and EQ > Parametric Equalizer.
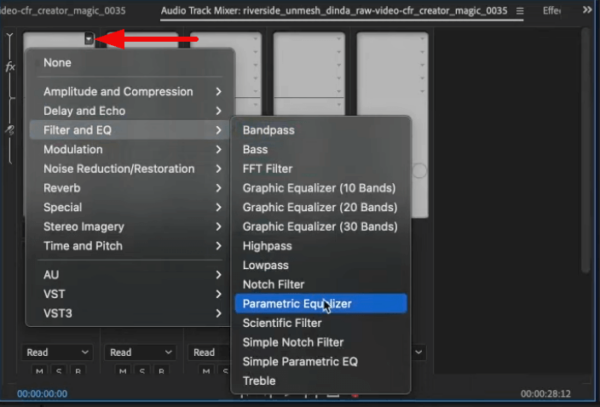
Once the Parametric Equalizer is added to the mixing desk, double-click it to access its advanced features.
Then, on the Track Fx Editor tab, change the preset from Default to Vocal Enhancer. This preset makes your voice stand out and sound better by doing a few things. It boosts the high-end frequencies, adds a high-pass filter, and dips around the muddy 300Hz area.
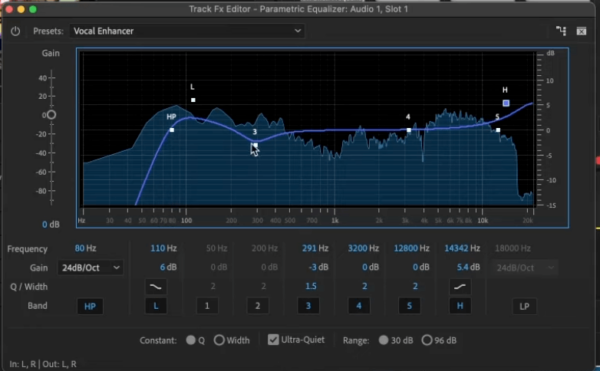
Most of the time, you can just choose a preset and call it a day. However, if it needs more edits, feel free to modify the preset by making changes to the different parameters. Again, the purpose is to enhance the audio without overdoing it. So, make sure to listen after applying EQ and make necessary adjustments.
Overall, EQ helps reduce muddiness, ensures balance between dialogue and music, and can enhance the overall listening experience. In audio mastering, even small EQ adjustments can make a huge difference.
Tip #4: Use the Mix Track
The final audio mastering tip on this list is to use the Mix Track. The mix track is the final set of effects you add to all tracks on your timeline. This allows you to apply uniform processing to all audio tracks at once.
There are a few audio effects I recommend adding to the mix track to complete your audio mastering process. These are the Hard Limiter and Loudness Meter.
Hard Limiter
A Hard Limiter is an audio effect that prevents your audio from exceeding a specified maximum amplitude level, which can avoid audio clipping and distortion.
To add a hard limiter to your project, click the arrow-down icon on the mix track > Amplitude and Compression > Hard Limiter.
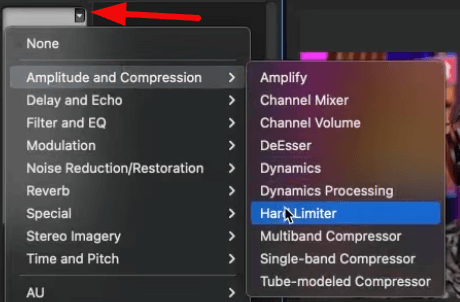
Then double-click to access the Hard Limiter settings tab. And finally, set the Maximum Amplitude to -1 dB.
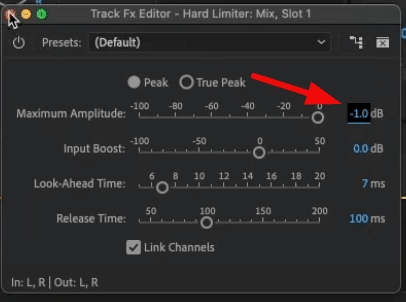
Doing this will ensure that your audio level won’t go beyond -1 dB.
Loudness Meter
The Loudness Meter in Adobe Premiere Pro can help you ensure your project is at the correct loudness level for the platform you’re publishing on. This is important because different platforms have different loudness standards.
To access the Loudness Meter, click the arrow-down icon on the mix track > Special > Loudness Meter.
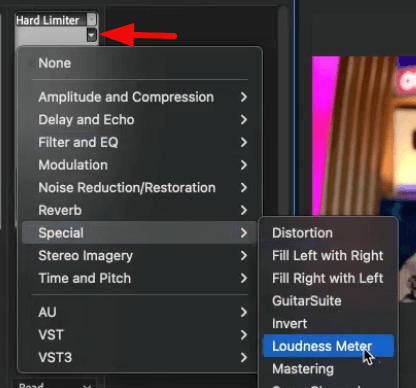
Then, on the Loudness Meter tab, choose the right preset depending on what platform you will publish your content on. So, for example, if you are editing a YouTube video, choose YouTube.

After that, click Settings to check the required standards. For YouTube, the Target Loudness is -14 LUFS and a Maximum True Peak of -1 dBTP.
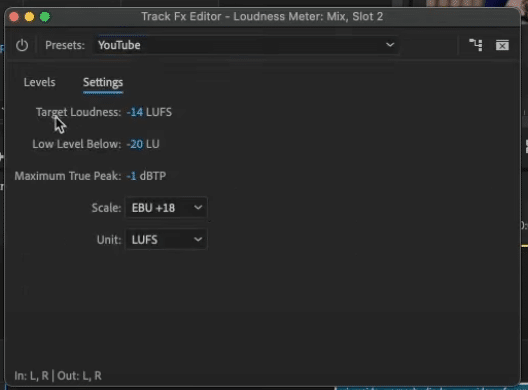
Now, to check if your project meets these requirements, go back to the Levels tab and then play your audio. Adobe Premiere Pro will analyze your audio in real time.
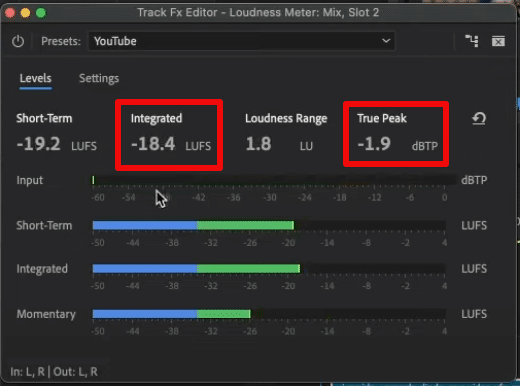
If the numbers do not meet the required standards, you will need to make some more changes to the audio.
Here is an example of how I used the Loudness Meter to meet YouTube’s loudness requirements.
Final Thoughts
Audio Mastering doesn’t have to be complicated and daunting. You can use Premiere Pro’s Essential Sound Panel for easy-to-use audio effects. Also, other advanced features, such as Parametric Equalizer, are available for more in-depth audio editing.
Premiere Pro Presets – Elevate Your Audio with Ease
Mastering audio in your video edits just got simpler. Our Premiere Pro audio presets are crafted to help filmmakers, content creators, and editors achieve clear, balanced, and impactful sound without spending hours tweaking settings.
Upgrade your audio game instantly. Download the Presets Now!

