Did you know that Audacity has powerful noise reduction tools? In this blog post, learn how to remove clicks, fix distortion, and reduce background noise using Audacity’s free built-in features, including effective audacity noise reduction techniques. I’ll walk you through each process of cleaning up your audio like a pro using audacity noise reduction methods. Whether working with voice recordings, music, or outdoor audio, these audacity noise reduction will help you achieve a clearer and more professional sound.
Tool 1: Repairing Clicks
Clicks can be common issues in audio recordings, especially when dealing with vinyl rips, speech recordings, or low-quality microphones. Fortunately, Audacity provides two tools that help eliminate these unwanted sounds. Incorporating audacity noise reduction into your workflow can significantly enhance the quality of your recordings.
First is the Repair tool. This tool removes a very short region of damaged or destroyed audio and then replaces it with an estimated portion of audio based on what is happening on either side of the segment.
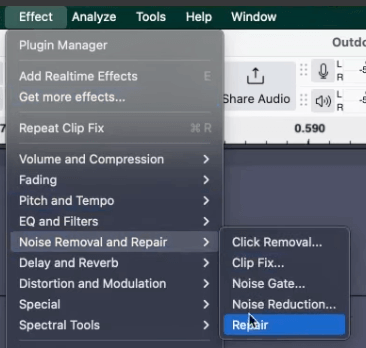
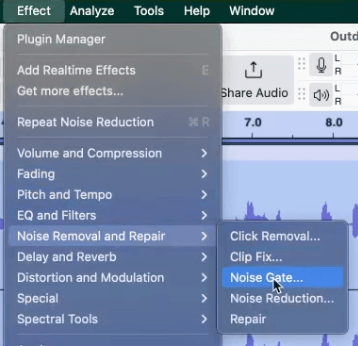
To use this tool, locate and highlight the small section with the click noise. Then go to Effect > Noise Removal and Repair > Repair to smooth out the spike.
By using audacity noise reduction, you’ll notice a remarkable difference in the clarity of your audio projects.
Tool 2: Click Removal
The second tool is called Click Removal. This noise reduction tool in Audacity is especially suited to de-clicking recordings made from vinyl records. And similar to the first tool, it’s very easy to use.
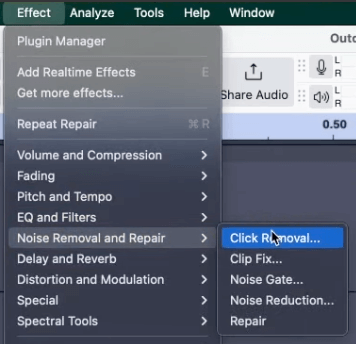
To use this tool, select the segment of the audio with noticeable clicks. Then go to Effect > Noise Removal and Repair > Click Removal.
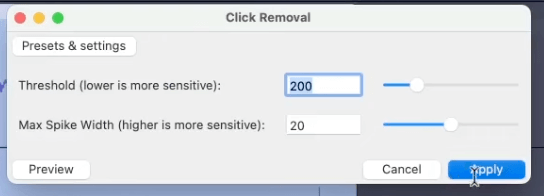
You can adjust the Threshold and Max Spike Width settings but usually, the default settings work pretty well. Finally, click Apply to make the changes.
Tool 3: Fixing Distortion
Distortion occurs when audio levels are too high which causes clipping and an unpleasant, fuzzy sound. While it’s best to prevent distortion during recording, Audacity offers tools that reduce the harshness of distorted audio.
Audacity’s Clip Fix feature is an amazing tool that fixes distorted recordings. It reconstructs clipped audio segments by interpolating the lost signal. The only downside is that it’s only likely to be effective for repairing lightly clipped audio.
To use the Clip Fix tool, highlight the distorted audio and go to Effect > Noise Removal and Repair > Clip Fix.
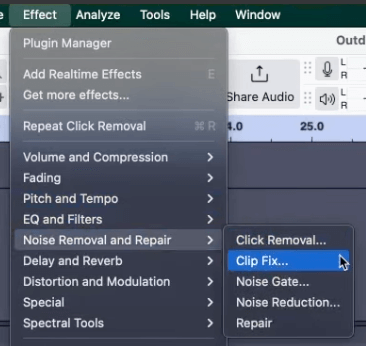
Again, the default settings work fine with most audio but feel free to dial them in. Finally, click Apply to process the audio.

Tool 4: Removing Background Noise
Unwanted sounds such as hums, wind noise, and static noise are common problems when working with audio. Moreover, these can be difficult to fix without proper tools and knowledge. Fortunatelyaudacity noise reduction tools are specifically made for this matter.
Noise Reduction in Audacity is an amazing tool that can reduce constant background sounds effectively. Utilizing audacity noise reduction techniques is essential for achieving high-quality audio work. Although it is not suitable for individual clicks and pops and irregular background noise, it works well with most background noise such as hums, hisses, and buzzes.
To use this tool, select a short section of your recording that contains only the background noise. Then go to Effect > Noise Removal and Repair > Noise Reduction and click Get Noise Profile.
Exploring various audacity noise reduction techniques can help you master audio editing.
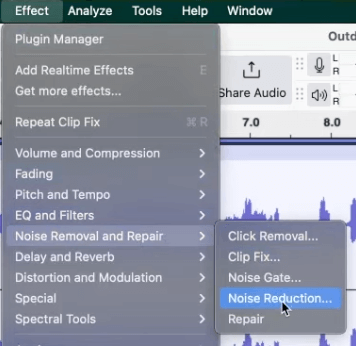
After you’ve applied audacity noise reduction, you can enhance your audio further with additional editing tools.
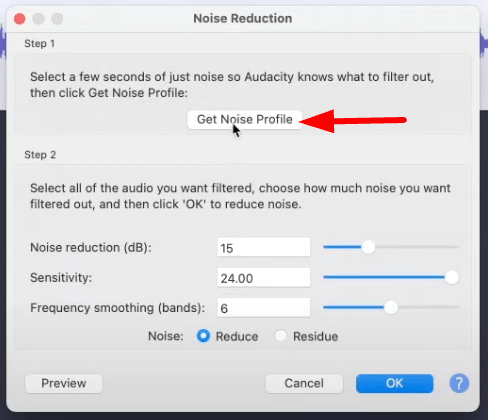
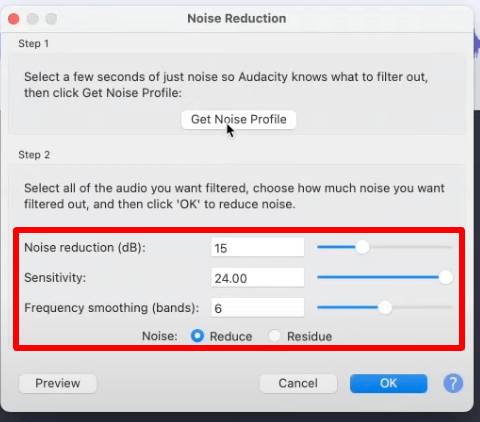
After that, select the entire audio track and go back to Effect > Noise Removal and Repair > Noise Reduction. Feel free to adjust the Noise Reduction, Sensitivity, and Frequency Smoothing settings. You can also start with defaults and tweak them as needed. Finally, click OK to apply the noise reduction.
Tool 5: Using Noise Gate
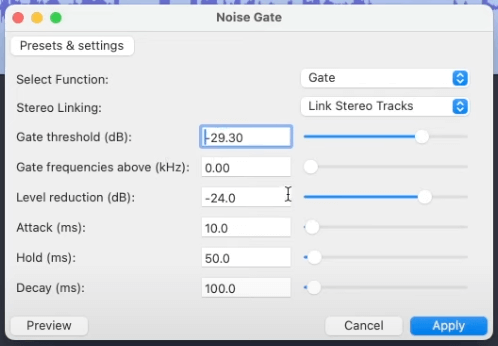
The Noise Gate tool in Audacity is another feature that can reduce audio noise. It’s used to reduce the level of sound below a specified threshold level. It can also be used after the Noise Reduction effect to further reduce the noise level during periods that should be silent.
To use this tool, highlight the entire audio track and go to Effect > Noise Removal and Repair > Noise Gate.
Remember, noise gate is one of a few ways to tackle Audacity noise reduction in your projects. So, enhance your audio experience with effective audacity noise reduction practices. Each audacity noise reduction adjustment you make contributes to a better final product.
Feel free to adjust the different settings to make your audio sound better. Again, the default settings work well with most audio cases. However, if you want to change any of the parameters, check this guide by Audacity.
Final Thoughts
Cleaning up audio in Audacity can be easy with the right tools. Click Removal and Repair helps eliminate clicks and pops. Clip Fix reduces distortion caused by clipping. Noise Reduction removes constant background noise. And finally, Noise Gate silences low-level noise effectively.
These 5 Audacity noise reduction features can help you achieve professional-quality audio, making your recordings sound clearer and more polished. Try to experiment with these and find what works best for your specific audio needs!
Audacity Presets
Struggling with background noise, uneven levels, or poor clarity? Our expertly designed Audacity presets take the guesswork out of audio editing. Whether you’re a podcaster, musician, voice-over artist, or content creator, these presets will help you achieve cleaner, more professional sound in seconds!
Further Reading
- Clarity VX for Real-Time Noise Reduction in Live Streaming
- How To Master Noise Reduction Inside DaVinci Resolve For Free
- Remove ANY Background Noise from Your Audio File Using Adobe Audition
- Sound Better in Audacity: 5 Steps To Great Audio
- Remove Vocals from a Song Using Audacity

